
I love shooting pictures. I also travel a lot, and don’t love that. So whenever possible, I try to take advantage of that travel to squeeze in some shoot time. Last weekend I had a quick trip to Washington, DC to teach Nikon School, and because of a change of plans, had Friday afternoon free. Which meant I wanted to get out and shoot.
On a previous trip to DC a friend told me about Great Falls Park. It’s near the airport I flew into (Dulles), so decided to head there and check out fall foliage. It did not disappoint.
Fall colors make for good pictures, but they can be difficult to do well. What I mean is that a bunch of trees with colorful leaves is pretty to look at, but as a picture can be boring because there’s no center of attention. To solve that you have a couple of options. You can look close, for one leaf, or a small group of leaves, that stand out from the rest. You can also look for patterns in the trunks and branches, letting those hard, dark shapes pull the colors together.
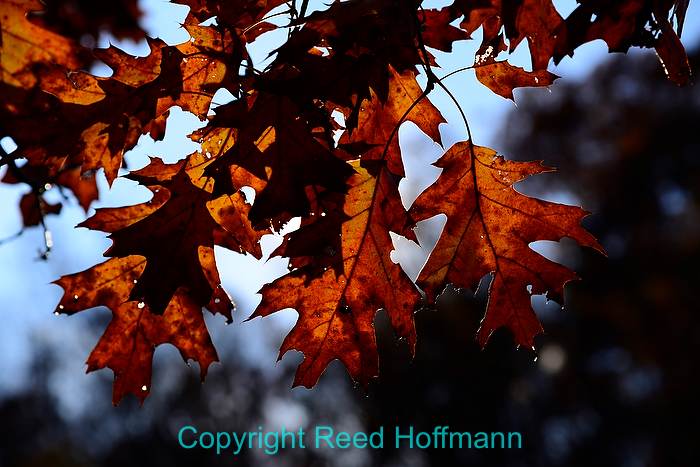
Putting the sun behind these leaves brings out their color and texture, and the small grouping makes it easier to focus on the details. Nikon D610, Aperture Priority, ISO 200, 1/1000 at f/6.3, EV -1.0, Nikon 24-120mm f/4 lens at 120mm. Photo copyright Reed Hoffmann.
Another option is to work against the light. That means finding scenes where the light’s coming in from the side, or even straight into your face. Sidelight creates shadows, making the lit areas, and colors, stand out better. And backlight can make leaves glow. It can also let the sun shine straight into the lens. That’s something we work hard to avoid most of the time, but as with everything in photography, there are times when doing the wrong thing makes the picture work.
A few tips about shooting into the sun. First, ‘don’t look straight at the sun, with or without the camera. It can damage your eyes. And for photography, the sun, unblocked, is simply too bright and will be overexposed in the picture (meaning a white hole in the image). If you underexposure to see the shape and color of the sun, the rest of the scene will be so dark that it’s nearly black. So the trick when shooting the sun, or in this case shooting into the sun, is to have it partially blocked. If you manage to do that, and also shoot at a small aperture (F/16, f/22, etc.), then there’s a good chance you can get a starburst effect. What works best for me is to put the sun just behind the edge of something in my frame, then while shooting, slightly shift my position so the sun comes into view. If I do that a number of times, I’m almost guaranteed to get at least one frame with that starburst.
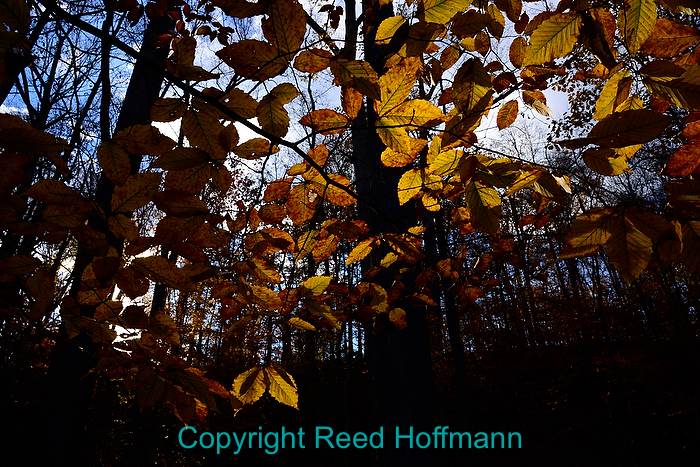
Walking into the woods, I found this patch of leaves at just the right angle to catch the light of the low sun. That made them stand out against the starkness of the surrounding area. Nikon D610, Manual exposure mode, ISO 400, 1/125 at f/16, Nikon 24-120mm f/4 lens at 24mm. Photo copyright Reed Hoffmann.
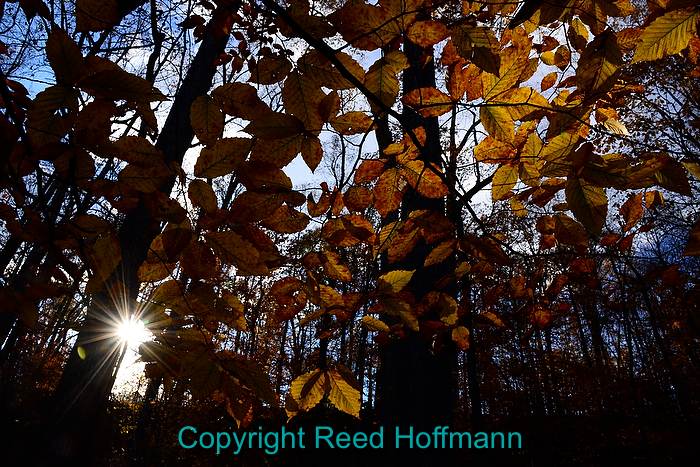
By shifting my framing just a bit, I was able to let the sun start to show at the edge of a tree trunk. That paired with a small aperture created the starburst effect. Nikon D610, Manual exposure mode, ISO 400, 1/125 at f/16, Nikon 24-120mm f/4 lens at 24mm. Photo copyright Reed Hoffmann.
The other suggestion I’ll make when doing this is to shoot in Manual exposure mode. Most of the time I prefer to shoot in Aperture Priority. In this case, though, because of the intensity of the sun, set your exposure manually for how you want the rest of the scene to look. Then that won’t change as you shift back and forth, trying to get that starburst. It takes some practice, but fairly easy to accomplish.
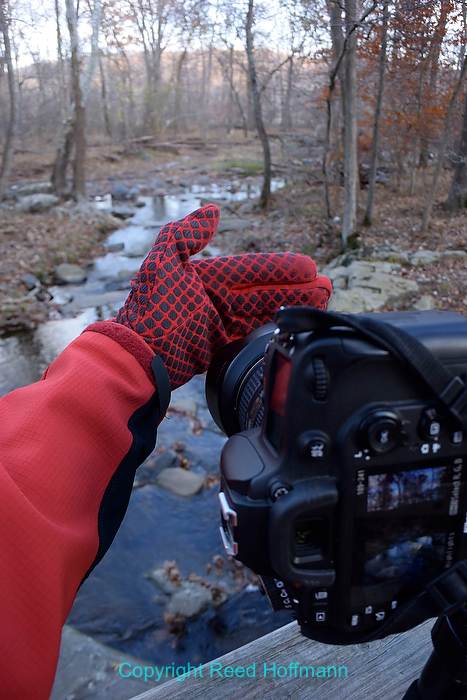
With the camera on a tripod, I decided to try putting my hand in front of the lens during part of the exposure to reduce the amount of light coming in the upper half. Nikon V3, Program mode, ISO 160, 1/60 at f/3.5, Nikon 10-30mm f/3.5-5.6 lens at 10mm. Photo copyright Reed Hoffmann.
Another challenge you might have is the reduced light you’ll encounter when shooting in woods. If you include sky in your photo, and also want to see detail in the foreground, it’s likely you’ll have another exposure problem. That’s because the sky, if it’s a sunny or bright day, will be much brighter. Expose for it and the foreground goes too dark. Expose for the darker foreground and the sky overexposes (will be too bright). The normal solution to this is to use a graduated neutral density filter. It’s a glass or plastic filter that’s neutral – gray, no color – that “gradually” gets darker from one edge to the other. Placed in front of the lens with the darker edge at the top, it will reduce the brightness of the sky without adding much, if any, darkness to the foreground, balancing out the exposure. But what if you don’t have one with you? The other way around this would be to create an HDR image (here’s a link to a webinar I just did on HDR). But I had another idea, one that came from how we used to shoot fireworks.
Photographing fireworks involves a similar problem. Those aerial explosions create very bright bursts of light. Exposing properly will mean any darker foreground areas will be underexposed (too dark). Our solution for that back then was to bring along a black piece of cardboard and put it in front of the lens, blocking just the upper half where the fireworks were exploding. In a 20-second exposure, we’d remove it from the top briefly a few times, letting in a little light from the explosions while allowing all the light in for the foreground. Remember, this was thirty years ago, long before digital. It was truly hit and miss.
So here I am last weekend, in the woods at Great Falls, with a tripod and camera but no graduated neutral density filter. And there’s a pretty little stream I want to photograph, but the sky will be too bright. Instead of HDR, I chose to use my hand to simulate that black piece of cardboard. Using a one-second exposure, I turned on the camera’s self-timer and set it for two seconds. I’d press the shutter button, wait for the shutter to open, and then wave my hand around in front of the lens, obscuring the upper part of the frame. And shot a lot of photos. Most of them didn’t work out, letting either too much or too little light in. And I had red gloves, which would sometimes added red to the scene (note to self – always wear black gloves). But there were a couple that worked pretty well.
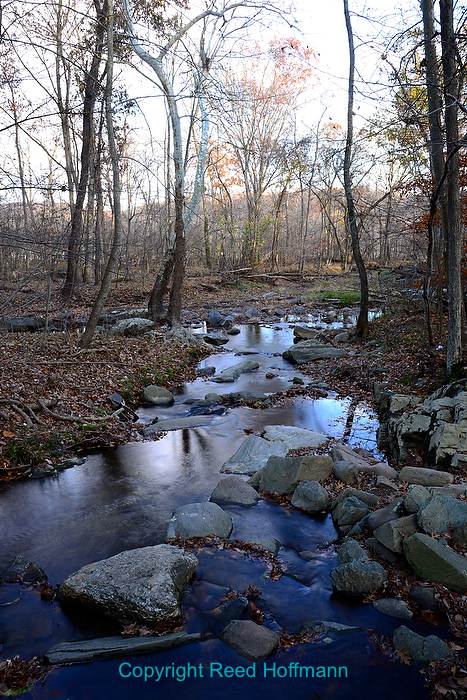
Standing on a small bridge crossing this creek, I liked the reflection in the water, but the sky was too bright and overexposed. Nikon D610, Manual exposure mode, ISO 50, one-second at f/22, Nikon 24-120mm f/4 lens at 24mm. Photo copyright Reed Hoffmann.
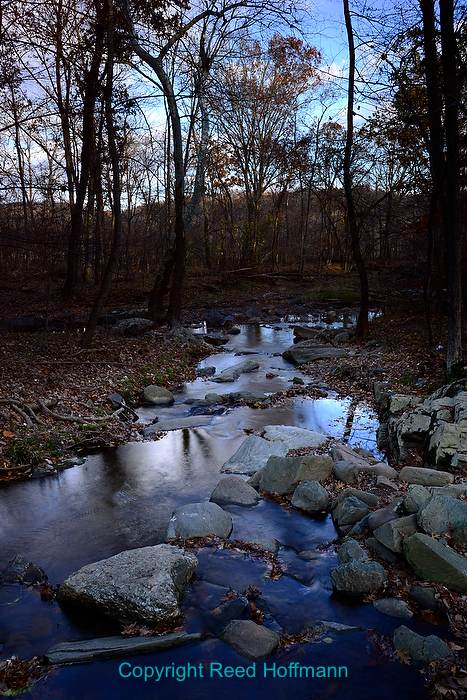
Waving my hand in front of the upper part of the lens blocked enough light from the sky to balance out its exposure with that of the creek below. Nikon D610, Manual exposure mode, ISO 50, one-second at f/22, Nikon 24-120mm f/4 lens at 24mm. Photo copyright Reed Hoffmann.
As with most photography, light and location are two of the primary keys to good pictures. I was lucky to arrive there mid-afternoon, when the light was right. The leaves were past peak but still with plenty of color, and there was a pond and creek in addition to the river. It’s a beautiful park, and I had a fun one-hour shoot there. Then it was time to head to the hotel and make sure the room was properly set for the next day’s class. But that wasn’t the end of my shooting. It I get to DC, and it’s possible, I want to go to the National Mall for some night photography. But that’s another story…