Personally, I’m a fan of shallow depth of field because it helps keep the viewer’s attention where I want it. There are times, though, where I’d like as much sharpness throughout the entire image as possible. And that’s more challenging because greater depth of field can actually decrease sharpness.
Depth of field (DoF) determines how much in front and behind your subject also appears in focus, and involves focal length, distance to subject and aperture. The wider your lens, the easier it is to have more depth of field. The further you are from your subject, the easier it is to have more depth of field. And the smaller the aperture (higher f/stop numbers) the easier it is to have more depth of field. But smaller apertures also mean more diffraction, which actually means a LOSS of sharpness.
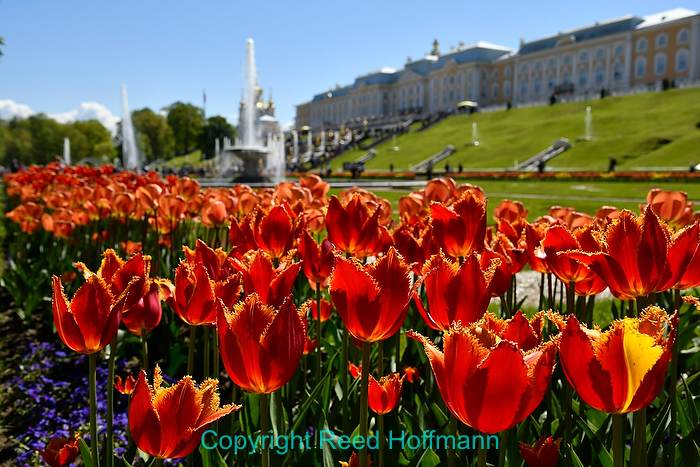
In this photo of the gardens at Peterhof outside Saint Petersburg, I chose a wide aperture to keep the viewer’s attention on the tulips. Nikon D7500, ISO 100, 1/800 at f/5.6, -0.7 EV, Nikkor 16-80mm f/2.8-4 lens at 33mm. Photo copyright Reed Hoffmann.
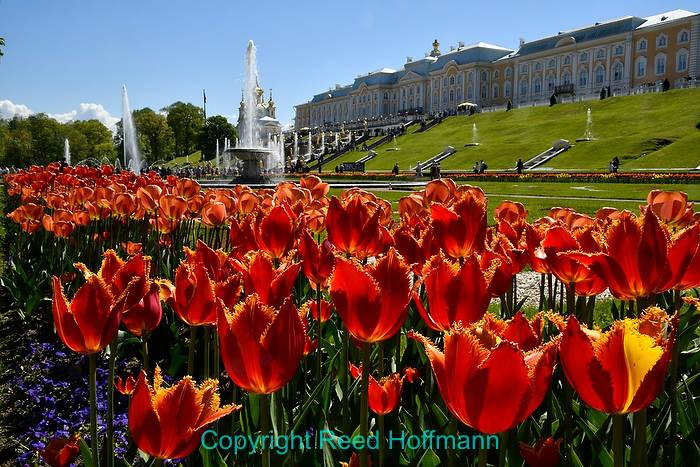
On this one, though, by using a small aperture I gained greater depth of field, which brought more detail into the fountains and buildings in the background. However, thanks to diffraction, the tulips here (where I’m focused) are actually not as sharp as the image captured at f/5.6. The camera was mounted on a tripod for both to make sure camera shake wouldn’t introduce softness. Nikon D7500, ISO 100, 1/50 at f/22, -0.7 EV, Nikkor 16-80mm f/2.8-4 lens at 33mm.
Simply put, diffraction results from the severe angle light has to bend when passing through a very small aperture. That bending makes it harder to maintain sharp focus. Using the smallest aperture your lens offers (such as f/16 or f/22) actually will result in a slightly LESS sharp picture, although with greater depth of field. While your photo will have more apparent sharpness from near to far, that sharpness will actually be less than what you’d have in a smaller area with a wider aperture. Technically, most of your lenses will be at their sharpest about two-to-three stops down from maximum. For an f/4 lens, that means somewhere between f/8 and f/11. But pixel size (and number of pixels) also has an effect on diffraction, so technically, more is involved than just aperture.
But what if you want both great depth of field AND maximum sharpness? That’s possible, but not by taking just one picture. It requires recording multiple images of the same scene, at the same exposure, shifting focus on each frame from the closest area you care about to the furthest as you take those photos. You then assemble that group of photos afterwards in software into one single, composite image. That’s what “focus stacking” is.
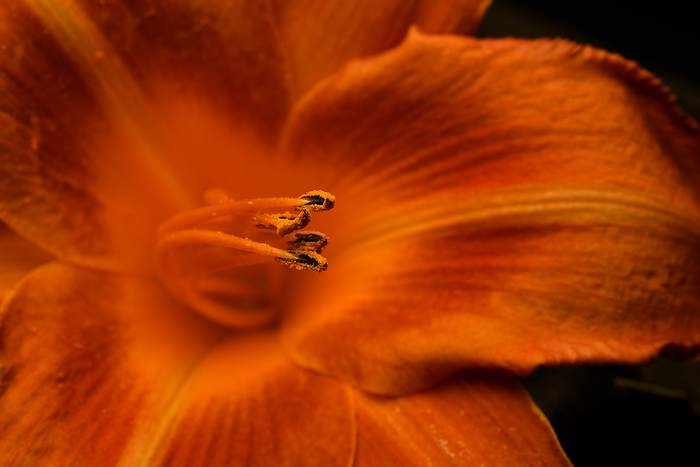
The closer to your subject, the shallower the possible depth of field. In this case, using a macro lens, even at f/22 I can’t hold sharpness in the background. Nikon D850, Manual exposure, ISO 100, 1/200 at f/22, Nikkor VR 105mm f/2.8G IF-ED lens at 105mm.
Focus stacking only became possible once photographers had software that could bring those photos together in a realistic way. That couldn’t be done in a traditional film darkroom. The first uses of focus stacking were for close-up pictures. Remember, the smaller the subject, the smaller (shallower) the depth of field. That made it impossible to get any real depth of field in macro (close-up) photography. Even with a lens that offered incredibly small apertures (f/32, f/45…), making a tight shot of an insect left you with an image where part of the eye might be the only sharp area in the scene. Focus stacking changed that.
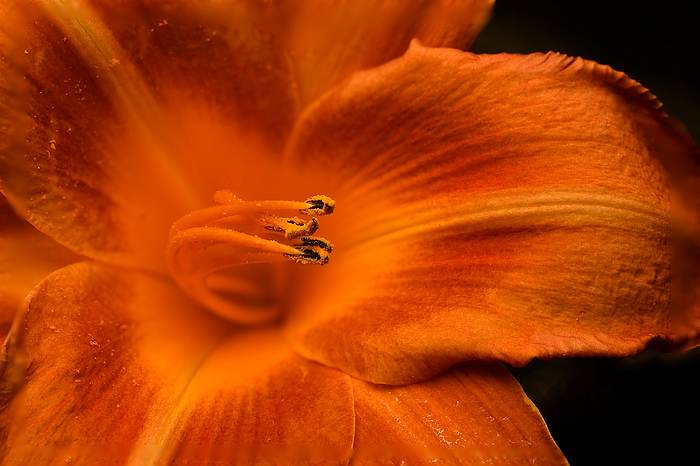
By taking advantage of focus stacking, however, I can combine 29 frames of this flower into one final image, maintaining sharpness throughout as much of the frame as I wanted. Note that I stopped at the edge of the blossom, upper right. Nikon D850, Manual exposure, ISO 100, 1/200 at f/22, Nikkor VR 105mm f/2.8G IF-ED lens at 105mm.
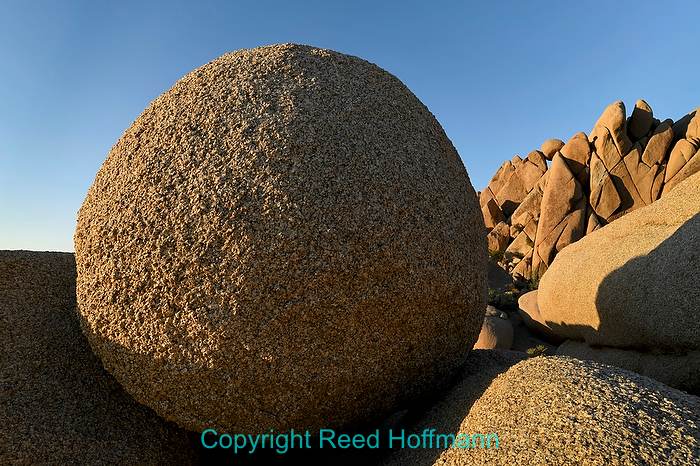
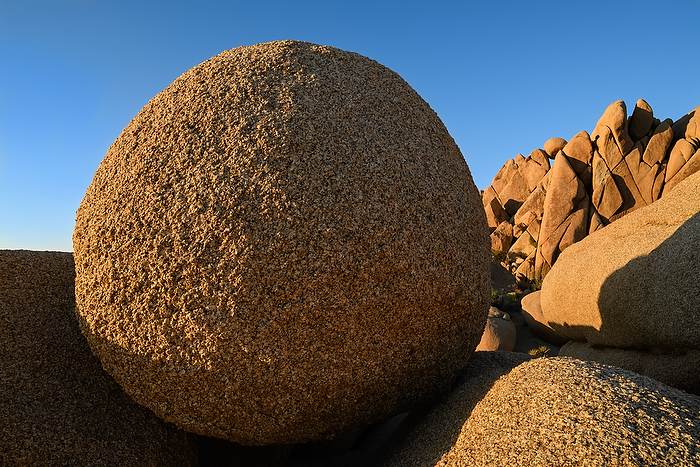
For this photo from Jumbo Rocks campground in Joshua Tree National Park, I wanted good sharpness from the foreground (lower right) all the way to the rocks at the upper right. The next two photos will show the difference focus stacking makes.
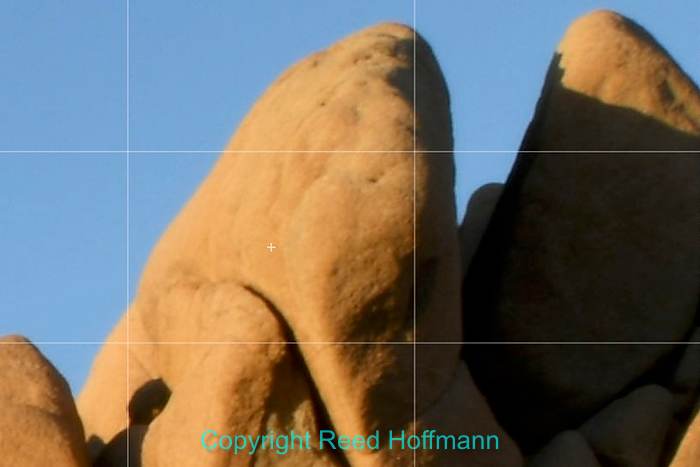
I started by shooting the scene at f/25, using hyperfocal distance to maximize sharpness throughout the image. In this 100% zoom of the rocks at upper right, you can see I don’t have the sharpness I was hoping for. That’s diffraction doing its thing.
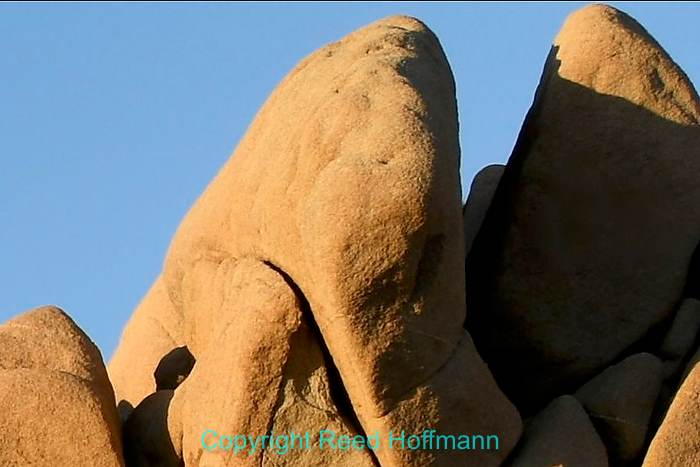
Shooting nine frames using focus shift, at f/8, I then stacked them in software afterwards and the result was a much sharper image. I’m still amazed at the amount of detail those 45-megapixels on the D850 capture!
Today, a number of photographers (including myself) are using focus stacking to get greater sharpness out of not just their close-ups, but their landscape pictures as well. If you understand diffraction, you’ll know that using the smallest apertures actually reduces sharpness. But shooting at two-to-three stops down from maximum aperture will limit your depth of field. However, if you shoot at that medium aperture and use focus stacking, you can have the best of both worlds. You can create a landscape picture that has BOTH great depth of field and great sharpness.
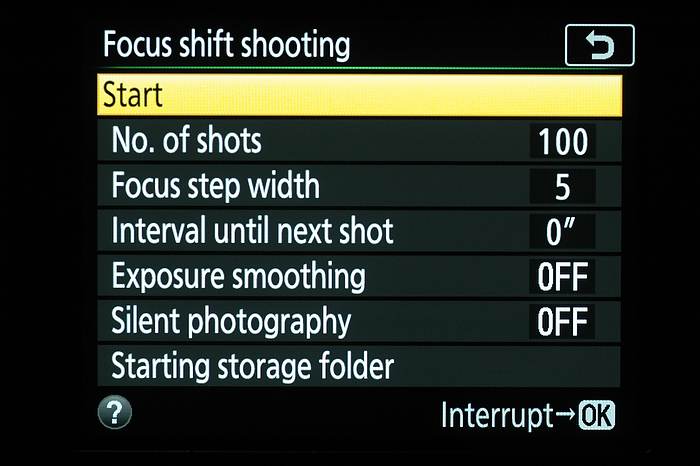
“Focus shift” is Nikon’s term for this feature, built into the D850. This menu is where you set the parameters for how it works.
Today, some cameras offer the ability to help automate focus stacking. Depending on the manufacturer, it could be called “Focus Stacking, “Focus Bracketing” or “Focus Shift.” Some cameras might even take this a step further and actually blend the photos together in-camera to create the final image (although there are usually limitations to doing this). Nikon introduced a “Focus Shift” feature with the D850 (which requires blending the photos together in software afterwards). The new Nikon Z7 and Z6 cameras both offer it as well. Here are some of the things I’ve learned from using it:
– Turn off VR (Vibration Reduction, or any image stabilization). If not, the image could shift during shooting, which will ruin the composite.
– Use a tripod, perhaps with a cable release or smartphone app to fire the camera (although sometimes the built-in features, like Focus Shift, will take care of firing the shutter for you for you)
– While your camera needs to have autofocus turned on to do this, make sure your first frame is focused on the closest area you want in focus (the camera will then shift focus on the following frames, going from near to far).
– Shoot in Aperture Priority or Manual, since having the aperture change will ruin the composite.
– Turn on “Exposure smoothing” only if using automatic exposure (when in Aperture Priority). I prefer the simplicity of using Manual exposure, which then doesn’t require Exposure smoothing.
– If you’re not using flash, take advantage of the Electronic Shutter option. That not only speeds up the process, but saves on shutter wear and tear and any possible vibration caused by the shutter going up and down.
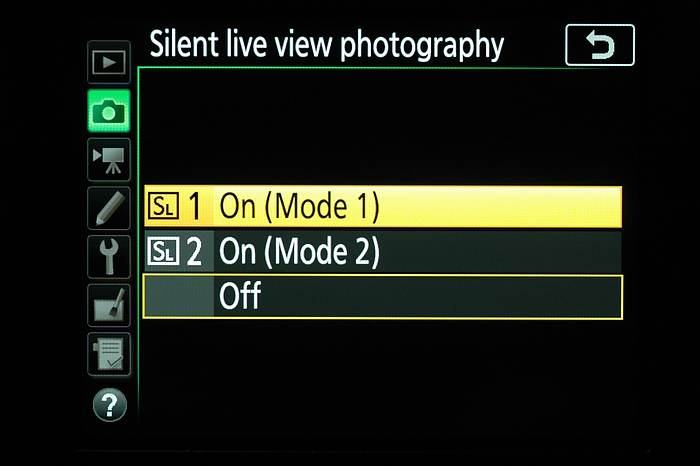
If you use the “Silent photography” option in the D850’s Focus shift feature, make sure you set the “Silent live view photography” menu to ‘SL 1.” That means the photos will be recorded at the full 45-megapixels the camera can capture.
– You’ll often need to set a “Focus step width,” which determines how much the focus will change between each photo. On the Nikon, that’s from 1 to 10. There are no set rules for where to place that, just guidelines. The closer you are to a subject, the smaller the number you should use. The further away, the larger. So for an extreme close-up, you’d probably use something between 1 and 3. For a landscape photo, perhaps 5-10.
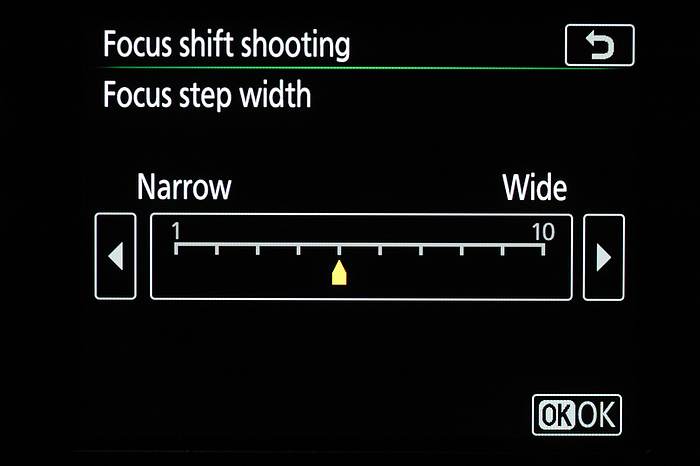
The “Focus step width” menu in the Nikon D850. I generally use between 2 and 6, depending on how close I am to the subject.
– You also tell the camera how many photos you want it to take, although it often won’t actually shoot that many. For instance, if doing a landscape photo and nothing is very close to you, it may only need to shoot a few. I usually set my landscapes for 50 frames, and the camera will stop when focus reaches infinity, which may be just a half-dozen or so.
– Consider shooting JPEG, or convert your RAW captures to JPEG before stacking. Otherwise the already long process with the computer will be even longer (this is particularly true with Photoshop).
– Frame a bit loose, as you’ll lose some of the outside edge of the frame in the compositing process.
– And finally, you’ll need software that can assemble the photos. Some of those include Adobe Photoshop, Helicon Focus and Zerene Stacker. If you already have Photoshop, then you might as well start with it. Like HDR imaging, if you end up doing a lot of focus stacking, you’ll probably invest in specialized software for its added features (I now use Helicon Focus). For instance, Helicon Focus will automatically take RAW files, convert them to DNG for the composite process and then save out the final image as a DNG.
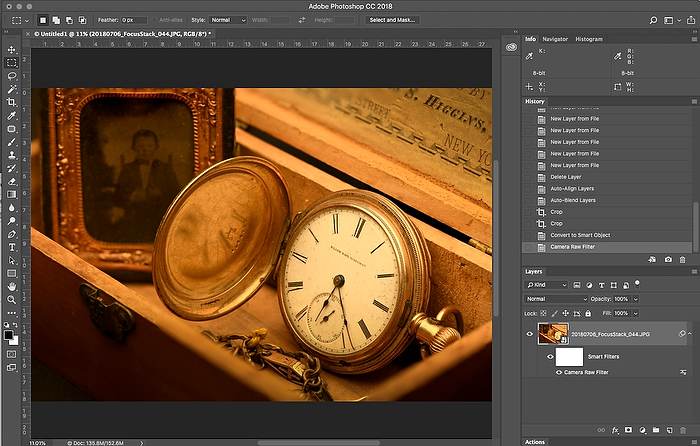
A finished image using Photoshop. As you can see from the History palette at right, there are many, many steps.
If you’re stating with Photoshop, like I did, these are the steps With Photoshop CC 2018:
1 – Go to Files – Scripts – Load files into Stack… then select your images. Make sure all options in this dialog are un-checked.
2 – Once all the images have loaded into the Layers palette, select them (click the first, hold down the Shift key, scroll to the end and select the last one. That will select all).
3 – Now go to Edit – Auto-Align Layers… and choose Auto. Make sure all other options are un-checked. Wait for Photoshop to finish that (which can take quite a while depending on the number of images and resolution).
4 – Now choose Edit – Auto-Blend Layers… Check “Seamless Tones and Colors,” then OK. Again, Wait.
5 – Now you have an aligned, blended image that uses the focus throughout the series of photos. You’ll also probably have some white pixels along at least one edge, as Photoshop has needed to shift some images because of the changing focus. You can crop to remove that.
6 – Now for editing and saving. In this case, when I used twenty 45MP images from my Nikon D850, it made a 3.5GB PSD file. Photoshop has a limit of 2GB for a PSD file. So you can either Flatten the image, or turn it into a Smart Object.
7 – Choose Filter – Convert for Smart Filters. Doing this will let you be able to go back and re-edit any edits you’ve done after assembling the composite, maintaining a non-destructive workflow for those edits.
8 – Now that you have a single Smart Object, you can use the Camera Raw Filter to edit the stacked image. Choose “Filter – Camera Raw Filter.”
9 – In the Camera RAW Filter editing window, you can do edits to the image that can later be undone or re-edited, as long as you save the image as a PSD or a Layered TIFF.
Helicon Focus has a 30-day free trial, has fewer steps and lets you save the result as a DNG. That will allow you to do further edits non-destructively, and create a file that’s fairly manageable in size.

If you decide to do a lot of focus stacking, youÕll probably end up buying a specialized program to assemble the images, like Helicon Focus.
Either way you do it, I think you’ll have fun with this. For non-moving subjects, it’s a great way to maximize sharpness while achieving greater depth of field. Better yet, it’s a new technique to add to your kit of photo skills. Enjoy!
(If you like this story, please share it with your friends and let them know about the links on photography I post on my business Facebook page. I’m also on Instagram and Twitter, @reedhoffmann)