Camera Gear – what I use and why
(updated February, 2021)
I’m often asked about what lenses and cameras I use, how I set up my cameras and suggestions on tripods and other gear. This area is a good starting point for those types of questions. Below you’ll find my answers on all of that as well as preferred bags, exposure and processing settings the menus I find most helpful (and why) and much, much more. At the end are my recommendations for speedlights, tripods, filters and light modifiers (umbrellas, reflectors and soft boxes).
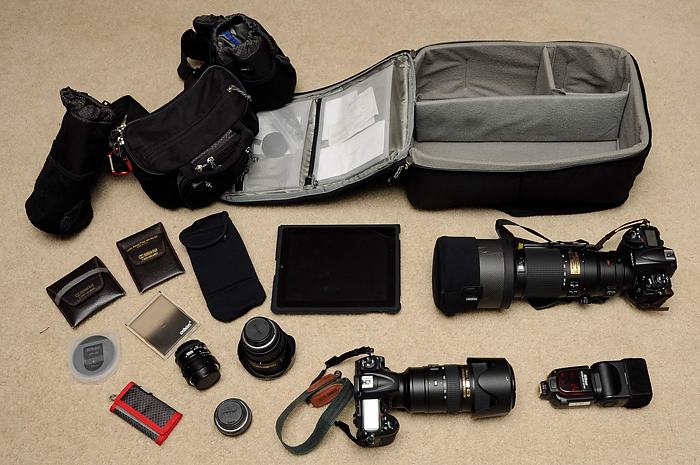
INSIDE MY BAG THESE DAYS
I’m lucky enough to have a fairly large assortment of gear to choose from, so I pack according to what I’m going to do. For family trips and general running around, I usually take a Nikon DX body and either one lens, like the 18-140 f/3.5-5.6 AF-S VR lens or a pair, the 16-85mm f/3.5-5.6 AF-S VR and 70-300mm f/4.5-5.6 AF-P VR lenses. With the introduction of the Z 50, I might now take it and the two kit lenses it was introduced with. If I’m doing more serious photography and it involves travel where weight is a concern, then my go-to kit is two cameras, first a DX (the D500, D7500 or Z 50) and an FX (either the Nikon Z6, Z 6 II, Z7, Z 7 II, D780 or D850). For lenses, I often take three. For the mirrored cameras those would be the 16-35mm f/4 VR (or 18-35mm f/3.5-4.5), 50mm f/1.8 and 70-200mm f/2.8 VR. For a lighter kit, I’d replace the 70-200 f/2.8 with either the f/4 model or the 70-300mm f/4.5-5.6 AF-P model (sharper than the AF-S one). I love pairing an FX and DX camera together, as that gives me more flexibility in framing thanks to the crop factor of the DX camera (1.5X). If I’m shooting wildlife, then my go-to lens right now is the Nikkor 200-500mm f/5.6 lens. If I need a faster aperture, then it might be the Nikkor 200-400mm f/4 VR or 500mm f/4 VR lenses. And I’d probably add in the TC-14E III teleconverter with those two. If I’m trying to go extra light, I’ll take the Nikkor 80-400mm f/4.5-5.6, which while slower, would take the place of both the 70-200 and the long telephoto. Sports? Then I switch to the Nikon D780, D500 or Z6 II. And I almost always have a Nikon flash in the bag, either the SB-700 (lighter weight) or SB-5000 (more power). Or, to go very light, when I don’t need much power, the SB-500.
With my Nikon Z cameras, I’m often using the FTZ adapter with my F-mount lenses. Going forward, my lens purchases will continue to be the new S-mount lenses for the Z cameras. So far I’ve bought the 14-30mm f/4, , 24-200mm F/4-6.3, 24-70mm f/2.8 and 50mm f/1.8, and have been very happy with their performance (you can see examples from them in my blog posts fro the last couple of years).
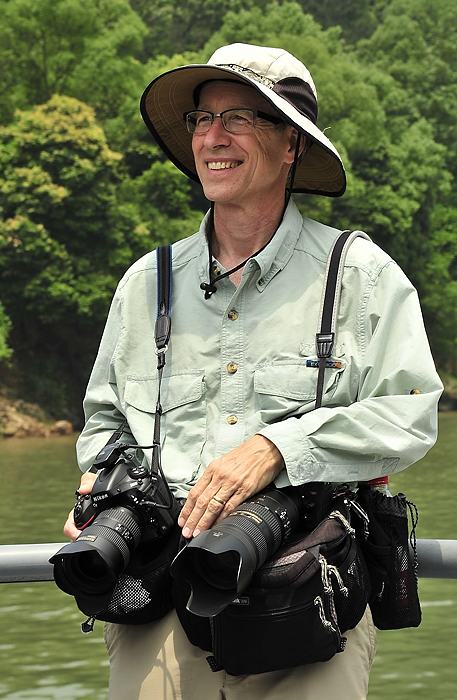
The bag I choose is always based on what I’m doing. I like working out of a waistbelt with a couple of accessory pouches for general shooting, like these. For travel, the Think Tank Airport series backpacks are great, fitting even in the tiny overhead spaces I often find in commuter planes. The Airport Essentials is my current favorite for small and light, and the Airport Advantage adds wheels and will still fit in those commuters. Think Tank has a workshop promotion (that you qualify for by reading this) where you get a free product every time you place an order over $50. To take advantage of that deal, go here.
LENSES
I shoot everything from landscapes to portraits, sports to news. And high quality is always a must. This section lists many of the lenses I use, in different situations, and why I like them.
As a Nikon shooter, I’m going to talk about Nikon lenses here because that’s all I use. I think other companies also make good lenses, but there are two big reasons I’ve stayed with Nikon. One is their well-deserved reputation for excellent optics. and the other is faultless communication between camera, lens and flash. Of course, not all Nikkor lenses have the same level of optical quality. As with most things in life, you get what you pay for. Higher-end lenses (okay, more expensive) tend to have better optics, better lens coatings, better edge-to-edge sharpness, better contrast and color and hold up better over many years of use. Nikon’s “kit” lenses (like the 18-55mm f/3.5-5.6 commonly sold with entry-level and sometimes mid-level cameras), while good, make sacrifices to be lightweight and inexpensive. However, you don’t always have to spend a lot of money to get a good lens. Fixed focal-length lenses (non-zoom) are usually very sharp and not as expensive. And there are some very good zoom lenses in the under $1000 category too, as I explain below.
(Note – “DX” lenses are those made primarily for Nikon’s DX cameras. While they can be used on Nikon’s FX cameras, you get reduced resolution, so they are mainly used on DX cameras.)
Consumer Zooms
By “consumer zooms” I’m talking about those that generally cost less than $1000 but still have very good image quality. There are several that I’m fond of, and regularly use if I’m trying to carry less weight and don’t need fast apertures (which generally means f/4.0 or less for longer telephotos, f/2.8 or less for 200mm and shorter).
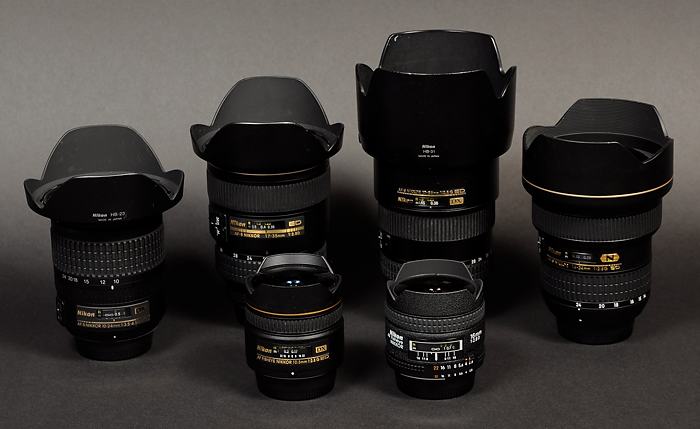
Nikkor 18-35mm f/3.5-4.5 AF-S – A very nice super-wide (and not DX) lens for under $1000, it’s a bit smaller, lighter and less expensive than the 16-35mm f/4 (mentioned below), but not quite as wide and no VR.
Nikkor 10-24mm f/3.5-4.5 AF-S DX – This is my favorite super-wide zoom in the DX category. It’s very small and compact. Some people feel that its edge-to-edge sharpness isn’t as good as they’d like, but I rarely shoot the lens wide open (maximum aperture), and find that at f/5.6 to f/11 I’m happy with the results. Of course, there’s also the older (but still very nice) Nikkor 12-24 f/4 lens. If you’re looking for a less expensive (but slower) super-wide DX lens, check out the relatively new Nikkor 10-20mm f/4.5-5.6 AF-P DX lens (but be sure and check it’s compatibility with your Nikon body. The new AF-P lenses aren’t compatible with some of Nikon’s older digital cameras).
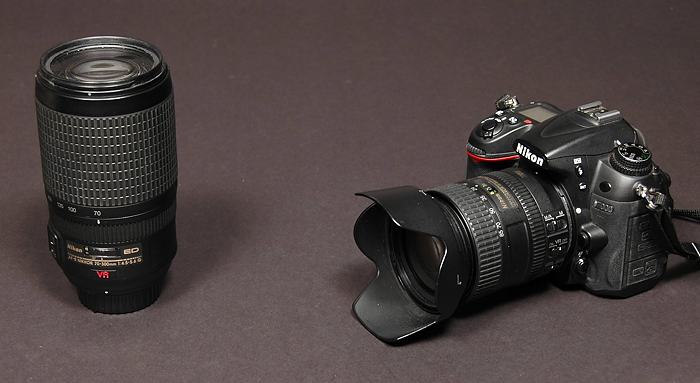
Nikon’s 70-300mm f/4.5-5.6 AF-S VR and 16-85mm f/3.5-4.5 AF-S VR are two of my favorite consumer zooms. Compact, sharp, with VR – excellent value for their price. And the new AF-P version (below) of the 70-300mm is even better.
Nikkor 16-85mm f/3.5-4.5 AF-S DX VR – This is one of my favorite “go-to” lenses for personal (as opposed to professional) work. Compact, very good sharpness and VR, I love pairing that with the 70-300mm (mentioned below) for vacations and family travel.
Nikkor 70-300mm f/4.5-5.6 ED AF-P VR – My other favorite “go-to” lens for personal use, I love pairing it with the 16-85mm mentioned above. Very good optics, especially at this price, and a bargain at around $600. Plus, it’s not a DX lens, so no crop factor if you use it on an FX body. It also resolves surprisngly well on Nikon’s 36 and 45-megapixel bodies.
Nikkor 80-400mm AF-S f/4-5.6G ED VR – A more expensive long zoom (about $2300), this has been a popular lens for wildlife shooters who want a wider zoom range than the 200-500 and can’t afford the excellent, but pricey, 200-400mm f/4.
Pro Zooms
I break lenses down into “consumer” and “pro,” based mainly on price. I recommend the “pro” lenses to anyone who can afford them. You get what you pay for, and lenses play an incredibly important role in image quality. “Pro” lenses, in addition to the quality benefits, will stand up to harder use longer.
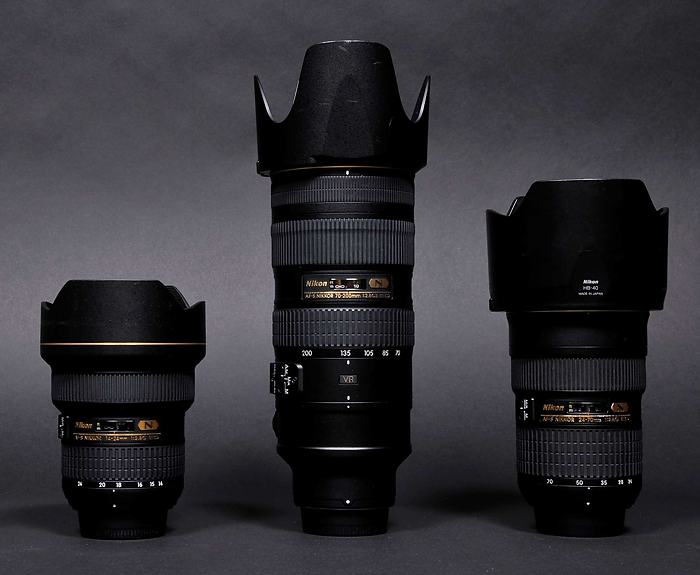
Nikkor 14-24mm f/2.8 AF-S – Described by some as perhaps the sharpest, fast super-wide zoom ever made. An amazing lens, it’s also got a very large, protruding front element that makes adding filters difficult. I use this when I absolutely need that f/2.8 aperture, and it’s great for night photography.
Nikkor Z 14-30mm f/4 S – The first super-wide lens for users with Z cameras, this quickly becamse a favorite among landscape photographers using those cameras. The follow-up f/2.8 version, released in 2020, is an awesome night photography lens. Plus, both have been designed to take screw-in filters, a welcome change from the 14-24mm f/2.8 F-mount lens.
Nikkor 16-35mm f/4 AF-S VR – This has been my favorite wide-angle zoom over the years. While f/4 is not considered a fast aperture in wide-angle lenses, better noise performance in today’s cameras mean we don’t need an f/2.8 lens as often. The 16-35mm range means a very wide option at the one end and a “normal” wide-angle choice at the other. As opposed to the 14-24mm zoom, it takes standard 77mm filters (actually, you’ll want a “thin” filter for less chance of vignetting at 16mm). And finally, it has VR, not common on wide zooms, which is particularly nice if you want to shoot some video.
Nikkor 24-70mm f/2.8 AF-S VR – Most pros consider a 24-70mm 2.8 zoom one of two “bread-and-butter” lenses in their bag (the other, the 70-200mm 2.8 is mentioned next). Great standard zoom range in a fast, very sharp lens.
Nikkor Z 24-70mm f/4 and 24-70 f/2.8 S lenses – the new “normal” zooms for photographers using the new Z cameras, you have a choice of a fairly light and small f/4 model, or the larger, faster (both in aperture and focus) f/2.8 version. The S lenses from Nikon demonstrate how that larger lens mount offers the ability to go even further with optcal performance.
Nikkor Z 24-200mm f/4-6.3 – Another lens for the Z cameras, this has become my “go-to” all-purpose lens. For landscape photography, it paired with the 14-30mm f/4 give me a very compact and high quality kit for my mirrorless Nikons. Despite retailing for under $1000, I put it in the “pro” class becaues of its excellent resolution.
Nikkor 70-200mm f/2.8E FL ED AF-S VR – The other “bread-and-butter” pro lens, this might be the single most popular lens among serious photographers today. No question about its sharpness, great VR capability (more important in telephotos) and a fast f/2.8 aperture all the way from 70 to 200 millimeters has made this a regular part of a serious photographer’s kit for many years. And the S version, for Nikon’s Z cameras is the next generation of a great lens.
Nikkor 70-200mm f/4.0 AF-S VR – Added to Nikon’s line-up in 2013, this is a smaller, lighter version of the f/2.8 model, so a stop slower but more than $1000 less expensive. Still has ED glass and Nano Crystal coating. I’m very impressed with this lens and look to use it when I don’t need the speed of the f/2.8 model. Plus, it can still use Nikon’s teleconverters.

The 200-400 f/4 is a wonderful wildlife lens, and extremely popular for people going on safaris. You can rent one for a very reasonable price.
Nikkor 200-400mm f/4G AF-S ED VRII – Nikon’s made a 200-400mm f/4 lens for a long time now, and it’s the gold standard for wildlife photographers. When photographing animals in the wild you’re often unable to change your distance to subject, so a zoom can be essential to get the framing you want. Very sharp, great VR, and perhaps most importantly, it’s not too large to hand-hold, at least for a short time. The size and weight also make it a reasonable lens to carry to remote places where those factors can be extremely important. Finally, better high ISO performance in today’s cameras has meant this lens starting has been showing up more on sidelines of evening or inside sporting events which previously required f/2.8 lenses. And Nikon now also has a slighty different version of this, a 180-400mm f/4 VR lens, with built-in 1.4X teleconverter. Of course, that means a higher price tag as well.
Fixed Focal Length (“Prime”) lenses
Nikkor 16mm f/2.8 AF-S fisheye (or its 10.5mm DX partner) – This is a fun lens to use because of its full-frame fisheye view. I also like it because of the fast aperture (f/2.8) and very small size. Plus, while it gives edge distortion (“field curvature”) when shot as is, if you use Nikon’s edit software, Capture NX-D, there’s a button that will automatically change it from a 180-degree view to a 130-degree corrected view. That removes the distortion, and gives you essentially two lenses in one – a full-frame fisheye with 180-degree coverage and curvature, or a corrected 130-degree view. This is a favorite for me when I’m traveling and want to go light, but expect to be indoors where I’ll want a wide view in low light.
Nikkor 40mm f/2.8 AF-S DX Micro – This is a close-up lens, commonly called a “macro” lens, and made for Nikon’s DX cameras. It’s very light, small, fast (f/2.8) and inexpensive. What’s not to like? Only downside, as with any short close-up lens, is that you risk blocking light from your subject when you get very close. And, as a DX lens, you’d have lower resolution using it on a Nikon FX body.
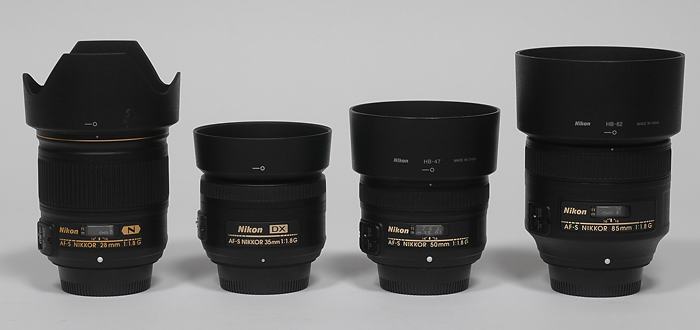
Nikon’s 28mm, 35mm, 50mm and 85mm f/1.8 lenses are all very reasonably priced and excellent lenses.
Nikkor 20mm f/1.8 AF-S – I ordered this one right after it was announced, and love it. It’s small and light, and has become my go-to night photography lens. I expect to add the Z version to my kit in the near future.
Nikkor 28mm f/1.8 AF-S – If you’ve got an FX camera, this is a sweet, very fast, compact wide-angle lens for those times where you need a wide aperture due to low light or for shallow depth of field. Nikon also makes a 24mm f/1.4, but that’s more expensive. And on a DX camera this is still a slightly wide-angle lens, and thanks to it being AF-S, will autofocus on even the least expensive Nikon bodies.
Nikkor Z 35mm f/1.8 S – Designed with the new mount for Nikon Z-series cameras, if you have one of those cameras and are looking for great performance in that focal length, here it is. Plus, like all of the new S lenses, it can take advantage of the 5-axis in-body-stabilization of the camera and silent focus motor.
Nikkor Z 50mm f/1.8 S – Again, if you have a Z camera and are looking for a fixed, fast “normal” lens, look here. Larger and more expensive than the F-mount version, its optics are of a newer, better generation.
Nikkor 50mm f/1.8 AF-S – I find this lens to be a real steal. only about $200 for a very fast f/1.8 lens that will autofocus on even Nikon’s entry-level bodies (that’s the importance of the AF-S designation). Plus, it’s not a DX lens, so gives a full resolution image on both DX and FX bodies. I love shooting this lens wide open, even outdoors, to make unique photos with very little depth of field. Of course, as with any very fast lens, you better be in focus. Inches can make the difference between a great and bad picture if you’re not in focus when shooting at f/1.8.
Nikkor 85mm f/1.8 AF-S – Now we’re talking about a fast (f/1.8) telephoto, and still at a very reasonable price. This is a great budget lens for someone wanting to shoot indoors in poor available light. And, on an entry-level DX body it has autofocus (again, that’s what the AF-S means), and the “crop” factor of the DX sensor means the field of view is actually about 127mm. Plus, great depth of field control, even more than the 50mm listed above due to a longer focal length. I recommend this lens all the time to people who want to photograph their kids in dance, theater, or any indoor sports or action, but have a limited budget.
Nikkor Z 85mm f/1.8 S lens – The classic 85, but now in an S-mount for the new Z cameras.
Nikkon 105mm f/2.8 AF-S VR Micro – Of all the macro (“Micro” in Nikon-speak) lenses Nikon makes, this is my favorite. The extra focal length (as opposed to the 40mm and 60mm) means you’re less likely to block light from you subject, and less likely to scare off bugs. It’s also designed for “full-frame” cameras (not a DX lens), so gives full resolution with those cameras. Of course, when paired with a DX camera, the crop-facotr gives you an equivalent focal length of 152.5mm.
Nikkor 500mm f/4 AF-S VR – I chose this lens over the 600mm because of its smaller size. More reach than the 200-400 at the same aperture, yet still a manageable size to carry and shoot.
Nikon TC-14E III – Often times teleconverters come not just with a loss of light (one stop with a 1.4X converter), but a loss of sharpness as well. Not this one. It’s always with me if I’m shooting the 70-200 mentioned above (making it a 105-280mm f/4 lens), or one of the longer, more expensive telephotos from Nikon. Remember, though, that Nikon’s teleconverters can only be used on specific Nikon telephoto lenses.
CAMERAS
Having taught Nikon School from 2002 through 2018, I’m intimately familiar with Nikon’s cameras. I’ve shot all of them so I can help students regardless of the model they have. However, when I’m working, or out shooting on my own, as mentioned above, I prefer to carry one FX and one DX camera. Right now that means a Z6 II and either the Z 50 or D500, but in the past has been a D7XX/D8XX/D6XX-series camera and anything from a D90 to a D7500. The 1.5X “crop” factor of the DX camera lets me get more “reach” out of my telephoto lenses, and the larger pixels on most FX cameras mean they tend to do better at high ISO’s. This lets me play to the strengths of each body, and means I’m often shooting sports and wildlife with a DX body. Unless it’s low light (indoors or at night), when I’ll usually switch to the FX body. Plus, simply swapping a lens from one body to another changes the angle of view I get because of the change in sensors.
Exposure
Most of the time I choose to shoot in Aperture Priority. It, along with Shutter Priority and Program are called “automatic exposure modes,” because they automatically help you get a good exposure. And honestly, all of them can get you to the same place. It’s only how you interact with the camera that changes. I’m a big fan of limited depth of field, so Aperture Priority is what I choose to use. If using Shutter Priority, you need to be careful that you don’t choose a shutter 
speed that’s too fast or slow for the light. In that case, the camera can’t adjust the aperture wide or small enough for a good exposure and you end up with overexposed or underexposed pictures. With Aperture Priority, if I need the fastest shutter speed, I simply dial my aperture to its widest setting. I use Manual exposure as well sometimes, when the light is unchanging or when I’m lighting with flash. By staying in Manual when using strobe, I can set the aperture for the flash exposure, and use the shutter speed to control the ambient (available) light. And now with the electronic viewfinders of my Z cameras, I’m actually shooting more in Manual mode because I can see what’s happening to the exposure in the viewfinder before I ever shoot the picture.
Matrix metering (some manufacturers call it “Evaluative”) usually gets me close while in an automatic exposure mode, and then I use EV (exposure compensation) to adjust that exposure to where I want it. Since I tend to like scenes where the subject is the brightest part of the photo, with darker areas around it, I’m quite often shooting with EV at -.3 to -1.0.
Processing Settings
One of the great features of digital cameras is their ability to let you customize how they work. From menus and white balance to image processing, you can now set them up to create the “look” of the photos that you want.
I’ve been shooting Nikon for over 40 years, so obviously the settings I talk about here are for my Nikon cameras. However, you’ll find that many of these can be applied to Canon, Sony, Panasonic, Olympus, etc. The different companies may call them by different names, but most camera and processing settings I talk about can be used on other cameras as well.
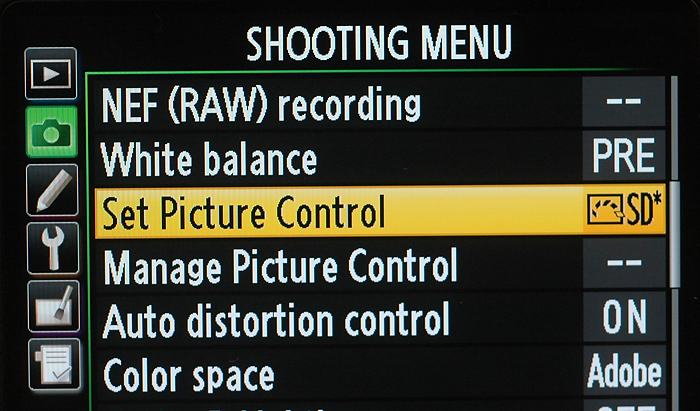
Nikon’s Picture Control menu is the starting point to take control over the in-camera processing of your photos.
In the days of film, you bought it based on the “look” it gave you. That could be saturated, cool, warm, contrasty – there were lots of choices. Since you’re not buying film anymore, who decides how your images will look? Turns out you do, if you choose to. When you shoot JPEGs, the camera is processing the raw data from the sensor for color, saturation, sharpness, noise reduction and other variables to give you a finished image (and compressed too, with JPEG). Those settings are available to you in most cameras, and can be changed. For instance, Nikon’s current cameras have a “Picture Control” setting that does that, and other manufacturers have similar options. If you look inside that menu, you’ll find by default it’s set to “Standard.” But you could also choose Flat, Neutral, Vivid, Monochrome, Portrait and Landscape. Each one of those will make your photos look a little – or a lot – different. After choosing one of those, you can go even further and tweak the individual settings within them for more or less contrast, saturation, sharpening, etc. If you shoot JPEG, these settings are extremely important because they determine how that finsihed image (JPEG) will look coming out of your camera. If you shoot RAW (NEF for Nikon, different for others), then the choices you make in image processing in-camera are simply a starting point. You can always change them later in RAW processing software.

Picture Control set to “Vivid.”
However, remember that you’ll only see the results of those processing settings from the camera if you shoot JPEG (since every image is processed that way), or if you use the manufacturer’s processing software. Third-party programs by companies like Adobe, Capture One, Microsoft or Apple do their own processing of the RAW data, ignoring what you set in camera and giving the images their own look. If you use those programs, you’ll probably want to create your own “recipes” for different situations. For instance, I keep my Nikons on “Standard” most of the time, but up the sharpening a couple of notches. For landscape shots, I’ll often use the “Vivid” setting and even bump up the contrast and saturation an additional notch. And if I’m in a contrasty situation where I’m worried about overexposing highlights, I’ll choose the “Neutral” setting. Since I want to keep those “looks” when I get to the computer, I use Photo Mechanic as my browser (which looks at the embedded JPEG in a

Picture Control set to “Standard.”
RAW file for the preview). Nikon View NX-i would also give a “true” rendering of the NEF (Nikon’s RAW format extension) data. My editor of choice for careful editing of my best images was Nikon’s Capture NX 2, which used those Picture Control settings as a starting point, and then I would work from there with selective tools. With Nikon discontinuing support NX 2 (their current software, Capture NX-D, only allows global edits), I’ve gone back to Photoshop for my major editing. I use Lightroom at times too, but mostly for work that requires a lot of photos processed quickly, where I don’t need to do careful selective work on the images. I’ve found Adobe Camera RAW (part of Photoshop) to be so powerful that I do almost all of my editing in it, now. When finished, I save the file out as a DNG, which means I can open it again later into Photoshop with the edits intact. That gives me the power and flexibility of non-destructive editing.
MENUS
Rather than try to go through my favorite, or most commonly used menu settings for different cameras, I’ll list the ones I use most frequently across different cameras. Not all Nikon cameras (or other manufacturers) have these settings, but many are common.
File Format – Most of the time now I shoot my cameras in RAW (NEF) format. If I want the absolutely best quality, then I’ll choose 14-bit lossless compressed. 14-bit files are larger, but the difference between them and 12-bit is like when you’re making a cake. 14-bit means you have a few more ingredients to start with. I choose lossless compressed to keep the file sizesown without having to sacrifice quality. And I shoot JPEG sometimes when I want to save space, speed up my workflow, and am comfortable with my exposure and white balance. JPEG files at highest quality (least compression, “Fine” in Nikon menus) have a lot of information and you can still make big changes to things like tone and color.
PLAYBACK MENU
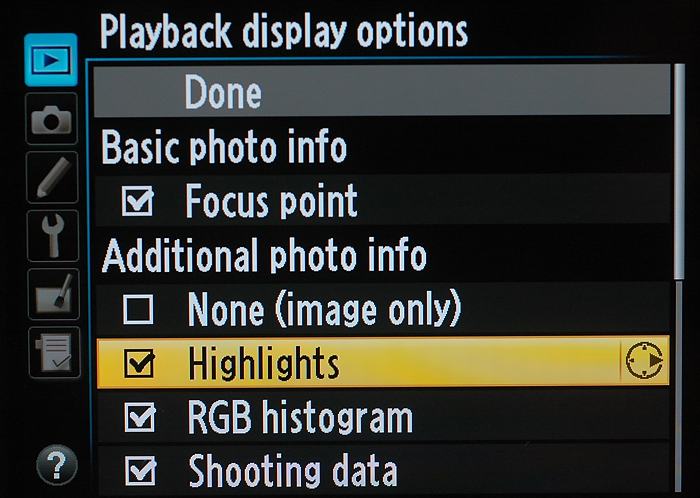
Playback display options – On every camera I use, one of the first things I turn on is found in the Playback Menu – “Highlights.” Sometimes called “highlight alert,” or “flashing highlights,” or even “blinkies,” this will make the LCD flash black-and-white any area that’s overexposed. It’s a great feature to warn you of an overexposure problem. If an area’s flashing and it’s large or important, then you need to decide how to correct that. Most of the time that involves reducing the exposure until the area’s no longer blinking. This menu also lets you choose to see an RGB histogram (in addition to the black-and-white luminance histogram already shown), see what focus point was used, or see more shooting data than is normally displayed.
Image Review – for most shooting I keep this turned off, for two reasons. One, I don’t like the display turning on after every press of the shutter, as I find that distracting. And two, when an image is being displayed on the rear LCD, that changes how the dials function. That means I can be trying to make a change in exposure and instead am changing the display. That’s frustrating. The only time I turn Image Review “On” is when I’m shooting something like portraits or a product in the studio, and want instant feedback on each photo.
Rotate Tall – I like to leave this “Off,” and here’s why. The LCD on the back of the camera is horizontal, so if you choose to have your vertical rotated, they’ll be turned to fit into the smaller vertical dimension of the LCD. So I turn off “Rotate Tall” and instead rotate my wrist to see a larger image displayed full-size on the LCD screen.
SHOOTING MENU
Shooting Menu Bank – In the past I haven’t used this much, but in newer cameras I may start. Here’s why; if you turn on the “Extended Menu Banks” option, you can now include the exposure mode you want in a Menu Bank choice. That means you can create groups of settings that apply both to the shooting options you want and include a specific exposure mode as well. For some people, this may be a nice option. However, it’s important to know that if you make any changes to camera settings while in that bank, you’ve now changed the bank.
File naming – This allows you to change the default prefix of “DSC” for file names to any three-letter combination you prefer, such as your initials. This is useful in situations where you might be sharing images straight off the card, before you rename them with something more meaningful. But if you always download and rename first (and I highly recommend this), then there’s no real need to change the prefix of the file in-camera.
Image quality – I tend to set my cameras to RAW only, unless I’m on a tight deadline and need JPEGs ASAP. In that case I might actually shoot RAW + JPEG, so I have the RAW file in case I make a big mistake on exposure or white balance (or any other image processing variable). And sometimes, if I want JPEGs fast for web, email or screen use, I’ll choose RAW + JPEG, and set the JPEG for a smaller resolution and higher compression. That way the camera’s creating those JPEGs for me, andI can always go back to the RAW for all the data and resolution. Finally, for someone who wants to start trying RAW, the RAW + JPEG option is nice because they get the JPEG they’re used to, plus the RAW data. Keep in mind, though, that you may need a larger capacity card since you’ll be writing more data to the card.
JPEG compression – I choose “Optimal quality, which means the JPEG file size can change based on the amount of detail in the photo. In “Size priority,” file sizes are fixed, which can mean less information in highly detailed photos. On newer Nikon’s “ptimal” quality is indicated by an asterisk next to “Fine.” (Fine*)

NEF (RAW) recording – As mentioned above, I prefer “Lossless compressed” (smaller file sizes without a loss of quality) and 14-bit (more data than 12-bit for processing RAW information). With some cameras, choosing 14-bit can slow down the maximum frame rate, and anytime you choose larger files (like RAW over JPEG) the buffer will fill faster when shooting at Continuous frame rate. High-speed cards are helpful in avoiding this. And with the new 45-megapixel cameras (D850 and Z7), I’m sometimes choosing the RAW Medium image size, which still gives me a 25-megapixel image.
White Balance – I always say, “if you know what your light source is, tell the camera.” So in daylight conditions I choose “Direct sunlight,” in fluorescent I choose “Fluorescent,” and so on. I only use “Cloudy” or “Shady” if I want to add more warmth to the scene. And I use Preset whenever possible under artificial lights or mixed lighting conditions to minimize color problems. I keep a gray card in my bag just for this. What about Auto? That’s gotten better and better over the years, and with Nikon now we have various Auto choices for both dayligth and artificial light. I’m finding them to be pretty accurate.
Set Picture Control – As mentioned above, “Standard” is my preference, with Sharpening increased a notch or two. If I want to pump up the contrast and color (like the old Kodachrome and Velvia films), I’ll choose Vivid and add some Contrast and Saturation. And in a high-contrast situation, I’ll often choose Neutral or Flat to help protect the highlights in the photo.
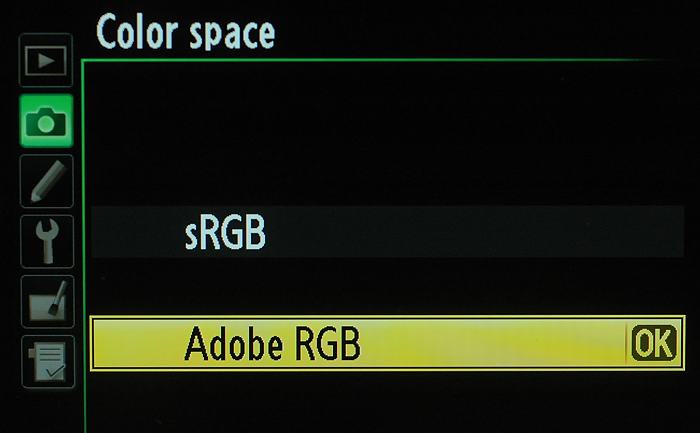
Color space – Adobe RGB is what I choose, because I run color management on my computers and monitors, and that gives me a slightly larger color gamut to work with than sRGB. However, that also means I regularly convert my files from Adobe RGB to sRGB because most of the world (web, browsers, printers, etc.) expect sRGB. There are many photographers (including some very famous pros) who choose to shoot sRGB for an easier workflow. Simply said, if you aren’t using color management, or understand what that means, stick to sRGB.
Active D-Lighting – If you know how to manage contrast through exposure, graduated filters and post processing, then you probably want to leave this turned Off. If that doesn’t make sense to you, then I recommend leaving it on “Auto.” That way if you’re shooting a high-contrast scene, the camera will automatically underexpose a bit, then add extra processing to the shadow areas. This is an attempt to extend the camera’s dynamic range, and can be helpful in some situations. One downside to using it is that it can slow down the frames-per-second your camera’s capable of because of the added processing required.
Long exposure NR – Once you start shooting time exposures, you risk a different type of noise caused by those long exposures. This setting helps mitigate that in exposures over one second by making a second “black frame” of the same length of time and processing the two files to help remove that noise. So it means each exposure will take twice as long (a five-second exposure becomes ten seconds with the two exposures). This also results in more quickly draining the battery. I only turn it on after I’ve figured out the correct exposure (to save time and battery), and generally not until I get to ten seconds or longer. With newer cameras, I now only use this in exposures over 30-seconds. And finally, it’s most likely to happen in hot and humid environments, so if I’m not in that situation, I often don’t use it at all.
High ISO NR – We all know that with digital cameras, the higher you raise the ISO the more likely noise will be visible. I normally choose to process that kind of noise after the fact, on the computer, but you may want to try this to have it done in-camera. In that case I’d recommend trying “Low” or “Normal.” Higher settings can soften your images, resulting in a loss of some sharpness.
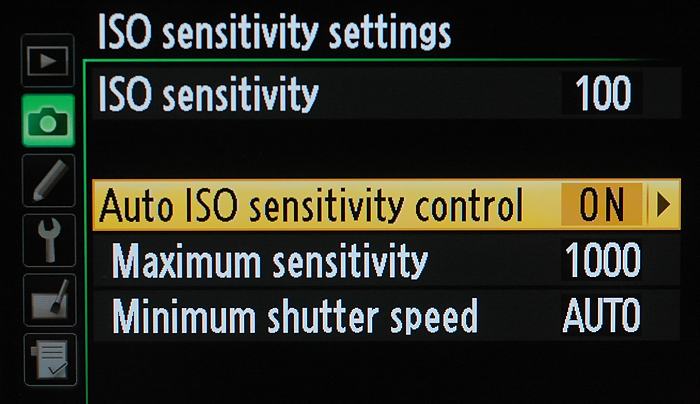
ISO sensitivity settings – I love this menu choice. It lets me set the ISO I prefer to shoot at, but then also allows the camera to raise that ISO to a higher level I choose if the shutter speed drops below a certain speed, that I also choose. Newer cameras also allow you to have the camera choose that shutter speed based on focal length (“Auto”), which can be good as long as you’re not using a wide-angle lens that would allow the shutter speed to drop very low. This is a very nice menu that allows ISO to float in a smart way, and can really help in changing light conditions.
Multiple exposure – This lets you shoot from 2-10 exposures (the maximum number determined by the camera you have), after which the camera will merge them together in-camera. It’s a fun effect to try, both to create more blur (with action, like running water) or a more classic multiple exposure photo.
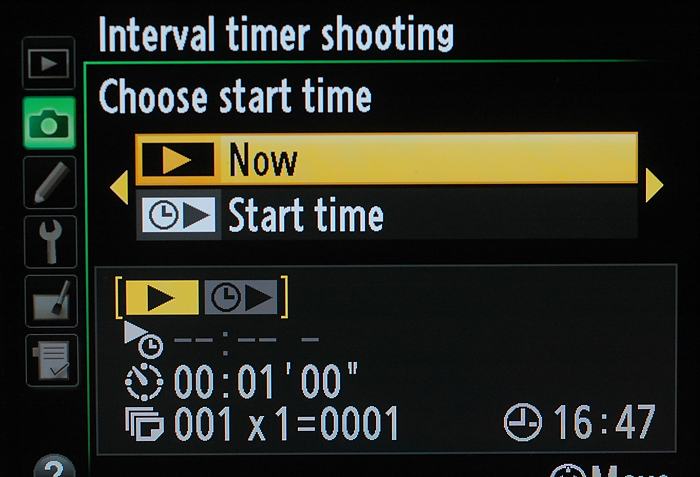
Interval timer shooting – Many Nikon cameras have had this feature for years now, and means you have intervalometer functionality built into the camera. This is normally used to create time-lapse movies, where you can set the interval between photos (every two seconds, or two-minutes, or whatever) and for how long and how many frames. If you’re using it to create a time-lapse movie, then you probably don’t need RAW (unless you plan to adjust exposure or color in individual frames afterwards) or even full resolution. I normally set for a smaller, more compressed JPEG since the images will be used on-screen. Also, be sure and turn off VR or you may get occasional shifts in the framing. You also want to have autofocus turned off, and don’t use Auto white balance or the color might shift as well. Finally, some newer Nikon cameras also offer the option to create a timelapse movie out of those frames internally, and save both the frames and the movie.
Time-lapse photography – Some Nikon cameras now have this feature, which combines the intervalometer function mentioned above with the camera creating the finished movie file immediately afterwards, in-camera. It’s a quick and easy way to create a time-lapse movie right out of the camera.
Movie Settings – Here is where you choose the resolution you want (4K, 1080, 720, etc.), the compression level (High quality or Normal), Microphone level and Destination (card) as well as many other options for the more serious filmmaker.
CUSTOM SETTING MENU
Autofocus
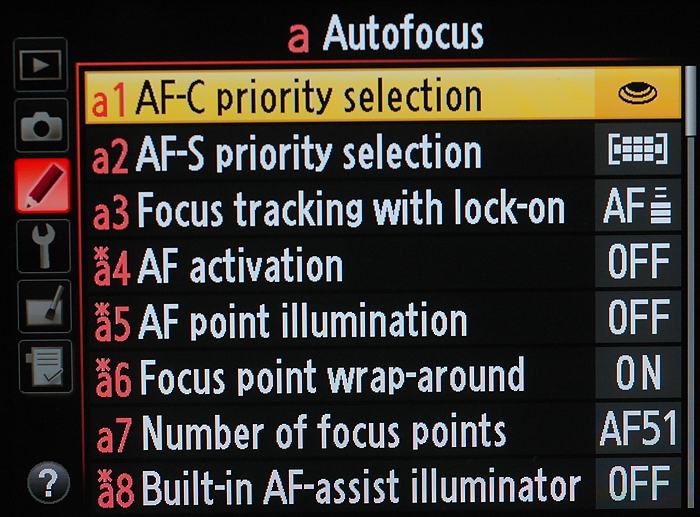
AF-C and AF-S priority – You choose what the camera’s priority should be with autofocus, in either C or S (Continuous or Single AF) modes. Release (camera shoots when you push the button, regardless of whether in focus or not), Focus (camera won’t shoot unless it confirms focus) or a combination of the two.
AF activation – This sets whether the autofocus starts when the shutter button is pressed, or only when the “AF-ON” button on the back is pressed. Using the AF-ON button is often referred to as “back-button autofocus,” (explained in detail here) and many professional photographers, myself included, work this way. This allows me to choose when the camera focuses (or more importantly, when it doesn’t), and separates shooting pictures from the action of focusing. I always use this with the camera set to Continuous AF. That way if the subject’s not moving, I press the AF button, let the camera find focus, release the button and then shoot pictures. If the subject’s moving, I hold down the AF button and let the camera track the subject while I shoot.
Number of focus points – This lets you set how many focus points you want to be able to control when choosing them manually, in the viewfinder with the rear thumb pad. I like all of them being active, but that takes longer to cycle through them.
Built-in AF-assist illuminator – This is a pet peeve of mine, and one I turn off on every camera I touch. That AF assist lamp in the front of the camera only helps if the subject is very close to you, the rest of the time it’s just annoying and lets everyone know when you’re trying to shoot pictures.
NOTE – for even more detailed information on how to use autofocus, particularly with the Nikon system, you can read the stories I’ve written about it here.
Metering/exposure
Easy exposure compensation – I’m a big fan of exposure compensation (EV) because I like to shoot in Aperture Priority (an automatic exposure mode) and am regularly overriding the exposure to capture scenes lighter or darker. With this turned on, I no longer have to hold the +/- button down to dial in compensation. Simply turning the main command dial changes EV for me.
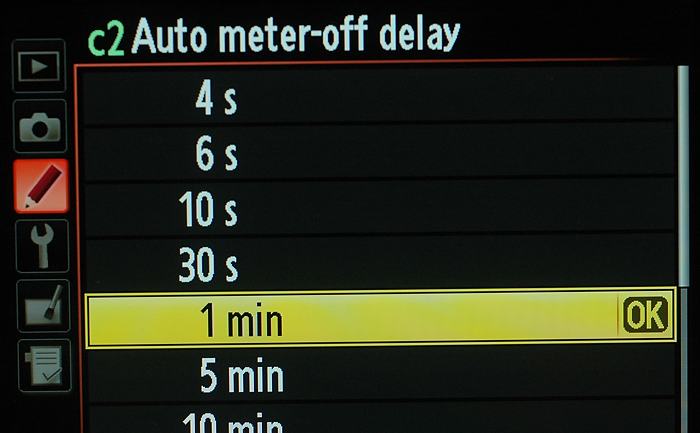
Auto meter-off delay – This is another pet peeve of mine. In the early days of digital cameras (about twenty years ago now), having the meter on was a big drain on the battery. That’s no longer the case. However, this carryover from then has the camera meter, by default, go to sleep after six seconds. As soon as that happens, moving a dial no longer changes your exposure. You’re constantly tapping the shutter button to “wake” the meter. So please, please, please, set that delay for one-minute. You’ll thank me later.
Monitor off delay – I also extend the default times on most of these so the camera’s LCD isn’t constantly turning off while I’m working with it. When I’m done with the LCD, I can tap the shutter button to turn it off, or press the “Preview” button on the back to accomplish the same thing.
Shooting/display
Exposure delay mode – Not all Nikon cameras have this one, but it’s a favorite of mine. Turning it “On” means that when you press the shutter the mirror first flips up, then after a slight pause, the shutter fires. This lets you shoot slow exposures on a tripod with less chance of adding motion blur by pushing the shutter button, and can lessen the chance that the mirror’s movement creates blur. Most newer Nikon cameras let you choose how long it waits, up to several seconds.
File number sequence – I like this turned “On” so that when I pull one card from the camera and replace it with another, the camera continues numbering the files from where it stopped with the last card. If you don’t rename when downloading to your computer, this can save you from accidentally overwriting files with the same name (number).
Viewfinder grid display – I’ve always struggled with keeping my horizons horizontal and straight lines vertical. Turning this on in cameras that offers it helps me, and of course, the lines don’t show up in the photos.

Bracketing/flash
Flash sync speed – All cameras have a maximum shutter speed where the entire sensor is completely uncovered by the shutter. Any speed above that, the second curtain of the shutter is starting to cover the sensor before the first has cleared the top. That speed is usually between 1/160 and 1/250. With many Nikon cameras, you can actually use higher shutter speeds, when used with appropriate Nikon Speedlights (not with a built-in, pop-up flash). That’s called “Auto FP,” and lets you shoot up to the camera’s maximum shutter speed (1/4000 or 1/8000) in the right circumstances. The camera’s able to do this by “pulsing” the flash so it’s in essence painting the subject with light during the exposure. The downside is that since it’s firing multiple bursts of light, they can’t be as powerful as one single burst. That means less “reach” for your strobe. However, when you choose “1/250 s (Auto FP),” the camera automatically has the flash fire one pulse once you lower your shutter speed to 1/250 or below. And some cameras even support “1/320 s (Auto FP), which means that full pulse flash will happen at 1/320 second or slower. This is a great feature, as it lets you shoot in bright sunlight at fairly wide apertures because you can use higher shutter speeds, something we weren’t able to do before. Other camera makers sometimes offer a feature like this, usually called “Hi-Speed Sync.”
Flash shutter speed – The default here is usually 1/60 second, which means that if you’re in an auto exposure mode (Program, Aperture or Shutter) and you have the flash turned on, the camera won’t let the shutter speed drop below 1/60. That can make it hard to get a good exposure for the background in low available light. I usually set this to 1/15, knowing that I need to be steady if shooting that slow. Otherwise I’ll add blur to the photo. The advantage is that I can often get a better exposure of the background area.
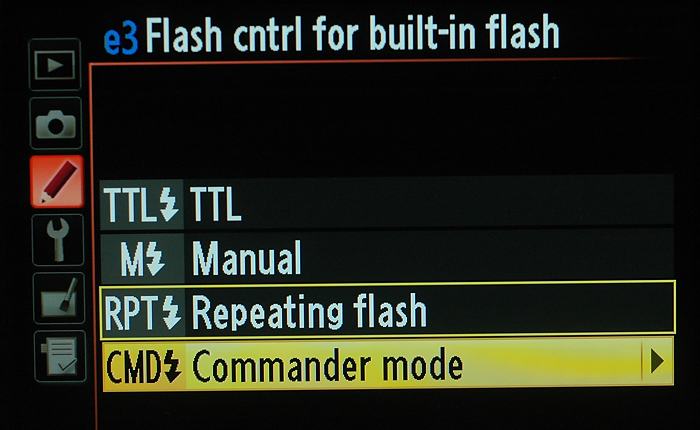 Flash cntrl for built-in flash – This lets you choose whether you want TTL (the default, where the camera and flash work together to try to give you the right exposure), Manual, Repeating flash or Commander mode (again, in cameras that support this). I’m a huge fan of Commander mode, letting the camera’s pop-up flash “talk” to Nikon Speedlights in the area. It’s also possible to use a Commander-capable Nikon speedlight or an SU-800 to control an external Commander-capable flash. And, many of Nikon’s newer high-end cameas, both F-mount and Z, now have this built into their menus, letting you use an adapter (WR-R10 and/or WR-A10) plugged into the camera to control Nikon speedlights that have radio contral capability (currently only the SB-5000).
Controls – these let you customize how your camera’s buttons work, and are well worth looking into.
Multi selector center button – some of Nikon’s higher-end cameras let you use this button, when previewing photos, to instantly zoom to 100%. This is a fantastic feature, and if your camera supports it, I strongly advise you using it. Go to the “Playback mode” option, choose “Zoom on/off,” then “Medium magnification.” “Low magnification” is under 100%, “High” is over 100%. Medium, as Goldilocks would say, is “just right.” Newer cameras actually say “1:1 (100%) instead of “Medium”
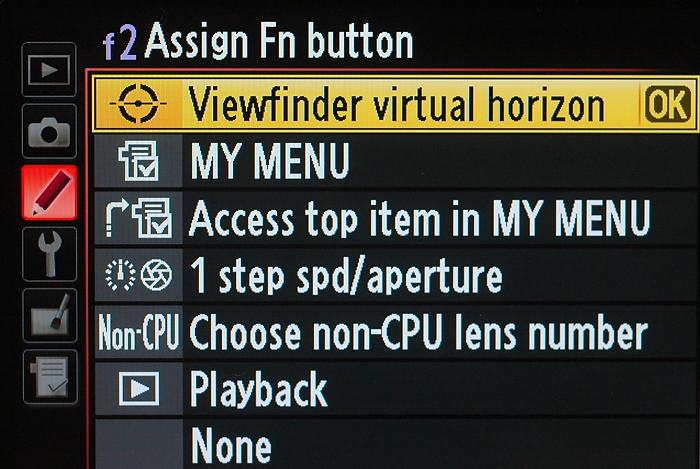
Assign Fn button – Many Nikon cameras now have one of two Function (FN) buttons on the front of the body, and this menu lets you choose what it does. I normally assign mine to either take me to the top item in “My Menu,” or turn on the “Auto ISO Sensitivity Control.” With the Z cameras, I now program them to let me change my autofocus options..
Assign Ae-L/AF-L button – On cameras that have this instead of an AF-On button, I can use this menu to either make that an “AF-Lock button or an “AF-On” button. Setting it for AF-on gives me back-button focus.
Movie
Assign AE-L/AF-L button – I set this for “AE lock (Hold).” That’s because I often use an automatic metering mode (Shutter Priority) when shooting video, and this lets me quickly lock the exposure for the brightest area of the scene I’m shooting. Otherwise the exposure would shift, and look unnatural. If you shoot video in Manual exposure mode, you’d likely use this button another way.
Assign shutter button – I often set this to make the camera start recording video when I press the shutter button. I find that easier than having to remember to press the red button instead.
SETUP MENU
Format memory card – Formatting cards on a regular basis is an important part of a good workflow. It helps prevent the card’s directory structure from getting corrupted through overuse. I prefer to format my cards after I’ve finished downloading and backing up the images on them, and do it using the two-button method on the outside of the camera. This menu does the same thing as the two-button method.
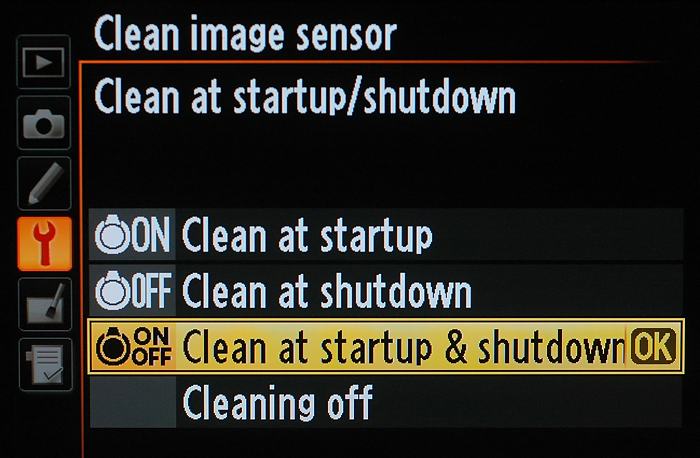 Clean image sensor – This feature, available on some cameras, has the camera “shake” the sensor. I turn on the “Clean at startup/shutdown,” which makes it do that every time you turn the camera on and off.
Image Dust Off ref photo – If your sensor gets dirty, you can create a reference photo using this menu that can be applied with Nikon’s Capture NX-D software to remove those spots from photos you’ve recently shot. To be most effective, it should be created as soon as you notice the problem, before the dust moves.
Auto image rotation – If this is turned “ON,” smart software will see that the image was shot vertically and rotate it for you automatically on your computer.
Image comment – Lets you embed a short string of information into every photo you shoot. It’s only visible when using certain software that can read metadata. It doesn’t show in the photo itself.
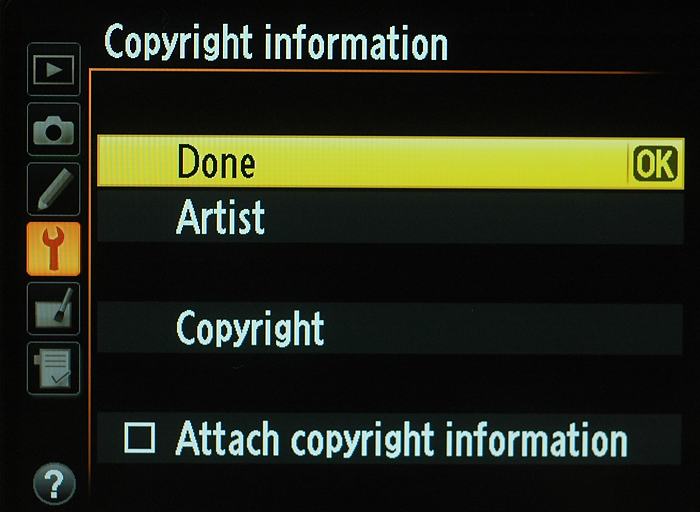
Copyright information – This allows you to embed your own copyright into all the photos you shoot. As above, this isn’t visible in the photo, but embedded into the metadata.
Save/load settings – This lets you save the settings you’ve created, to be loaded back into that camera or another one that supports this feature.
Virtual horizon – Another feature I love, this turns the rear LCD into a level to help you make sure the camera is, well, level. And with the Z cameras, you see this in the viewfinder.
Non-CPU lens data – If you have old lenses that don’t have CPU contacts, this will bring back Aperture Priority automatic exposure to them. You tell the camera the focal length and maximum (widest) aperture, it does the rest.
AF fine-tune – Allows you to adjust (in a very small way) the focus of the lens mounted on the camera. I haven’t personally found much use for this, but some photographers swear by it. It has to be done very carefully, and is most apparent at wide apertures when shooting close subjects. Some newer Nikon cameras now offer an “Auto AF Fine Tune” as well. Here’s a story I wrote about that feature in more detail.
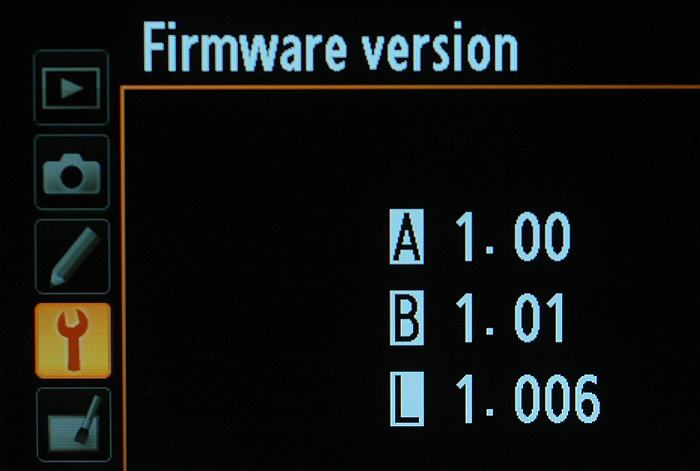
Firmware version – Occasionally manufacturers release new firmware for a camera. This is the software the controls the camera, and either fixes a problem, adds new features, or both. It can also let older cameras take advantage of newer-model memory cards. For example, a firmware update allowed Nikon cameras with XQD card slots to take advantage of the newer CFexpress card format. You can check your camera company’s website for the current version, read what it does, and if you want that, follow the instructions to download and install it. Nikon’s download center is here.
RETOUCH MENU
I prefer to do my editing on a computer, but this menu lets you do everything from crop, change color and tone, choose different artistic effects and even process NEFs to JPEGs, right in the camera. It makes a new copy, so doesn’t harm the original image.
MY MENU or RECENT SETTINGS
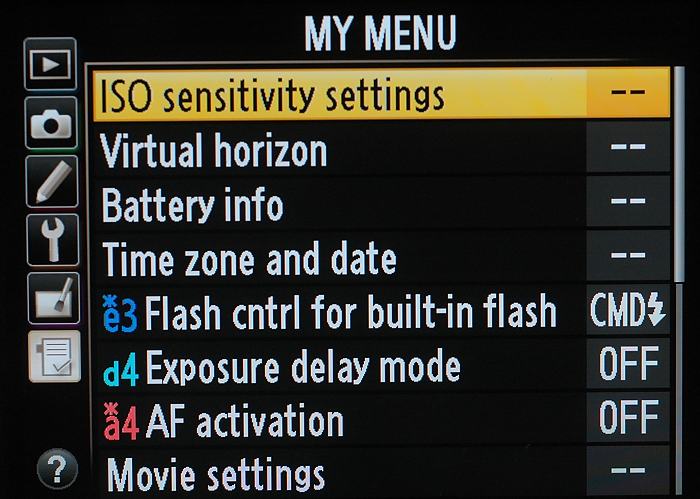
This is a great feature with Nikon cameras. It lets you either create a select set of menu items you regularly use, or have it always show you the most recent settings you’ve changed. I set my cameras to “My Menu,” and normally have some or all of these settings there: ISO sensitivity settings, Virtual horizon, Battery info, Time zone and date, Format, Flash cntrl for built-in flash, Exposure delay mode, Multiple exposure, AF activation, Movie settings, Long exposure NR and HDR mode.
SPEEDLIGHTS (FLASH)
In the old days I only put a flash in my bag if I thought I would need one. That changed when Nikon added “Commander Mode” to many of their cameras. That lets me trigger Nikon speedlights with the pop-up flash on most of my Nikon cameras, and I use
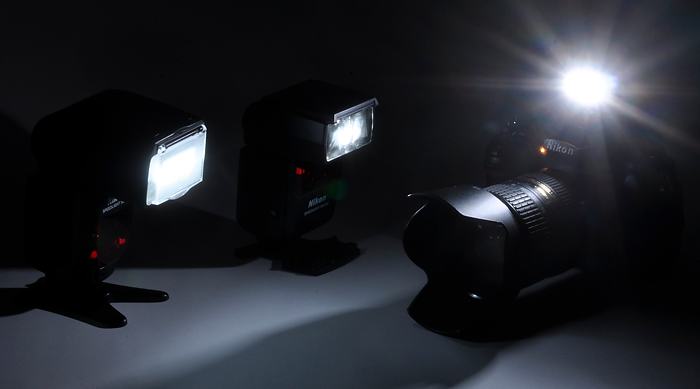
this feature a LOT. If I’m using them on camera, I tend to leave them set to TTL to take advantage of the great TTL (Through The Lens) metering capabilities they have. If I’m using them as a remote flash with a camera in Commander Mode, as mentioned above, then I go into the Custom Settings on the camera and change the built-in flash mode to “Commander.” Then, further in that menu, I usually turn off the built-in flash so it doesn’t contribute to the exposure (it does a “monitor pre-flash” to get exposure and communicate with the external speedlights, but doesn’t put out much light during the actual exposure). And I sometimes adjust the power output of the remote speedlights by changing the EV (again in Commander menu on the camera) to + or -. Right now I’m using either the SB-500 or SB-700 if I’m going lightweight, or the SB-5000 (or SB-910) if I need the added power and features. I also have some SB-800 and SB-600 speedlights in my lighting kit, that I can also use with Commander Mode.
Some of Nikon’s newer high-end cameras (both F-mount and S-Mount) don’t have a built-in flash. So they need either a Commander-capable flash mounted on them to control off-camera Nikon speedlights, or an SU-800. The other option would be to use the menu on the camera to control the speedlight(s) through a WR-R10 and/or WR-A10 adapter plugged into the camera.
TRIPODS
A tripod (or two) should be an investment you make for the long-term. A good one will be a pleasure to use and should last many, many years. Here are my experiences and recommendations:
Photographers want three things when buying a tripod – lightweight, sturdy, and inexpensive. But you can’t get all three together so you have to pick two. If you want sturdy and inexpensive, you’re going to get an aluminum model which will be fairly heavy. If you want sturdy and lightweight, then you’re going to get carbon fiber, which is expensive. My suggestion, whichever route you go, is to spend real money. A good tripod, properly cared for, should last you 15-20 years. Even if you spend $1000 on a tripod, head and plates (not unreasonable, and you can spend less), that ends up costing you only $50 a year for 20 years.
I probably bought four or five cheap tripods over thirty years before finally getting a good carbon fiber one. I now have four good tripods, several different heads and a collection of plates. Here’s what I’ve got, from small to larger, and why:
Peak Designs Travel Tripod (aluminum), five sections, 3.3 pounds (with built-in Arca-Swiss compatible head), 51-inches without raising the center post. My newest tripod, I bought this because thanks to its unique design, it packs smaller than any other tripod I’ve found that is still very sturdy. This is the tripod I now bring along on trips where I expect to either not need a tripod, need a tripod only a small amount, or am very limited on space for luggage/gear. It also has a removable center post that lets me bring it down nearly to ground level.
Slik Pro 724 CF (discontinued, but replaced by newer model), 4 sections, 3.1 lbs without head, 51-inch w/o center column. A few of years ago a friend who works for THK Photo Products asked if I’d ever tried one of their Slik tripods. I hadn’t, but had looked at them because of their lower price and what appeared to be good build. He sent me this one, and I’ve been using it ever since. Nearly the same in size and weight to the Gitzo, it’s much less expensive, and it’s held up very well through over a decade now of heavy use. I’ve recommended it to many people who wanted a good carbon fiber tripod but were on a budget. I like that the center post can be quickly unscrewed and removed to let you get lower to the ground. This is the one I travel with the most.
Gitzo Mountaineer model G1228 LVL (discontinued now), 4 leg sections, 3.7 lbs without head, 52-inches w/o center column. This was my first carbon fiber tripod, and as expected with Gitzo, it’s been great. I bought this primarily for travel, so size and weight were very important. I’ve taken it all over the world, and while I might skimp on clothing for a trip, a tripod is almost always in my luggage. The LVL model means the centerpost will adjust sideways to simplify leveling, but you can save some money and get the one that doesn’t. And, I replaced the center post with a “short” post so I could easily lower the tripod down to nearly ground level.
Gitzo Studex model G1327 (also discontinued), 3 sections, 5.1 lbs, 60-inches w/o center column, 70 with. This is my BIG tripod, which I use in the studio or if I need support for a really big lens and won’t have to carry the tripod very far. While I normally avoid using a center post (makes the tripod less stable), on this big, heavy-duty tripod, I feel confident raising that post.
Ballheads and Plates
After you’ve got the legs, you need a good ballhead and plate system. Like many photographers, I started with a less expensive system (how the plate and ballhead connect), the Bogen Quick Release. It was good, and the price was reasonable for both ballhead and plates, but the plates mounted with friction and would slip. So I upgraded (and spent more money) to an Arca Swiss system, which is what I recommend to people now.

There are several companies that make very good Arca Swiss mount ballheads, and they cost serious money. But again, like the tripod, a good ballhead will be a pleasure to use and not cost that much in the long run. Some of the companies I’ve had experience with, and wouldn’t hesitate recommending, are Markins, Kirk Enterprises, Really Right Stuff and Acratech.
The first Arca Swiss style ballhead I bought was a heavy duty Markins M10. A heavier ballhead, it will take the largest lens and camera combination I’ve got without a problem. And, with a heavy-duty ballhead like that, I can use my Wimberley SideKick gimbal which makes panning and tilting with a long lens very easy.
Then I bought an Acratech GP ballhead for travel. The lightest high-quality Arca Swiss head I could find, it’s a unique design and weighs in at under one pound. That’s the one I use on my Gitzo or Slik tripod when traveling.
After that I added a new design called UniqBall. It uses two balls, where you set the first one to level the head, then the second lets you move the camera up or down and side-to-side, all the while maintaining a level horizon. It’s pretty cool. Of course, it’s expensive too. This isn’t a run-and-gun ballhead, as it takes a little time to set up. Best for people who prefer to work slowly and methodically. In other words, not me 🙂
I’ve had two recent additions to my group of ballheads. The first is a Buddiesman CB-1, a relatively inexpensive, compact ballhead that I use with the Slik tripod in my primary lightweight travel kit. And for something between the big Markins and the small Buddiesman, I also purchased the Artcise LB52. At just under $100 and weighing about 1.5 lbs., I pair it with a slightly larger set of tripod legs for when I can take a bit more with me when traveling.
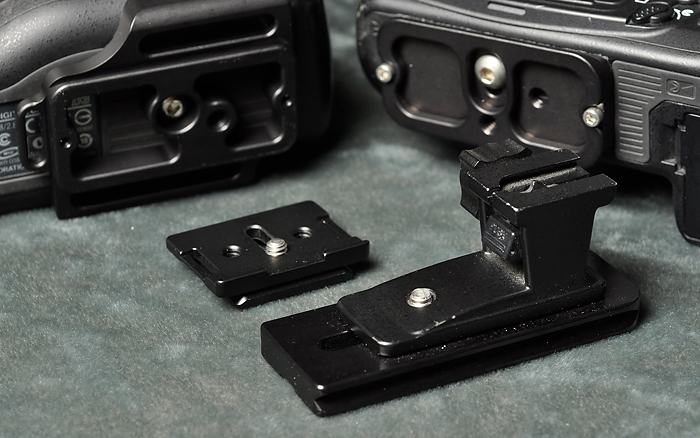
With the Arca Swiss system, you’ll need plates to mount the camera to the tripod. My favorite small all-purpose Arca Swiss plate is the P700U by Markins. It can mount on most of my cameras, from point-and-shoot through big DSLRs, and has a pair of flanges that keep the mount from twisting once it’s on the camera. But, of course, I have some other plates as well, larger ones that are designed for specific models of cameras. Plus two L-brackets, for my Nikon Z 6 and Z 6 II cameras, that allows me to mount the camera either vertically or horizontally and keep the center of the camera over the ballhead. Finally, if you have any long lenses, you’ll discover you can buy replacement “feet” that fit an Arca Swiss system and are also threaded to take a monopod.
MONOPODS
Monopods are great when you don’t need a tripod, but could really benefit from some extra stabilization of the camera, or when using a heavy lens. I have both metal and carbon fiber monopods. It was hard justifying the extra expense for the carbon fiber, but the lighter weight is nice, and they don’t get as cold. The two CF models I have are a small Slik Pro Pod 382CF, and a larger Velbon Neo Pod 7.
FILTERS
In all my years as a newspaper photographer, the only filters I ever owned were a few cheap, clear ones to protect the front element in case of rain. Now I own everything from polarizers to grads and ND (Neutral Density) filters. And most of these filters are fairly expensive. Putting a cheap filter on a good lens is like smearing Vaseline on your glasses. But most of the time I don’t use filters. My philosophy is that if I’m using high quality lenses, I’m being careful with them (lens caps on when not shooting), so only use filters when there’s a real need.
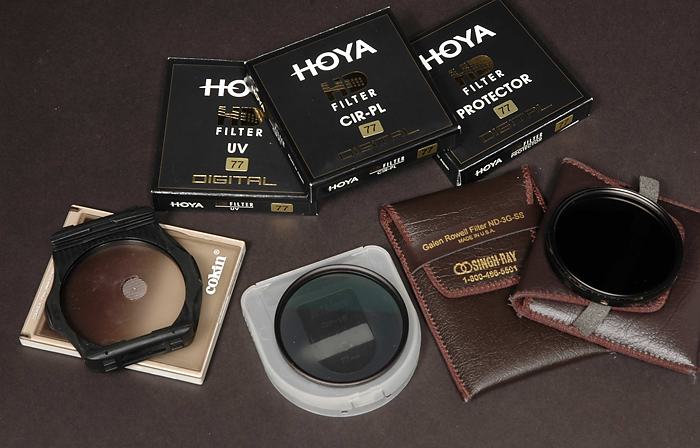
First, I have a few good “Protective” filters. These are made by Hoya, their HD line, and Nikon, and are only used when I’m going to be in bad conditions – like sand and seawater – where I’m worried about stuff hitting the front element of my lenses.
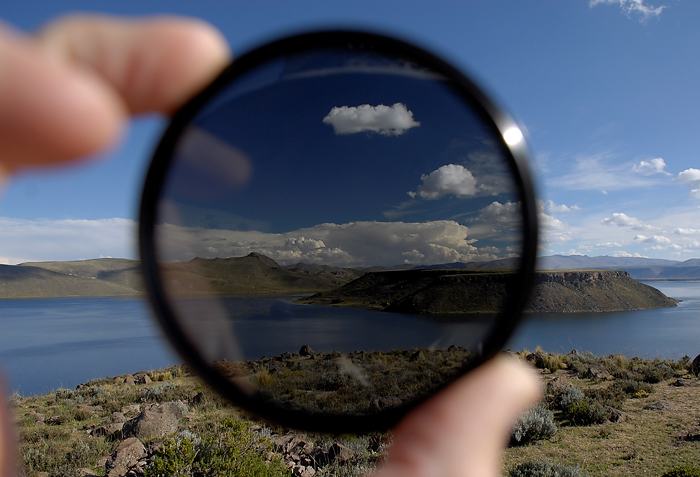
Then I own a couple of very good Polarizers. A “thin” Nikon and a Hoya HD. I rarely use Polarizers to darken a blue sky. True, they’ll do that, but mostly when the sun is to your left or right (90-degrees to the subject), and I can do that in software. The true advantage of a polarizing filter is that they can reduce, or even remove, glare and reflections. The secret is your angle to the surface. At 30-degrees, you can pretty much remove reflections entirely. These filters can be downright amazing for shooting through glass or water, or bringing out the true color in plants with waxy surfaces.
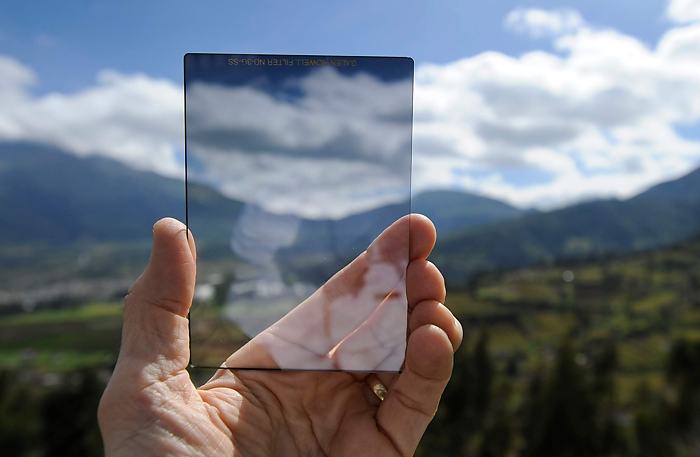
Neutral Density (ND) Filters – Simply stated, these are dark gray filters. They reduce the amount of light coming through the lens without changing the color, allowing you to shoot at slower shutter speeds. They commonly range from -2 to -4 stops in density, though you can find them up to -12. I have three of those, an 8, 10 and 12-stop. I also sometimes use a Singh Ray Variable ND, which lets me dial in density up to -8 stops. You don’t want to know how much it cost, though there are less expensive versions available now.
Graduated Neutral Density Filters – Often called “grads,” these are filters that go from dark gray at one edge to light gray at the other. You use them to reduce overly bright areas in a scene, such as a bright sky with a darker foreground. Whether we think about it this way or not, we use them to manage the dynamic range of light in a scene. Most commonly they’re used to darken a sky that’s too bright, though you can also use them to darken from a corner, side or even the bottom of the frame. They come in “hard” and “soft” models. “Hard’ means that the transition from dark to light is sudden. “Soft,” of course, does that in a much more gradual way. I used to carry a couple of Cokin P 121 series grads, a three-stop soft and a two-stop hard. But I was pretty rough on them, usually just holding them right up against the lens (with the hood off) to make my picture. That meant I tended to scratch them up, and replace them every year or two. That’s recently gotten me to spend more money to buy a glass grad, so I won’t scratch it as easily. I bought a Formatt one, three-stop soft, and have been pleased with it.
My final words on filters are good news for anyone who has lenses with different filter-ring sizes. Mine range from 62mm to 68mm to 82mm, and I sure don’t want to buy three of every filter. Which is why I’m a big fan of step-up rings. Costing only about $10-$20, they allow you to use larger-diameter filters on smaller lenses. That means you can spend your money on a few good filters, and use them on almost all of your lenses for a fraction of the cost of buying additional filters. I own step-up rings that go from 62mm to 82mm, which let me use my 82mm filters on all of my smaller lenses.
LIGHT MODIFIERS
If you take light seriously, then you realize there’s more to it than just looking for nice light. Part of that is taking control of light, and there are tools that can help you do that. The most common are umbrellas, soft boxes, reflectors and diffusers.
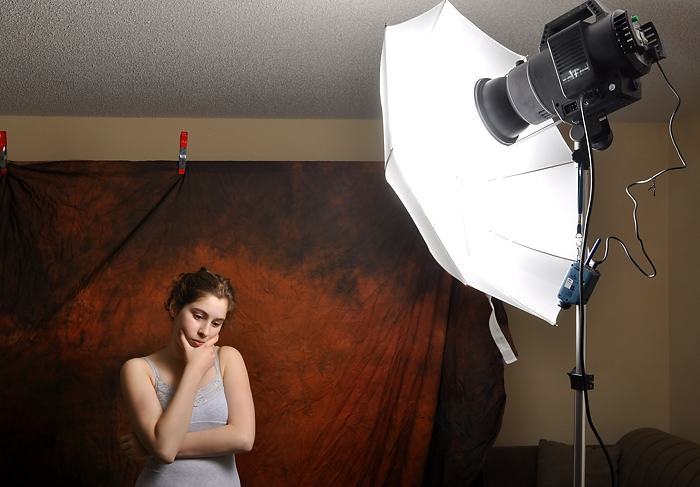
Umbrellas – The point of an umbrella is to make a small light source large. You can bounce the light out of an umbrella, or shoot through it (it the material is translucent). The closer you get the umbrella to your subject, the softer the light will be. That’s because the closer you get the light, the larger it is in relation to the subject. Larger umbrellas are thus softer light sources, but you have to balance size against how much space they’ll take up when opened. Mine range in size from 32 to 51-inches in diameter. The downside to umbrellas is that it’s hard to control the light – it just spreads out in all directions in front of the umbrella. Don’t forget you’ll need light stand(s) and a bracket to attach the strobe to the stand and umbrella.

Soft Boxes – A soft box also makes a small light source larger, and thus softer. But its advantage over an umbrella is that you have more control over where the light goes. You can aim the front of the soft box to direct the light, and turn it to feather it off your subject. Again, larger soft boxes give you a larger soft light source, but can become unwieldy. My small soft box is 24” X 16” and made by Photoflex. My portable medium one is a 30” X 30” Foursquare by Lightware, and my large is again by Photoflex and about 48” X 36.”
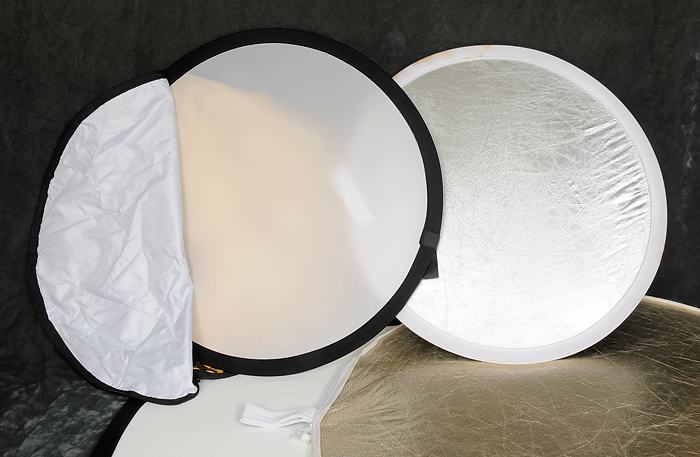
Reflectors – These are one of my favorite tools because they’re inexpensive, easy to use, and a constant light source (as opposed to a strobe). It’s easy to show someone how to hold a reflector for you, because they can see when the light’s being reflected onto your subject. If your subject’s in shade or backlit on a sunny day, a reflector can add a beautiful “kiss” of light. In my opinion, the best reflectors are those that have removable covers, so you can change them from soft white to silver to gold or a combination thereof. Again, large are better, but they still need to be manageable. Something around 36-inches in size is a good one to start with.
Diffusers block light from your subject, softening and diffusing it, and my favorites are simply reflectors that have removable covers (see above). With the covers removed they’re usually just translucent white fabric, and can be held between your subject and the sun to turn the light from hard to soft.
For more on how to work with flash, read this.
That’s about all I have to say about gear. I update this occasionally, and you’ll also find more specific stories on photography gear and how I use it on my blog.