Flash – What You Need to Know
Flash is an amazingly versatile and creative tool for photographers. If you’ve never done more than turn it on and off, you’re missing out on some great opportunities.
I spent over 20 years as a newspaper photographer, and was lucky to start at one with a great staff who happily shared their knowledge (the Evansville, IN, Sunday Courier and Press). The rule there was available light – you only used flash as a last resort. Which meant I didn’t use flash, and that was good. It forced me find ways to be creative with the available light, no matter how bad it was
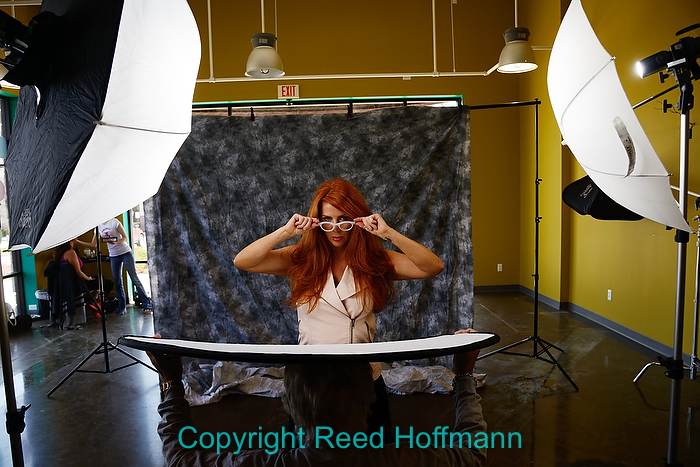
One of the first flash shoots I was proud of, I used a 30-ft sync cord to mount one flash in the end of this glass mixing tank to show it being inspected. Photo copyright Reed Hoffmann.
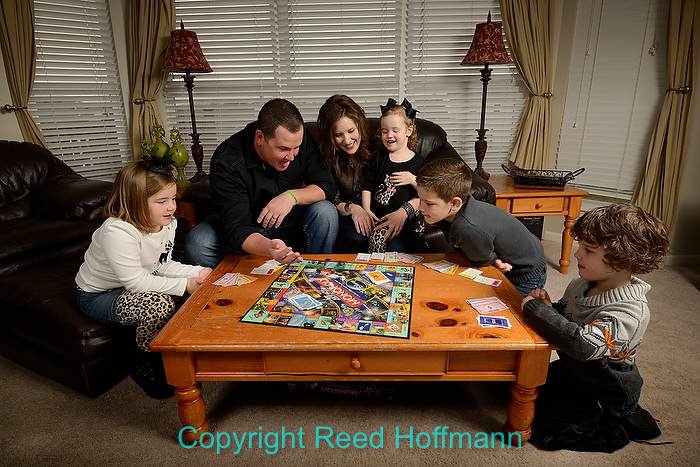
By the time I got to my third paper, in Rochester, New York (The Democrat and Chronicle), the rule there was you had to use flash regularly, but off-camera. One reason for that was the long winters, which meant we were inside a lot. And flash, when used properly, can help you make better, more powerful images.
Learning to use artificial light is challenging, and even more so back then. With film, you couldn’t look at the back of the camera to see what was happening. You crossed your fingers, shot, and prayed that when you processed the film, you had the picture. But my boss had a plan for helping young photographers learn how to use artificial light. It was painful, but effective. For the first six months I had to carry around a heavy case with hot lights. I can’t tell you how many times I had subjects sweating from the heat those created, and I blew a few fuses too. But I did learn. Using constant light sources taught me how to place light, because I could see exactly what it was doing. After he felt I understood that, he allowed me to start using flash.
What I learned from that, and all the years since, was that if you want to be successful with flash, there are certain key things you need to understand. I’ll explain those, beginning with the qualities of light you can take advantage of when using flash. And it’s important to know that when I talk about light sources, I’m talking about the last place light was before it strikes the subject (which might be the ceiling, a wall, an umbrella or softbox).
Direction – This is the easy one. Just like available light, when possible, you want to avoid light coming from the same place as the camera. That’s called front light, and is usually boring and flat. Light coming from the side (sidelight) adds shadows, which help define shape and texture and add a feeling of three-dimensionality to the picture. Backlight, while more difficult to work with, can help separate your subject from the background. So the rule of thumb is to get that flash off the camera. In the old days we did that with wires, but thankfully not any more. Now we can accomplish the same thing with radio remotes or IR systems (like Nikon’s Creative Lighting System, which I discuss below).
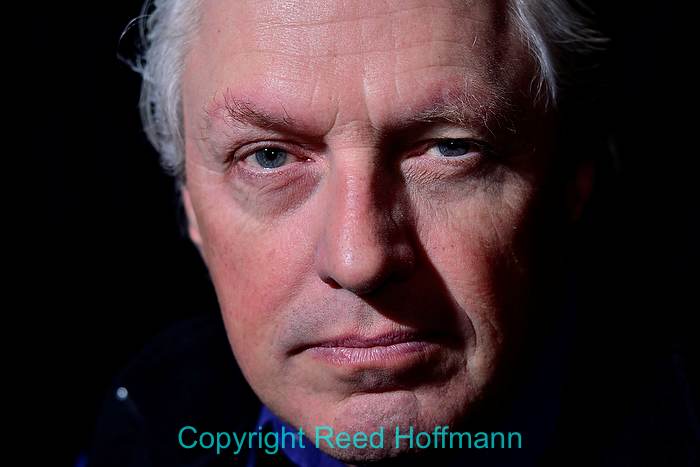
Front light is flat light, and pretty boring. It’s also a direction we’re not used to seeing light come from. Photo copyright Reed Hoffmann.
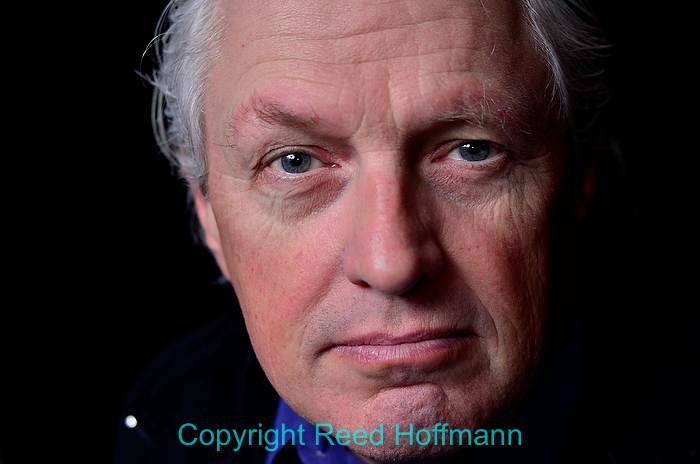
Sidelight, on the other hand, looks more natural, and the shadows it creates add a sense of depth to the photo and help define the subject’s shape. Photo copyright Reed Hoffmann.
Size – Here’s where things get really interesting, and can be confusing for beginners. The size of the light source, relative to the subject, determines whether that light will be “hard” or “soft.”
Hard light sources are small light sources. A small light source is a point of light, which results in hard-edged shadows. This is exactly what you see on a sunny day. While the sun may be huge, because of its distance from us, it’s a small, point light source. That’s why we see hard-edged shadows when out in the sun. Flash units are all small light sources, which means that without some modification (like an umbrella or softbox), they create hard light. You generally don’t want hard light when photographing people because of its harshness. However, as with most rules in photography, there are always times where breaking those rules pays off with a good picture.
Soft light sources are large light sources. If you’re outdoors on a cloudy day, those clouds are a soft light source because of their size (and distance, see below). And because of that size, the light essentially wraps around the subject. Thanks to that, the shadows it creates are soft, if visible at all. Soft light is generally considered the best light for photographing people. Of course, no flash units are big enough on their own to be large light sources (even large flash tubes are relatively small), so photographers modify the light from flashes, bouncing it into ceilings or off walls, or using softboxes and umbrellas to turn those small light sources into large ones.
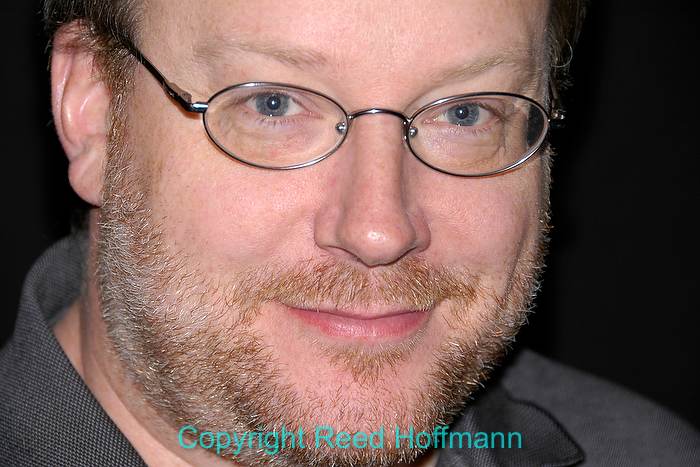
Notice how hard-edged the shadow from Bob’s nose is when lit with a single bare flash, which is a small light source.
Photo copyright Reed Hoffmann.
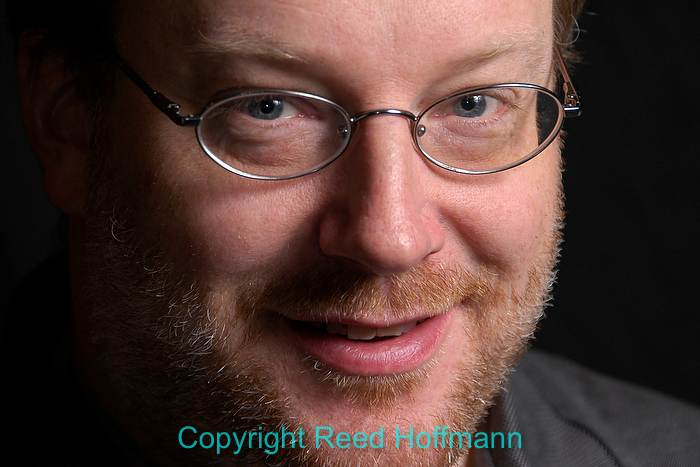
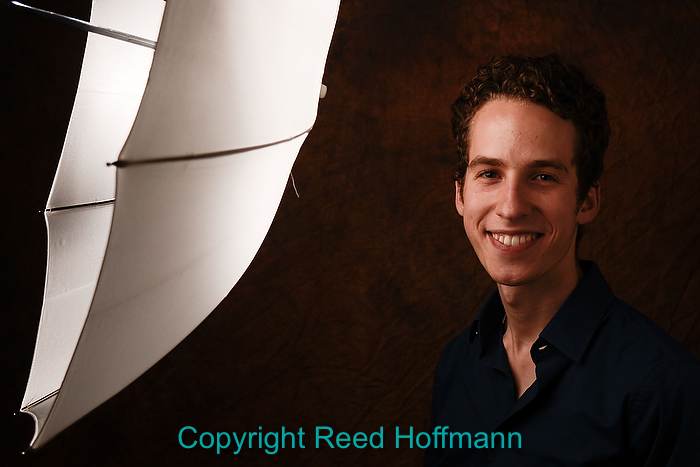
Now with that same single flash bounced out of an umbrella, it’s a larger light source, and thus softer, creating a softer-edged shadow. Photo copyright Reed Hoffmann.
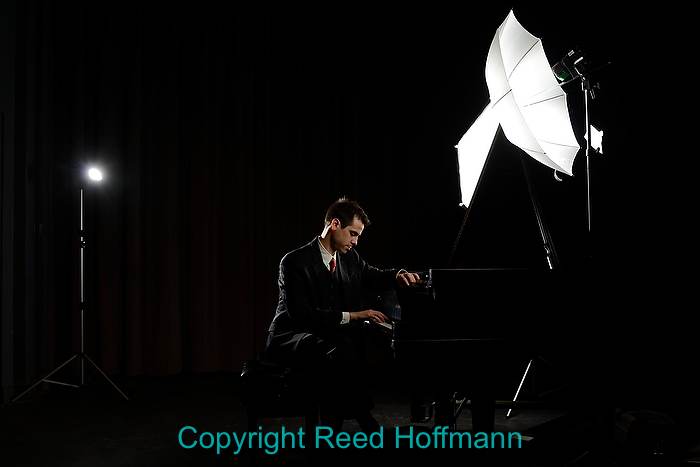
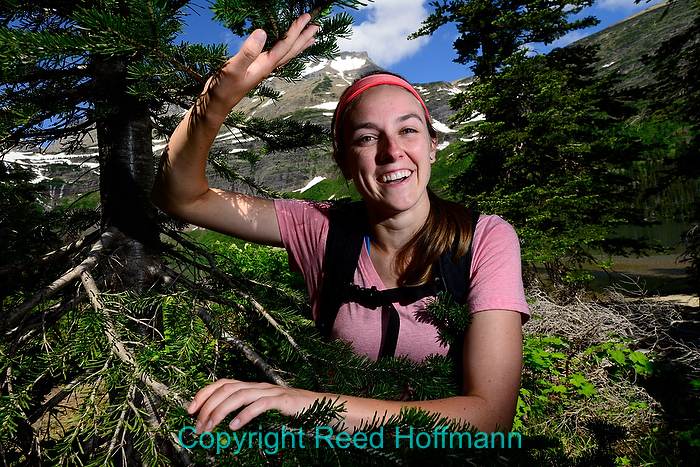
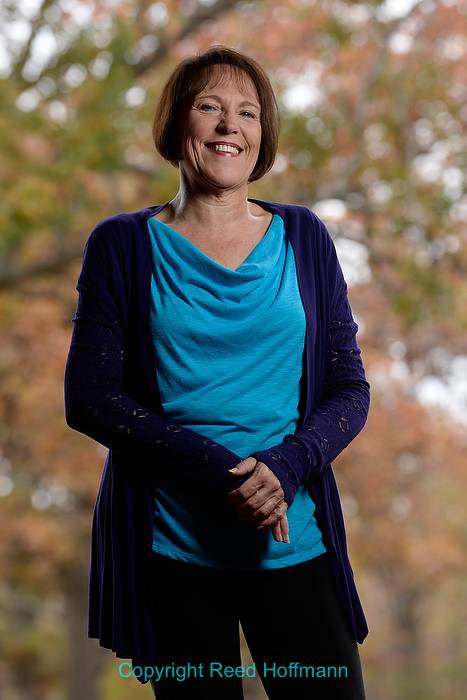
Using a relatively powerful Nikon SB-910, I can make the light on the subject the dominant light source in this photo. ISO 62, 1/800 at f/7.1. Photo copyright Reed Hoffmann.
Power – The power of a flash is important to us in two ways. First, it controls what we can do with exposure. A powerful flash can let us use flash from further away, whether indoors or as fill flash outdoors on a sunny day. And with enough power we can even set our exposure to make the flash the primary light source (stronger that the sun), instead of the secondary (what we do with fill flash). Finally, a more powerful flash will recycle faster, which is important if you’re trying to shoot photos in quick succession.
Distance to Subject – As you now know, distance to subject can affect the size of the light source relative to the subject. But more importantly is what that distance does with exposure. This is something called “the inverse square law,” and determines what happens with exposure in the areas in front and behind your subject. Simply stated, that means the closer the light to your subject, the more shallow the area of good exposure. If you place your subject ten feet in front of a wall, putting the flash close means that its exposure will fall off very quickly behind the subject. You can even take a white wall and make it black doing that, if you set your camera correctly (see “Exposure,” below). And the “inverse” part of this equation means that with that same subject at that same distance from the wall, by simply moving the flash further away from them, you can have an exposure that also shows that white wall. Again, same subject to background distance, same subject to photographer distance, all that’s changing is the distance of the light to the subject. Here’s one example of how this works in practice. Let’s say you’re photographing a large group and need to use flash. Most people would think that to do that, you’d want to get the flash as close to the group as possible. But actually, if you want an even exposure across the group, side-to-side, front-to-back, the opposite is true. You actually want your flash as far from the group as possible. That will give you the mos

In these two photos of Nick, I’m using the same exposure (ISO 100, f/5 at 1/200 second), and the background’s the same distance from him. But obviously, they look different. Photo copyright Reed Hoffmann.

What changed in these two shots is the distance of the light to Nick. Closer, in this photo, the background becomes darker. Further away, as in the left photo, more light reaches the background. Photo copyright Reed Hoffmann.
Color – All light has color, and flashes are light. Most manufacturers tune their flash units to produce light that’s essentially the same color as daylight. That’s handy when using flash in daylight conditions (outdoors, or indoors where the main light source is daylight). In those cases you can simply leave your camera at the Daylight or Flash white balance settings (they’re very close together color-wise).
However, when you start using flash in a place that is primarily lit by artificial light, you may run into color-cast issues. Let’s say you’re in a fluorescent-lit room, and want to add flash. In that case you’ll be working with two light sources that produce two different colors of light. There are a couple of ways of dealing with that. The easiest is to turn off the fluorescent lights or not use flash. Either of those will leave you with only one light source, and you can set your white balance accordingly. But if you want to take advantage of the available light, for instance to let it illuminate the background, then you need to change the color temperature (white balance) of one of those light sources. The simplest way to do that is by using a color correction filter (or gel) on the front of your flash. Sometimes they come bundled with the flash, but if not, you’ll need to buy some. The most common are green and orange. The green is used when in standard fluorescent light, to change the color output of the flash to be approximately the same as those fluorescent lights. The orange one is for use under incandescent light, doing the same thing. In those cases you’d then set your camera’s white balance to either Fluorescent or Incandescent. Unfortunately, over the last decade, lighting companies have started making their bulbs in a wide variety of color temperatures, so you may have to experiment with different densities of filters or white balance settings to find a good match. And you may even find yourself under lights that produce daylight color temperatures, in which case your life has just been made much simpler.
The orange color cast in this photo is because I have the camera set to Flash white balance, but the lights in the restaurant are in the incandescent range. Mixing color temperatures like this can create problems. Photo copyright Reed Hoffmann.
By putting an incandescent (orange) filter in front of my flash, and then setting the camera to its “Incandescent” white balance setting, all the light now has an orange cast, but is corrected to white by that white balance setting. Photo copyright Reed Hoffmann.
EXPOSURE
To be creative controlling flash, it’s usually easier to use your camera in the Manual exposure mode. When using fill flash (see below), you can leave the camera on an automatic setting because you’re just reducing the power of the flash. The rest of the time, though, you’ll probably want to control aperture and shutter speed separately. The reason for that is because you’re working with more than one light source. That means not only are there multiple light sources, but more importantly, one is short duration (flash) and the other is constant (available light). It’s that
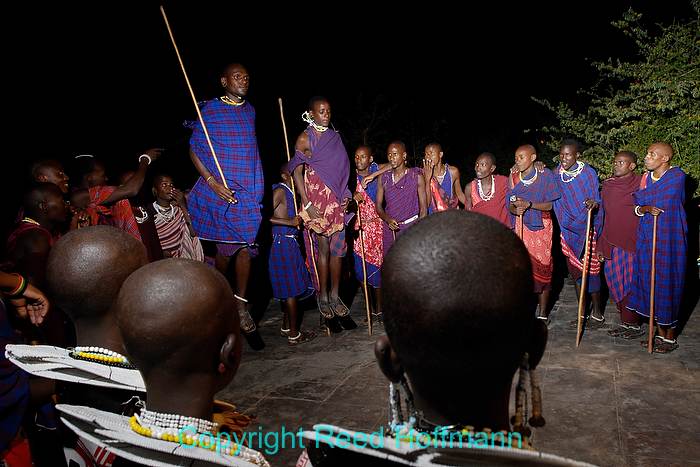
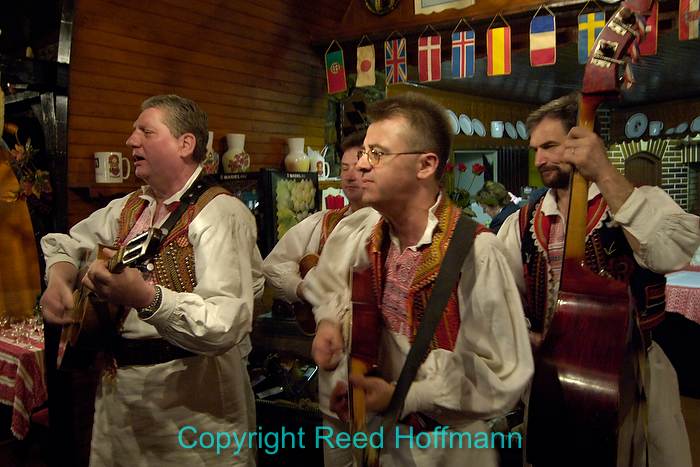
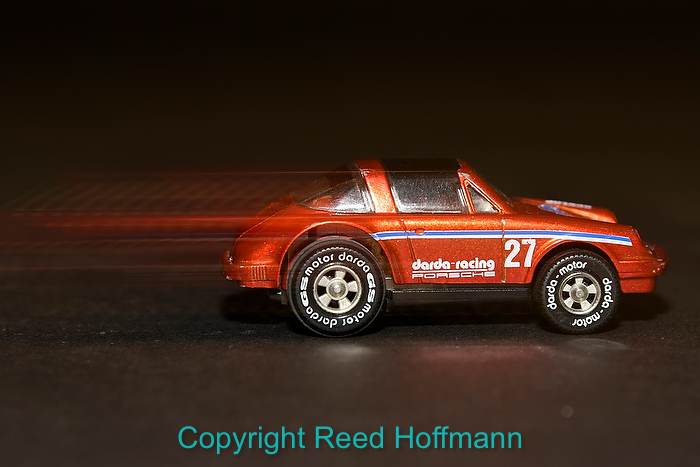
This photo was shot at 1/10 second. So how are the Maasai warriors frozen in mid-air? The answer is flash. The available light is too dim to record anything (at least at ISO 400 and f/7.1), so it’s the short pulse of flash that’s freezing the action. One speedlight is in my hand stretched out to the left, the other being held by someone else off to the right side. Photo copyright Reed Hoffmann.
Since flash is a brief burst of light (usually around 1/1000 second or faster), the shutter plays a very basic role in exposure. It simply needs to be open when the flash fires. If you’re in a completely dark room and using flash, you could set the shutter speed at five seconds or 1/200 second and get the same exposure, because the flash is providing the only light. However, if there’s light in that room aside from the flash, then the difference between five-seconds and 1/200 second will make a big difference in the look of the picture. That’s because the longer exposure will pick up more available light. So most professional photographers who use flash think of shutter speed as controlling the exposure of the background. And there’s an added benefit to this as well. Even if that results in a fairly slow shutter speed, if your subject’s moving, and the flash is the primary light source for that subject, the flash will “freeze” your subject despite the rest of the scene showing motion blur. Again, that’s due to the extremely short duration of flash. So with flash, shutter speed is primarily about controlling how the background appears in a photo. Aperture, though, is different.
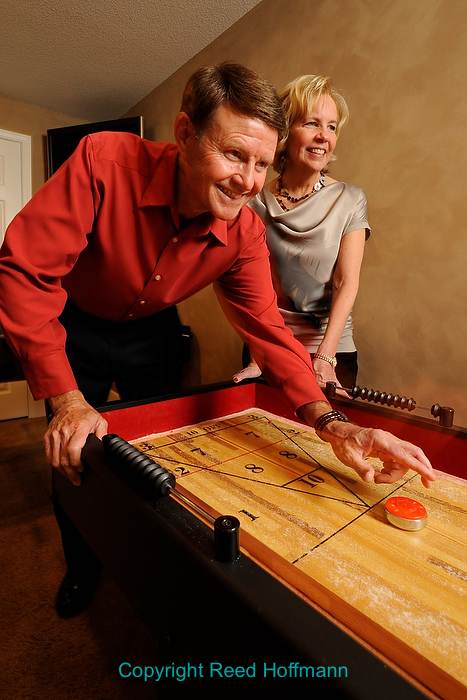
Again, the action of the puck being pushed down the table isn’t stopped by the 1/4 second shutter speed, but by the short pulse of the flash. All I had to do was set the exposure I wanted – ISO 400, 1/4 second at f/14 – and i-TTL did the rest. Photo copyright Reed Hoffmann.
The size of the aperture controls how much light comes through the lens. That’s true whether that light is constant or short-duration (flash). Thanks to that, you can think of aperture as being the exposure control that most directly impacts flash exposure. In that same scenario in the darkened room, changing the shutter speed had no effect on the final exposure. Changing the aperture absolutely would, because it would mean an increase or reduction in the amount of light allowed in from the flash.
In the old days of flash exposure, you set your aperture based on the ASA (now ISO) of the film and distance to subject. It made using flash hard work involving a lot of guessing (or measuring). Automatic flash simplified things, but demanded that you stay at a set aperture. Today most camera systems use a form of TTL (Nikon calls it i-TTL, “Intelligent”), which is “Through The Lens” flash exposure control. The flash emits a brief “pre-flash” of light first, which bounces off the subject and back into the lens, where a sensor reads its quantity. The camera can then calculate how much light is needed for the actual exposure, based on that information as well as ISO, aperture and distance to subject, and fires the proper amount of light for the final exposure. All of this happens so fast that unless you’re at a very low shutter speed and using rear-curtain flash, you never see that pre-flash.
What this means is that you can now set any aperture you like, and as long as the flash has enough power, you’ll get a good exposure, automatically. This is why professional photographers tend to shoot in Manual exposure mode when using flash. They set aperture for the effect they want with the subject, then adjust shutter speed to make the background look the way they want it.
For this portrait of a guide, I first set the exposure based on how I wanted the background to look. That was ISO 160, 1/320 at f/11.Photo copyright Reed Hoffmann.
Then I simply turn on the flash and let Nikon’s i-TTL system determine the proper amount of light to add for a good exposure. Couldn’t be easier. Photo copyright Reed Hoffmann.
This is how I “build” my flash pictures. I start by setting the overall exposure for how I want the background to look (often a bit dark), then add flash to the subject. Of course, that only works up to the camera’s maximum flash sync shutter speed unless the camera offers a “high-speed sync” option.
If I set a shutter speed above my camera’s sync speed, like here at 1/500, the first curtain will be blocking part of the sensor when the flash fires. Photo copyright Reed Hoffmann.
All cameras have somethiing called “Sync” speed, which is the fastest shutter speed they can use with flash. That’s because there are two shutter curtains, and at some point as you’re raising shutter speed, that second curtain starts to block the sensor (or film). The speed before that occurs is generally between 1/160 and 1/250 second. However, because flash is a very brief burst of light, there’s a relatively new feature that some cameras let you take advantage of. Commonly referred to as “high-speed sync” (and by Nikon as “Auto FP”), turning this on will let you shoot at higher shutter speeds with some accessory flashes (but not the built-in flash). This is accomplished by pulsing the flash so fast that it paints the subject with light during the exposure. The
With “Auto FP” turned on in my Nikon D750, I can shoot at 1/1600 second with flash, to use a fairly wide aperture (F/5.6) to defocus the background and make it a bit dark. Photo copyright Reed Hoffmann.
upside is that you can shoot at very high shutter speeds. The downside is that since the camera is pulsing the light, it won’t have the power it could with a single burst. That means there are times where you might want to use this feature, but your distance to subject is too far, or aperture is too small, to provide a good exposure. You can often overcome this by moving the flash closer, opening the aperture or raising the ISO. With Nikon cameras, the “Auto” part of this means that when you drop your shutter speed back to sync speed or below, the flash stops pulsing, and that means you can now get a single, full-power burst.
Finally, most cameras offer different flash sync modes. The default is usually called “Front Curtain,” because the flash fires as soon as the first shutter curtain (the “front” one) clears the sensor. By default, that setting usually prevents the shutter from firing below 1/60 second to help avoid getting blurry pictures (from camera movement). This applies when shooting in Auto, Program or Aperture Priority exposure modes. In Manual or Shutter Priority, you can always set the shutter at whatever speed you like, although you may choose a speed that won’t work with flash or give the result you want.
“Slow Sync” removes that shutter speed barrier, which helps make more natural-looking pictures by including background exposure, at the risk of blur. And “Rear Sync,” my personal favorite, both removes that shutter restraint (shutter can go as low as needed) but also fires the flash at the last possible moment, before the second, or “Rear” curtain starts to cover the sensor. By doing that, the flash will freeze the subject at the last possible moment of exposure, meaning that any subject blur will be behind the subject’s movement, which looks more natural.
With front curtain sync, if your subject is moving and there’s enough ambient light to show blur, that blur will show in front of the action. Photo copyright Reed Hoffmann.
With rear-curtain sync, in that same situation, the blur now appears behind the action, which looks much more natural. Photo copyright Reed Hoffmann.
CONTROLLING FLASH OFF-CAMERA
In the old days photographers could fire flash(es) away from the camera by connecting to them physically (with wires) or using light-sensitive accessories called “slaves.” Today you can buy radio remotes or use built-in systems like Nikon’s Creative Lighting System (CLS). With wires, old-fashioned slave or most radio remotes, you have to set the power of the flash manually. With systems like Nikon’s CLS, you’re able to do that from the camera.
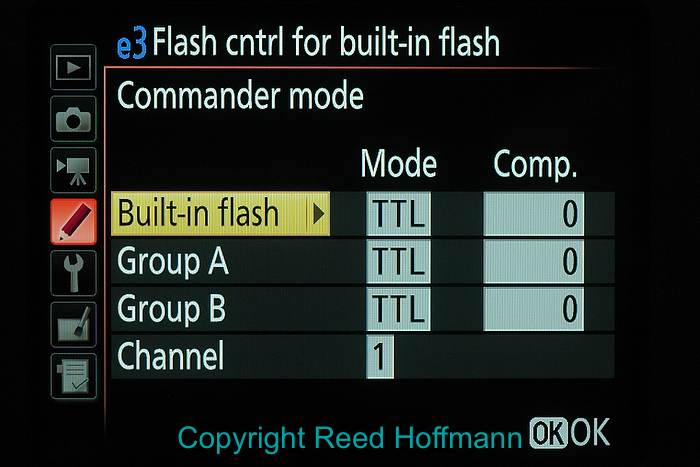
This is the Commander mode menu in one of my Nikon cameras. Notice that the Built-in flash is set to TTL right now, but you can turn that off in the menu, as well as individually controlling two separate groups of remote-capable Nikon Speedlights. Photo copyright Reed Hoffmann.
Most of the Nikon cameras I use have CLS built in, which lets me take advantage of something called “Commander Mode” from the camera. Through the menus I can tell the built-in flash to be a “Commander” for certain off-camera Nikon flashes, adjusting both how they work and the power they use. Not only can I control those flashes, but I can also control that built-in flash separately, dialing down its power or turning it off completely so there’s no light coming from the camera. This is a little confusing when you first use it, because that built-in flash fires whether you have it turned On or Off. The system communicates using infrared pulses, and the built-in flash fires to create those whether it’s contributing light to the exposure or not. So while you’ve turned it off in the menus, you’ll still see it firing, but it’s actually shutting down when the shutter opens. Give it a try and you’ll understand what I’m talking about.
If you have one of those Nikon cameras with CLS built in, then you can control up to two different sets (“Groups”) of Nikon speedlights separately. They’re listed as Group A or Group B, and by putting the Nikon Speedlight into “Remote” mode, and setting it to the same group, you can now control flash mode (TTL, AA, Manual or Off) and power (plus or minus compensation) from the camera.
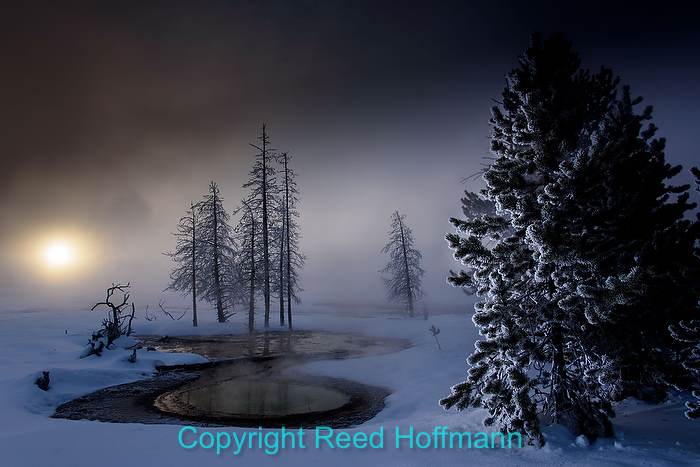
I made this photo at sunrise during a Yellowstone workshop I was teaching. A Nikon SB-500 is placed on the boardwalk at far left aimed to light up the frost-covered tree to the right. Then I let the built-in flash on my Nikon D750 trigger it. ISO 200, f/10 at 1/60. Photo copyright Reed Hoffmann.
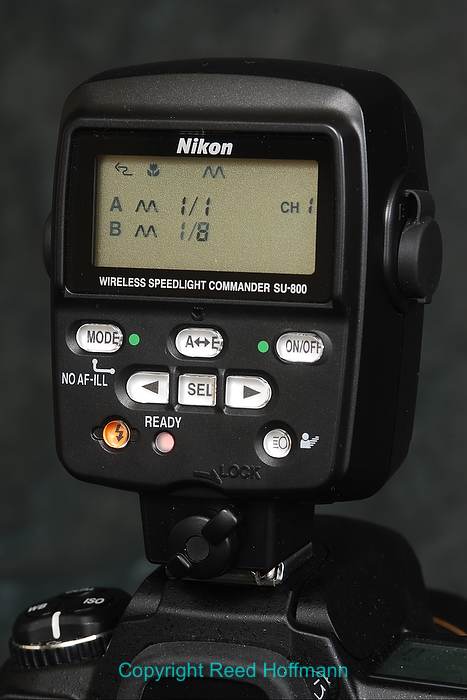
If you don’t have a Nikon camera that has Commander capability, you can still use CLS, but you’ll need a Commander unit on the camera. That can be one of several Nikon Speedlights (SB-500, 700, 800, 900, 910 and 5000 at this time) or the SU-800 controller. Those all have the ability to control up to three sets of flashes (instead of two, as the built-in does), and the SU-800 puts out a stronger and wider signal than the speedlights.
Your content goes here. Edit or remove this text inline or in the module Content settings. You can also style every aspect of this content in the module Design settings and even apply custom CSS to this text in the module Advanced settings.
Since this system uses infrared light to communicate, it’s limited by distance and objects can block the signal. Make sure you position the speedlights so the small round window on the side for receiving the signal is pointed toward the Commander unit. For triggering flashes further away, or behind or inside structures, you’ll want to use radio remotes. As of this writing, Nikon has four cameras that can use radio signals to control Nikon flashes. Those are the D5, D500, D7500 and D850. You’ll need wiehter the WR-R1- and/or the WR-A10, and right now this only works with the SB-5000. That same Speedlight SB-5000 can also be controlled by the infrared pulse of the previous generation CLS systems.
It’s also worth mentioning that connecting by wire is still an option. While you may not want to string sync cable everywhere, a TTL cord is an easy way to get the flash away from the camera (either held off to the side in your hand, or on a stand) and still maintain communications with the camera. And that cord (SC-28 or SC-29) can be used on any of Nikon’s digital SLRs, whether they have a pop-up flash or not.
LIGHT MODIFIERS
Once you understand the importance of the size of light, then you’ll realize that you’re pretty limited simply using the strobe as is. That’s where flash modifiers come in, as most of them are designed to change the size of the light source (the flash).

Since domes do little to change the size of the flash head, they don’t do much to soften the light. But they do spread it over a wider area, important if you’re using a super-wide lens. Photo copyright Reed Hoffmann.
Flash Domes – Some flashes come with a small plastic dome that fits over the head of the flash. Its purpose is to spread the light over a wider area, and reduces the output. These are designed to be used with especially wide-angle lenses, where the normal flash output would fall off at the edges. But since they’re no larger (or just slightly larger) than the flash head itself, they don’t really change the size of the light and so remain small light sources, and thus produce hard light. Some domes are larger than others, but remember, unless they change the size of the flash head to make it significantly larger, they won’t soften the light much.
Bounce – A simple way to improve the quality of light when indoors is to bounce the light off the ceiling. This changes your light source from a small, hard light to a large, soft light source. However, if the person is close, has a heavy brow or is wearing a hat with a brim, that light coming down from above can result in heavy shadows in the eye sockets. That’s what a bounce card is designed to counter. They bounce a bit of light straight out from the card and into the subject’s face, to soften those shadows. Remember, though, if the ceiling is too high or dark, all you’re getting is the light off the bounce card, which by itself is a small, hard light source. Some of Nikon’s speedlights have a built-in bounce card, which despite its small size can do a nice job.

The available light in the room is adequate, but unfortunately, her face is mostly in shadow. Direct flash, though, would have traded one problem for another. Photo copyright Reed Hoffmann.

Bouncing the flash off the ceiling, though, fills in the shadows somewhat while keeping the scene looking natural. Photo copyright Reed Hoffmann.
Reflectors/Diffusers – Most people probably think of reflectors and diffusers as tools to use with available light. Of course, they can also be used with flash, in the same way. Placed to the side or under a subject, they can bounce light in to fill in shadows. And just as a diffuser can be placed between the sun and your subject to turn that small, hard light source into a large, soft one, that same diffuser can be placed between a flash and your subject to do the same thing.
Using this reflector, at bottom, makes sure that some of the light coming from left and right is also bounced up into the face from below. Photo copyright Reed Hoffmann.
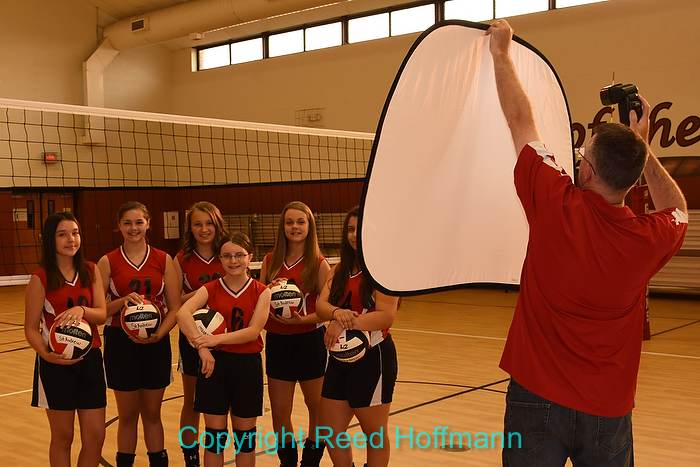
In this case, using a simple diffusion panel to shoot the flash through…Photo copyright Reed Hoffmann.
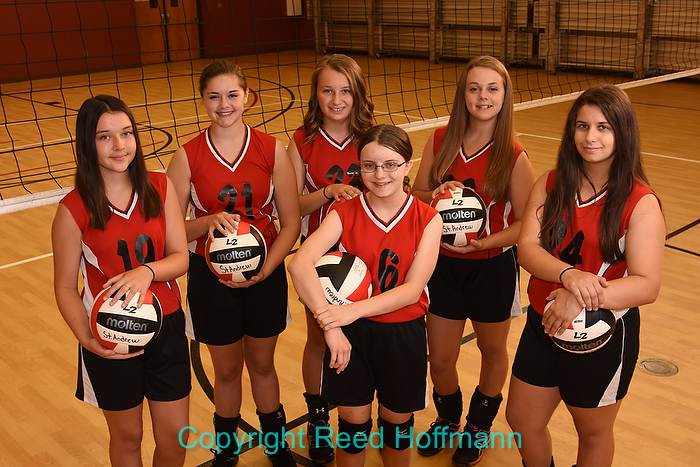
Results in soft, even light across the entire volleyball team. Photo copyright Reed Hoffmann.
You can bounce light out of an umbrella, or if the fabric is thin enough, shoot it through, to create soft light. Photo copyright Reed Hoffmann.
Umbrellas – The least expensive way to really change the size of a flash and make the light directional is to use an umbrella. You can get an umbrella, light stand and bracket (to connect them) for under $100. Of course, the larger the umbrella, the larger, and thus softer, the light. The closer you put it to your subject, the larger it is in relation to them, which will also result in softer light. Some umbrellas are designed so that you can shoot through them (white, with thin fabric), and that’s because when you reverse the umbrella like that you can put it still closer to your subject. As we all know by now, getting it closer results in it being softer.
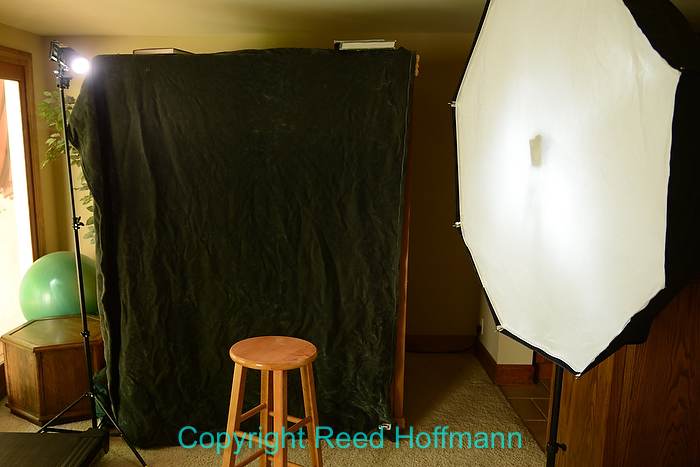
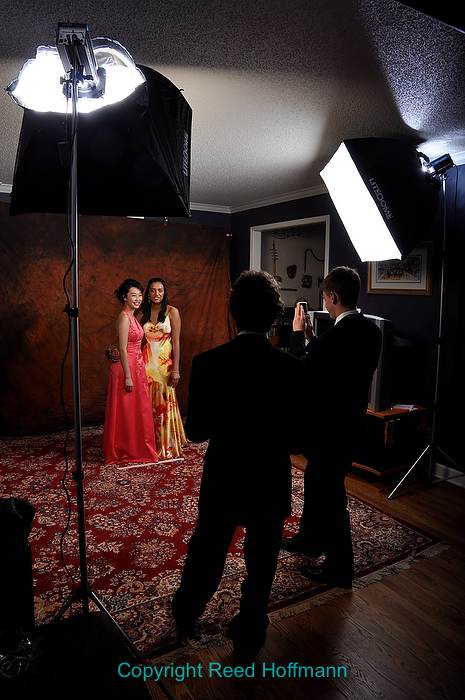
Softboxes – Like umbrellas, softboxes make a small light large (and thus softer), and they come in various sizes. Because there’s more to them, they’re also more expensive. You can get them in different shapes, from square to rectangle to round. One important consideration is the amount of diffusion, and where the flash is pointing. If the strobe is pointed towards the front of the soft box, then it’s better if there are at least two layers of diffusion between it and the subject. That will help spread the light more widely across the front of the soft box to create that larger, softer light (at a reduction in intensity). Some soft boxes point the flash into the back of the box, and have a reflective coating inside to maximize the amount of light being bounced back out through the front. They tend to do the best job of creating a large light source without a hot spot in the center.

Even a simple, small softbox, when placed close to the subject, can create soft light.
Photo copyright Reed Hoffmann.
This is a classic technique in lighting – place your subject in the shade, then light them. Photo copyright Reed Hoffmann.
Snoots, Grids, Flags and more – There are a lot of small flash accessories that can make a big difference. Snoots are any device that lets you create a narrower beam of light, like a spotlight. They’re often fabric with Velcro, and attach to the head of the flash. Grids are similar to snoots in that they’re designed to help you more carefully direct where the light goes. There are big ones that can be added to softboxes and small ones that mount to the front of a flash. Flags are any device that blocks light from going somewhere. They can be as simple as a piece of cardboard rubber-banded to the head of a flash. ExpoImaging and HonlPhoto make a lot of accessories like these at very reasonable prices.
By using two snoots on two speedlights, I ‘m able to create two shafts of light. Photo copyright Reed Hoffmann.
Now all I have to do is raise the shutter speed to make the strobes the only light that shows. Photo copyright Reed Hoffmann.
Simply adding a colored gel to a background light can make a picture more interesting. Photo copyright Reed Hoffmann.
Filters or Gels – I already discussed the use of filters or gels to change the speedlight’s color temperature to match artificial light. But you can also use them to add color, or change color in a scene. I carry a bunch of gels in various colors to help what otherwise might be a boring scene. They can also be added to create drama, introducing color to a portrait. One simple way to warm up a scene is by using a light orange gel with the camera set to Daylight (or Flash) white balance. Some photographers regularly use ¼ CTO (a lighter incandescent gel) on the front of their lights to add warmth to skin when shooting portraits.
USING FLASH
One Flash
On camera – While we try to avoid on-camera flash as much as possible, there are times where it actually works well, and other times where you don’t have much choice. One of those ways is as a fill light. Think of the flash as a secondary light source, so it should be less powerful and merely fill in shadows created by the main light source (often the sun). Achieving that almost always means powering it down some, and how much is very subjective. I usually start at -.7 (2/3-stop less) to -1 (one full-stop less) and see how that looks. Again, the light from the flash should simply lighten the shadows, not eliminate them. If you do that, you’re using the flash as the primary light, and the direction (from the camera) will make the light flat and boring.

Harsh shadows from above thanks to mid-day sun. Photo copyright Reed Hoffmann.
Shadows softened by adding a bit of flash. Photo copyright Reed Hoffmann.
Bounce – The other effective way to use flash on camera is to bounce it off a ceiling or wall. Those surfaces need to be fairly neutral in color or you’ll get strange color casts from them, and close enough so the light still has enough strength when it reaches the subject. I usually describe bounce flash as simply “boosting” the available light, because it has a very natural look. And since you’re turning that wall or ceiling into your light source, it’s both softer (because of the change in size) and comes from above (which helps it look more natural).
Direct flash, with it’s usual flat light, and background going dark, looks anything but natural. Photo copyright Reed Hoffmann.

Bouncing the flash off the ceiling, the light looks natural and adds to the background.Photo copyright Reed Hoffmann.
Off-camera – Better yet is to get the flash away from the camera. If your subject is within ten feet, even holding the flash at arms-length in your left hand will be far enough to be directional. You’ll be surprised how good a picture can result from that simple technique. And, as I said above, you can trigger it with either Commander mode (on certain Nikon cameras) or a cable that maintains exposure control (usually called a “TTL” cable). Adding a small soft box to the front of the flash can increase its size a bit, which helps too. But to get the best look with off-camera flash, you want to get it further than arms length away. Using a wireless remote, or something like Commander mode (Nikon), you can move that flash much further away. And don’t forget that you’ll sometimes want to make that light larger. At that point you can really start getting creative because you’re not only changing the direction of the light, but with an umbrella or soft box, the size as well.
Simply holding the flash out arms-length to the right side provides enough direction to create interesting light. Photo copyright Reed Hoffmann.
Whether you’re using a single flash on-camera or off, always remember that the available light is another light source. It can provide background illumination, or if strong (like the sun), can actually be the dominant source with your flash playing a secondary role. That’s one reason you can accomplish a lot with just one speedlight.
Multiple Flash
This is where I made a common mistake in my early years, and many people do the same. I thought that the more lights I used, the better the picture would be. Which is simply not true. It’s the quality, not quantity of light, that matters. Lots of great flash pictures are made with just one light. But there are also times where one light just won’t do the job. A big part of learning to work with flash is understanding how to get the right amount of light that’s necessary.
However, using more than one flash can get complicated quickly. That’s why you want to start slow and build up.
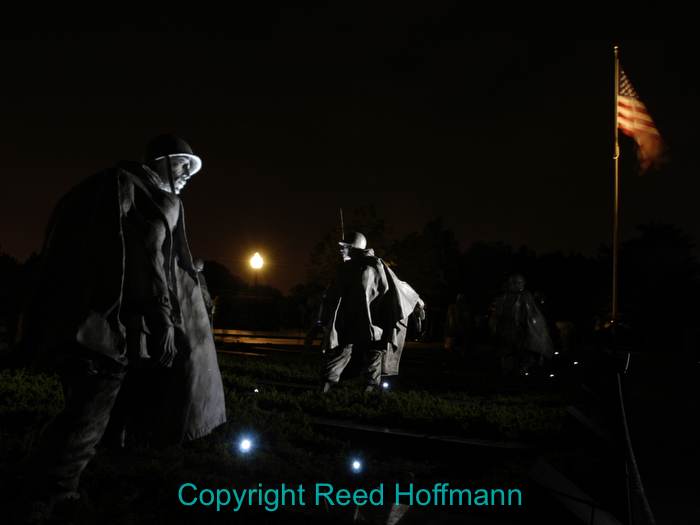
Remember, it’s not the number of flashes you use, but how you use them. This photo of the Korean War Memorial was shot with just one speedlight off to the far right side. ISO 200, 1/2 second at f/5.6. Photo copyright Reed Hoffmann.
One off-camera flash and the pop-up flash – As discussed earlier, the pop-up flash on many Nikon cameras can control some of Nikon’s speedlights off-camera (and some other camera makers have similar capabilities). If you have that type of system, then you have to remember that you have two flashes available to you. While the pop-up flash’s main job is to communicate with and control the off-camera flash, you can also have it contribute to the exposure. In that case you want to think of your off-camera flash as the main light, like the sun, and the pop-up flash as a fill light. You can do that by turning the pop-up flash’s power down, which will fill in some shadows and also create catchlights in a person’s eyes.
Two off-camera flashes – There’s a lot you can do with two flashes because now you’ve got two light sources that you control. In these cases, we normally set the pop-up flash so it’s not contributing light during the exposure, just controlling the off-camera lights.
A simple way to light a room when you have to move around and shoot in different areas is to put both lights on opposite sides or corners of the room (usually on stands). Point them into the ceiling (bounce), and you’ll create two large, soft light sources (as long as the ceiling isn’t too far away, or black). As you move around, that light will be stronger or weaker in different part of your photos, but still have a natural overhead-light look. Plus, the far one will add light to the background area, helping preserve the feel of the scene. This is great for parties, wedding receptions or any time where you need to light and work in a large area.
Simple setup, one light on the left side, one on the right. Photo copyright Reed Hoffmann.
A variation on that is to use one flash on-camera (which could be the pop-up flash, in this case contributing light), and have another person carry the second flash, perhaps on top of a monopod. Have them try to stay off to the side and slightly behind the people you’re shooting, with the flash held high and directed at the people. You can try dialing down the power of the on-camera light a bit too. That back/side light keeps the photos from looking front lit, and helps separate subjects from backgrounds.
For portraits, some photographers “cross” the two lights, putting one off to the side in front of the subject and the other on the opposite side, slightly behind the subject. You can think of it as the two lights being connected by a straight line that passes through the subject. The light that’s providing frontal illumination can be used unmodified for a harder, more dramatic look, or with a softbox or umbrella for softer light. The flash on the other side is most often used as a hard light source, to create an edge of light on that side of the subject, which again helps separate them from the background. Sometimes you’ll need to add a snoot or grid to that light to more carefully control where the beam of light goes.
Classic two light portrait setup. Soft (large umbrella with diffusion cover) light source at right, hard (small) light source left and behind. Photo copyright Reed Hoffmann.
The result of that arrangement is soft light across the face and a hard light helping separate the subject from the background. Photo copyright Reed Hoffmann.
A variation on this is to have the second light behind the subject pointed at the background. You can then adjust its power for how much you want to see the background, or how large a spot of light you want on the background (if the background is solid). Or you can put the light high, above and behind them, pointed down at their head. That creates a hairlight. But be careful with this one. It’s easy for that light to show every stray hair that’s sticking out. Both of these scenarios also create a feeling of separation between subject and background.
For classic portrait lighting, try one light about 30-degrees to the right or left of your subject in an umbrella or softbox, and the second above and behind you, also using an umbrella or softbox. The light behind you should have its power dialed down, because it’s job is to provide fill light for main light to the side.
Another classic arrangement, one light above the camera to left, the second off to the right. Photo copyright Reed Hoffmann.
The result is nearly even light, with just a bit more power coming from the right side. Photo copyright Reed Hoffmann.

Finally, three lights in use. One in a softbox to light the subject, one shooting through the louvers to create shadow lines, and a third to light up the company logo on the wall. Photo copyright Reed Hoffmann.