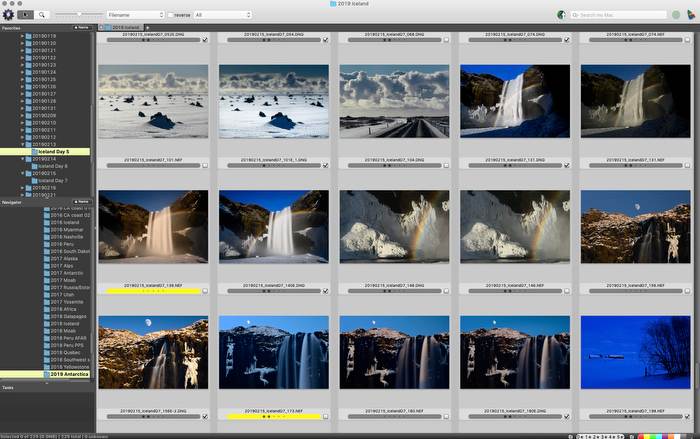
Photo Mechanic, which I describe as the “hub” of my digital workflow. A traditional browser, I simply point it at a folder on my computer and it shows me the photos inside. All of my pictures are downloaded, sorted and organized from within it. If I want to edit a photo, I simply launch that image into the editor from within Photo Mechanic.
I started shooting digital full time in 1996. Photo Mechanic (by Camerabits) was the first serious, and relatively fast program for downloading/renaming/sorting digital images. I started using it in the first year or two, and still do today. After a few years of working in digital, I settled on a file naming protocol and folder structure that would prevent naming conflicts and make sense long term. Both of those rely heavily on the date the images were shot. Files are renamed by date, a single word or group of letters/numbers and sequential number. So on the recent Iceland workshop I led, a picture shot on February 11 could have the name, “20190211_IcelandD3_084.” That means it was taken on February 11, 2019, during the third day of the Iceland trip, and was the 84th image I kept from that day. It would also reside in a folder with the name “20190211.” Using the year first, then month and day means the names sort chronologically. For both folders and files. Photo Mechanic automates the renaming and folder creation for me during the download process. This system of file and folder names is what I’ve been using for everything I’ve shot the last twenty years, from workshops to assignments to family photos, and I expect to use it until I die. But what I do with the photos after I’ve shot them, well, that’s changed several times over the years.
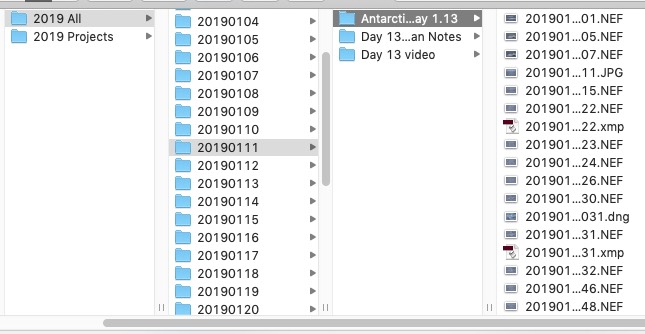
Here’s my folder organization, which I find extremely easy to work with. Note that the date shot is key to both file and folder names, and prevents a new image in the future having the same name.
In the early days of digital working for a newspaper, we’d edit our photos in Photoshop and save the finished images as JPEGs. As I learned more about getting the best quality out of digital, I started working in Layers in Photoshop and saving the important photos as PSDs (Photoshop Documents). That had the advantage of keeping those edit layers intact so I could re-work the files later (a Layered TIFF works that way as well). The disadvantage was that those PSD files grew in size dramatically, easily by factors of 10X, 20X or more. Then along came an update to Nikon’s own edit software, Capture NX.
All camera manufacturers whose cameras can create and save RAW files also offer free software to open those files. If you’ve ever bought a just-released camera and wanted to shoot RAW right away, you’d need to use their software to open them. Within a few months, companies like Adobe would release an update to their software that would also allow opening those RAW files. In 2006 Nikon partnered with Nik software to develop a different, more powerful and now fee-based version of Nikon’s RAW edit software called Nikon Capture NX. It was groundbreaking because it allowed you to edit a RAW file using “Control Points” instead of Layers (easier and faster), and keep those edits stored inside the RAW file. That offered many advantages, one of which was keeping the original file size nearly the same. It was also one of the first editing programs that allowed for “metadata” edits, meaning the edits were stored as text data, not pixels, so file sizes didn’t balloon. Today, most edit packages do metadata edits by default, to prevent you from overwriting an original file.
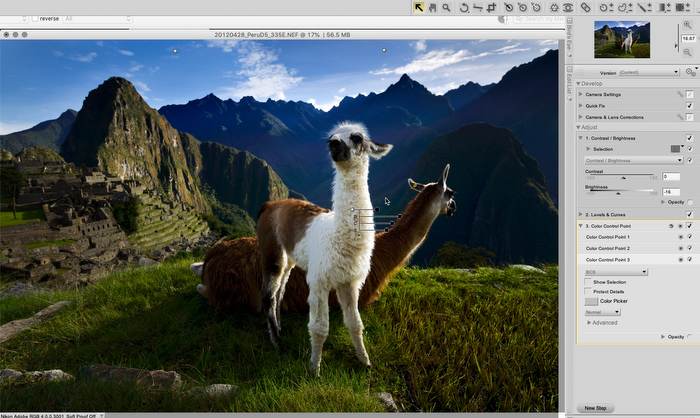
Capture NX was in incredibly easy and powerful editor for Nikon NEF (RAW) shooters. Unfortunately, support for it ended in 2014.
Once I started using Capture NX, I stopped using Photoshop except for the occasional picture that needed something more than NX could do (like adding text or compositing). However, nothing great lasts forever, and after Nik was purchased by Google in 2012, it looked like the end was near for Capture NX. In 2014 the licensing deal between Nik and Nikon apparently expired, and Nikon released Capture NX-D. While it was free, the Control Points, and thus the tremendous edit power they offered, was gone. You could continue to use the NX version, but it wouldn’t support RAW files from new cameras (starting with the D810). It was tempting to open RAW files from new cameras with that software, save as TIFF and then continue using Capture NX. But that would be a clunky workflow. It was time to say goodbye to NX and move on.
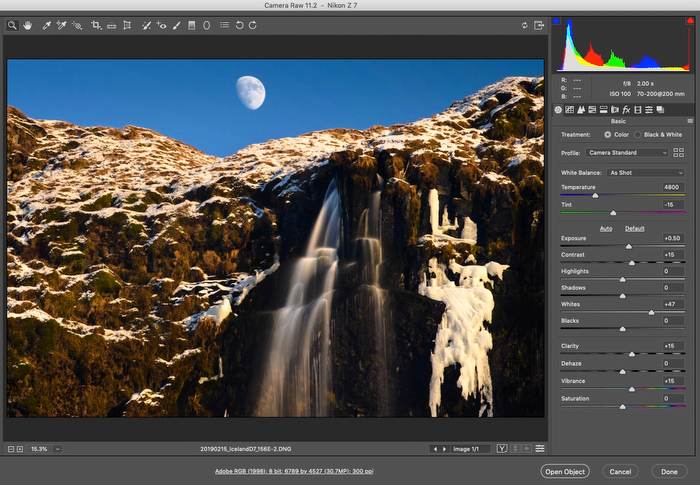
At the same time, Adobe had been continuing to improve their RAW edit engine, referred to as ACR (Adobe Camera Raw), making it better and more powerful. The same engine in both Lightroom and Photoshop, it was reaching the point where, with the Adjustment Brush and its Auto Masking feature, it could be a powerful editor on its own. And that’s where I went. I now do 99% of my editing of images in Adobe Camera Raw in Photoshop. I set its preferences so that any file I launch from Photo Mechanic (JPEG, TIFF or RAW) opens into ACR. I do my edits there, then save that work out as a DNG (Digital Negative format) right back into the folder where the original, either a RAW or JPEG file, resides. Like the files created by NX, that DNG keeps its edits intact inside the file. That means the next time I open the image, even if I’ve moved it, I can continue editing where I left off or change an existing edit step.
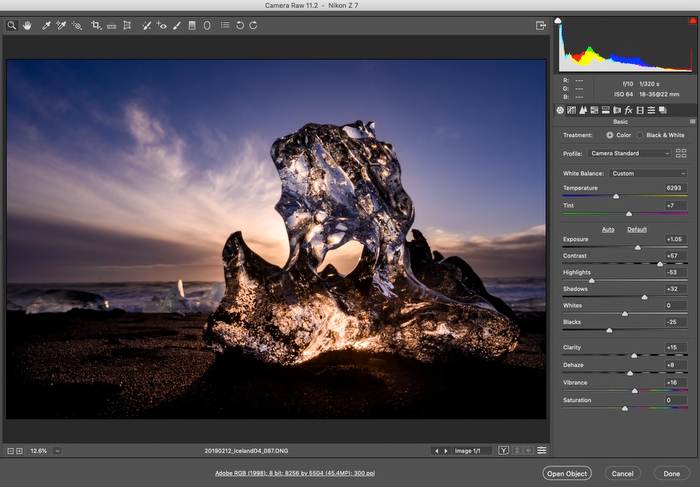
My editor of choice today is Adobe Camera Raw, which is part of Photoshop. Its tools have gotten so sophisticated and powerful that I’m normally able to do all my editing within it, not needing to use the main Photoshop program.
I’m sure many of you have noticed I’ve hardly mentioned Adobe Lightroom at all. Photo Mechanic and Adobe Camera Raw (inside Photoshop), do what I need 99% of the time. For those times where I need to edit a lot of photos quickly, I’ll import the group into Lightroom and do that there, and have LR save those edits out as DNGs. So why not use Lightroom all the time? Two reasons. First, Photo Mechanic is much faster at browsing images than Lightroom. And two, if I do all my work in Lightroom, then I’m essentially committing to paying Adobe a monthly fee for the rest of my life.
Obviously, I already pay a monthly subscription to Adobe for the use of PS and LR. But by doing most of my metadata and all of my organization through Photo Mechanic, I’m free to take that information to any other program at any other time (because it’s not part of a catalog). And by saving my edits as DNG files with the metadata embedded (instead of inside a Lightroom catalog), I’m also free to take those DNG edits with me to another program that can read them. Remember, Adobe created the DNG format and then published it for any other developer to use. Which means I’m not locked into Adobe. Some other photographers feel the same way, and have developed similar workflows for the same reason (like this one I posted about a while back). Don’t get me wrong – I think Lightroom is a powerful program, and right for people who understand what they’re buying into and willing to take the time to learn it. For me, though, it’s not the right tool. Of course, that could change. Because if I’ve learned anything in my years in digital photography, nothing is forever. Change is a fact of life. And I’m sure in the years to come, my workflow will continue to evolve. And that’s a good thing, as long as that evolution means a better workflow.
If you like this story, please share it with your friends and let them know about the links on photography that I post on my business Facebook page. I’m also on Instagram and Twitter, @reedhoffmann. And if you’re curious about the workshops I teach, you can find them here.

