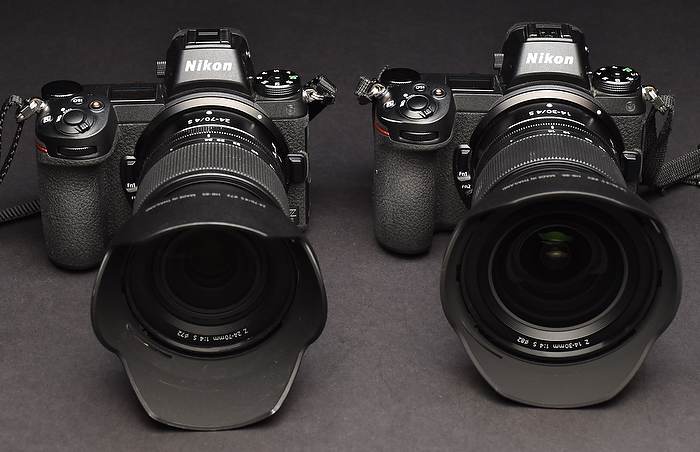
I’ve been using Nikon’s Z 7 and Z 6 cameras for over a year now, and for the most part have been very happy with them. Here’s why, and the camera settings I’ve used that work best for me. (if you want to see images, most of what I’ve posted to Instagram the past year is from those two cameras)
The first thing anyone notices when they get these cameras in their hands is that the electronic viewfinder is bright and crisp, and accurate. Actually seeing what your image will look like before pressing the shutter button becomes a game-changer. I spend much less time reviewing images afterwards to check exposure ,and have a higher confidence I’ve gotten the frame I want when I press the shutter button.
Since neither camera was introduced as a “sports” camera, it’s no surprise my only real quibble with them is with the autofocus. While I find the AF very good in general, I miss the 3D option in Nikon’s mirrored cameras, and the speed isn’t as fast as the top-of-the-line autofocus system shared by Nikon’s D5/850/500 cameras. The “stutter” effect in the viewfinder, when shooting at high frame rates is also a little off-putting, although the more I’ve used the cameras the more I’ve gotten used to it.
So overall, for Nikon’s first serious foray into mirrorless cameras, I’ve been very impressed and can’t wait to see what they release this year. Okay, on with the settings and how I use them.
The the first thing I do with every new camera is adjust the diopter to my eyesight. With that out of the way, here’s what else I’ve done with my Z 7. While these settings are for that camera I use the same for my Z 6 with the exception of the “Image Size” menu. More on that below.
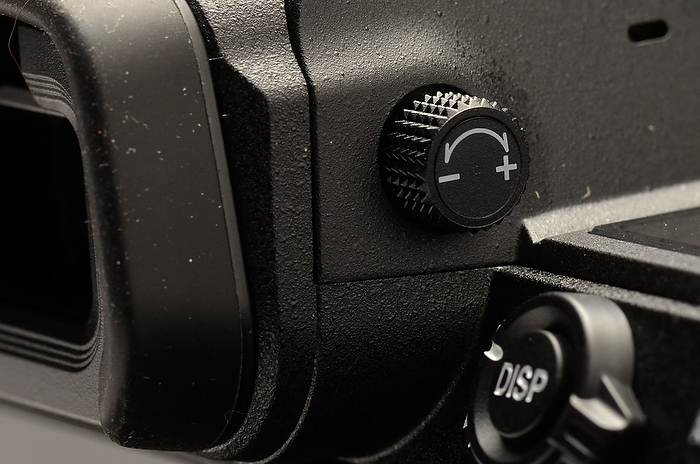
If you don’t take a minute or two to adjust the diopter on your camera, you’ll probably never see how sharp your viewfinder can really be. And I appreciate that Nikon made this dial locking, so it doesn’t get accidentally changed while going in and out of a camera bag.
Display button
This lets you cycle through four different choices in the information you see in the viewfinder. I use two of them a lot. The first shows me a small histogram in the lower right corner of the screen. I love this one. A quick glance shows me how my exposure will be before I take the picture. That, combined with the excellent WYSIWYG (what you see is what you get) of the viewfinder, for color and exposure, mean I get those things right more often when shooting. The other one I use regularly is the virtual horizon indicator. I just wish it was less obtrusive (it’s big and bright and colorful, blocking parts of the center of the scene). In my perfect world, that would be more of a ghost image in the viewfinder, and I’d also be able to have the histogram showing at the same time. Here’s hoping for a firmware update to do that!
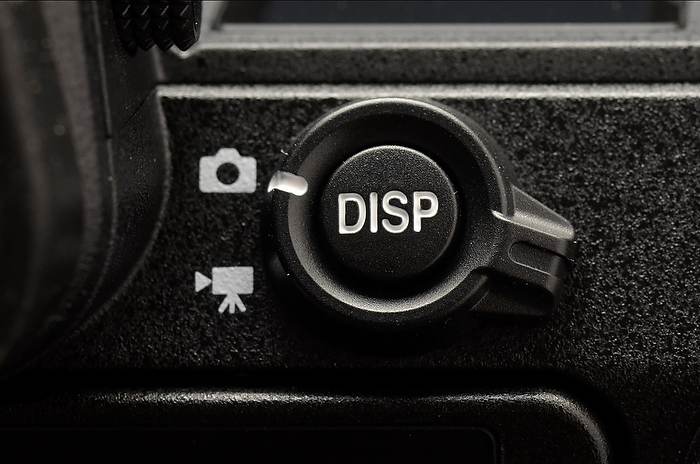
Of the four displays I can cycle through with the Display button, the Histogram and the Virtual Horizon Indicator are the two most useful to me.
i button on the back of camera – this, to me, is one of three buttons I use all the time (the others are the Function 1 and Function 2 buttons on the front). I’ve programmed the twelve slots the “i” button offers me for the primary things I change on a regular basis. Any options I can’t put in there, like Flash Control and Format, are in “My Menu” (listed further down in this story).
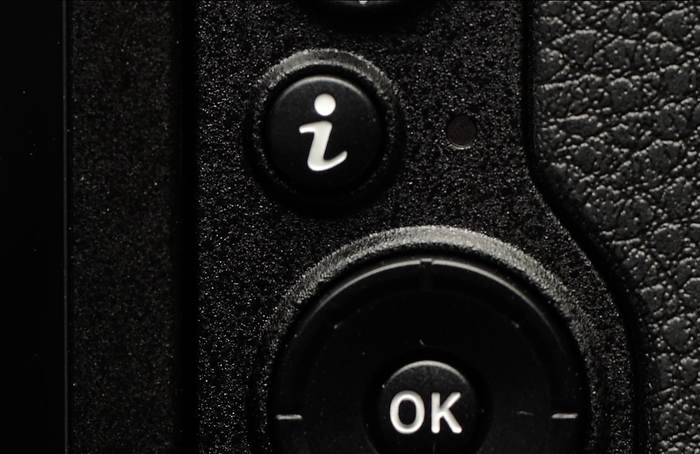
One of my favorite features on the Z cameras is the “i” button, which gives me quick and easy access to twelve of my most used options.
Top Row, L to R
Picture Control
Image Quality
Image Size (I use this a lot with the Z 7, which lets me switch to a DX framing and still have about 20-megapixels of data. I don’t use it much with the Z 6, as then I drop down to about 10-megapixels)
Flash compensation
Vibration reduction
AF-area mode
Bottom Row, L to R
White balance
Choose image area
Multiple exposure
Exposure delay mode
Silent photography
Focus mode
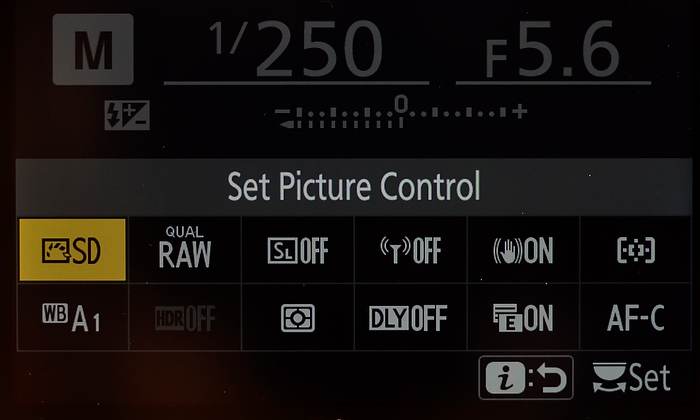
Here’s the display that comes up on the back of the camera when I press the “i” button. Over the last year I’ve changed those twelve options a few times, and list my current favorites above.
Function buttons
Function 1 – Playback – I don’t want the image popping into the viewfinder every time I shoot a picture because it’s distracting and slows me down. However, there are times where I do want to check the image I’ve shot immediately, in the viewfinder without taking the camera down from my eye, and so program F1 to let me do that. And, I find it much easier to review images I’ve captured looking at them inside the viewfinder instead of on the back of the camera. This capability is one of the things I truly love about this EVF camera. In fact, I’ve gotten so used to pressing that button for Playback that I’ve even programmed my mirrored Nikons to do the same, though, of course, I have to look at the rear LCD to see the image on them.
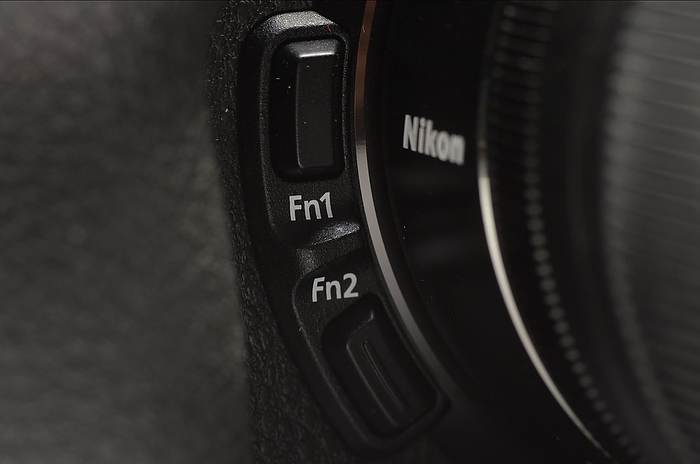
The electronic viewfinder of the Z cameras has changed how I use the Function buttons. Fn1 turns on Playback. That means as soon as I’ve taken a picture, I can press Fn1 with a finger and immediately see that image in the viewfinder. Fn2 brings up My Menu, and the various menu items I’ve loaded into it.
Function 2 – My Menu – Most Nikon cameras give you an option, after the “Retouch” menu, to use either “Recent Settings” or “My Menu.” I’m a huge fan of “My Menu,” as it lets me load up to 20 of my favorite menu choices into one, easy-to-get-to place. That way, even the things I don’t change often (like the self-timer), I can access quickly without having to hunt through the menus. Below you’ll see what those choices are.
PLAYBACK MENU
Playback folder – ALL
Playback display options – This controls what different pages of information I can see when using Image Playback to review an image. “Highlights” is my default screen on the camera, as it flashes any areas that have been overexposed, warning me I might want to change my exposure. The second most used is “RGB histogram,” which gives detailed exposure information, both overexposure and underexposure, of all three color channels. Here are the four pages I set to view on all my Nikons (mirrored or mirrorless):
Focus Point
Highlights
RGB histogram
Overview
Image review – OFF (again, I don’t like having the image pop up every time I shoot)
Rotate tall – OFF (this means I have to turn the camera sideways to view vertical images, but also means they’re larger on the LCD, which is more important to me.
PHOTO SHOOTING MENU
File naming – RAH
NEF (RAW) recording – compression ON, 14-bit
Color space – Adobe (you should use sRGB unless you’re also using color management software and hardware like I am)
Metering – Matrix (I use this probably 99% of the time while in Aperture Priority mode and shift EV – exposure compensation – as necessary to get the exposure I want)
Flash mode – Rear (I prefer having the flash fire at the end of the exposure)
Focus Mode – AF-C
AF-area mode – what I use most are:
Single-point AF – for landscapes and portraits.
Wide-area AF – (s) – most sports, similar to “Group AF” on my mirrored Nikons.
Auto-area AF – if I want to take advantage of Eye Detect.
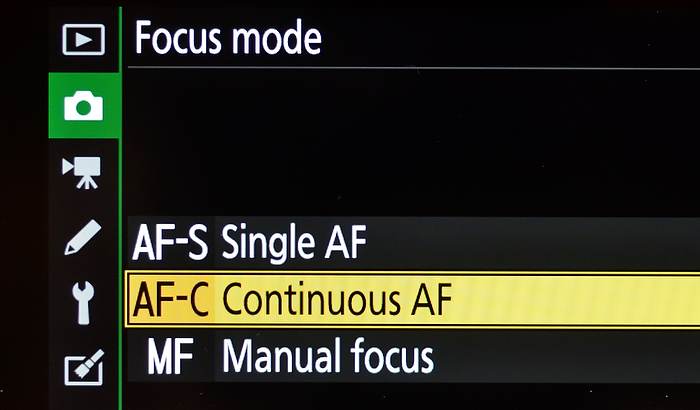
Since I use back-button focus, I simply keep my Focus mode set to AF-C all the time. If I want continuous, tracking autofocus, I keep my thumb pressed down on the AF-ON button. If I’m shooting a non-moving subject, I press to attain focus and then release, essentially locking focus at that distance.
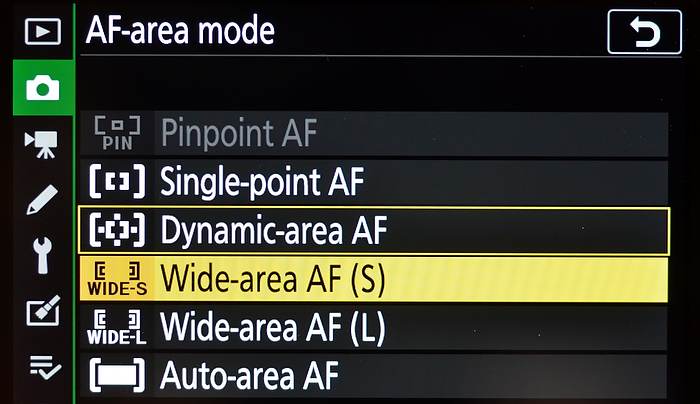
When photographing non-moving subjects (like landscapes), I use Single-point AF. For moving subjects, I use Wide-area AF (S) most of the time.
MOVIE SHOOTING MENU
I’ll probably cover this in another story.
CUSTOM SETTING MENU
a1 and 2 – AF-C and AF-S Priority – Release
a3 – Focus tracking with lock-on – 3 for regular work.
a4 – Auto-area AF face/eye detection – Face and eye detection on.
a7 – AF activation – OFF (I use back-button focus)
a11 – Low-light AF – OFF (this can slow down focus)
a12 – Built-in AF-assist illuminator – OFF
b2 – Easy exposure compensation – ON (this lets me use the Main Command dial to adjust EV while in Aperture Priority mode, which is the exposure mode I primarily work with).
c3 – Power Off delay
Playback – 20s
Menus – 20s
Image review – 20s
Standby timer – 1m
d7 – File number sequence – ON
d8 – Apply settings to live view – ON
d10 – Peaking highlights – Level 2, Red
e1 – Flash sync speed – 1/200s (Auto FP) – this lets me go above the 1/200-second flash sync limit when paired with a flash that can do the same.
e2 – Flash shutter speed – 1/15s (this means that in A or P exposure modes the camera won’t use a shutter speed below this while using flash)
f3 – OK button –
Shooting mode – Zoom on/off – 1:1 (100%)
Playback mode – Zoom on/off – 1:1 (100%) – one of my favorite options, means than when I’m reviewing an image I’ve shot, all I need to do is press the OK button to jump to a 100% view where the active focus sensor was.
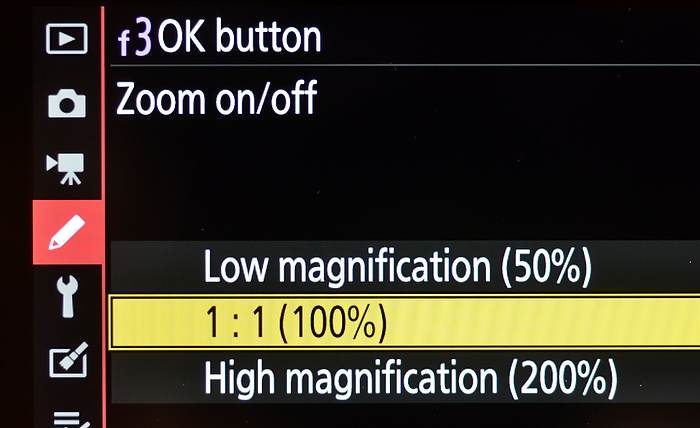
This is a feature Nikon started offering way back in 2007, and since then has included it in most of their mid-to-high end cameras. And when I show it to people, they’re blown away that they didn’t know about it before. Turning this on means that when you’re in Playback and looking at a photo, pressing the OK button will zoom to 100% on the image at the point your active AF sensor was. A very quick and easy way to check focus.
SETUP MENU
Viewfinder brightness – AUTO
Control panel brightness – Manual, 7 (this means I can see the top display clearly even in bright sun. I leave it at that setting unless in dim light or while doing night photography)
Limit monitor mode selection – “Monitor only” and “Prioritize viewfinder” (this means when I cycle the display, these are the only two choices. I keep it on “Monitor only,” which means the viewfinder, unless I’m using the rear LCD to frame a picture, in which case I switch it)
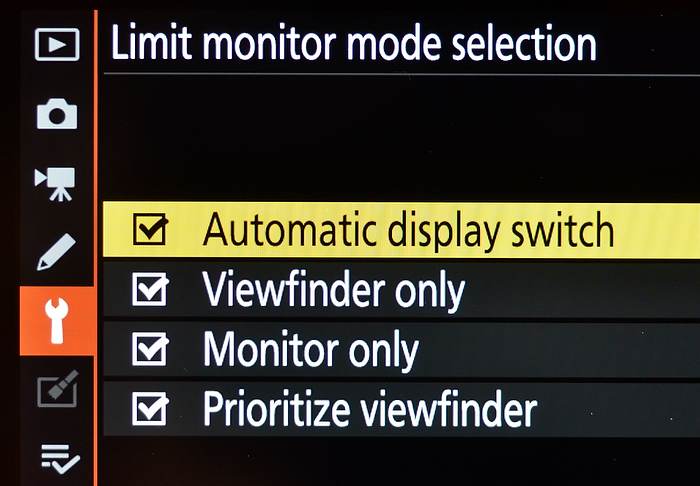
This menu lets you limit the options available when you press the Monitor mode button on the side of the viewfinder. Since “Monitor only” and “Prioritize viewfinder” are the only ones I use, I turn the others off. That lets me quickly cycle between what I use with the camera to my eye (Viewfinder only) and when framing images using the rear LCD (Prioritize viewfinder).
Image Comment – ON (my name)
Copyright information – ON (my copyright)
MY MENU
ISO Sensitivity settings – allows me to quickly adjust my Auto ISO settings.
Battery info
Airplane mode
Time zone and date
Flash control
Format memory card
Metering
Self-timer
AF activation (switch between back-button and shutter button)
Auto-area AF face/eye detection
Focus tracking with lock-on (I shift this based on the sport I’m shooting)
Silent photography (turns off the Mechanical shutter, but also prevents use of flash)
Focus shift shooting
HDR (high dynamic range)
Multiple exposure
Auto bracketing
Vibration reduction
Long exposure NR
Control panel brightness
Apply settings to live view
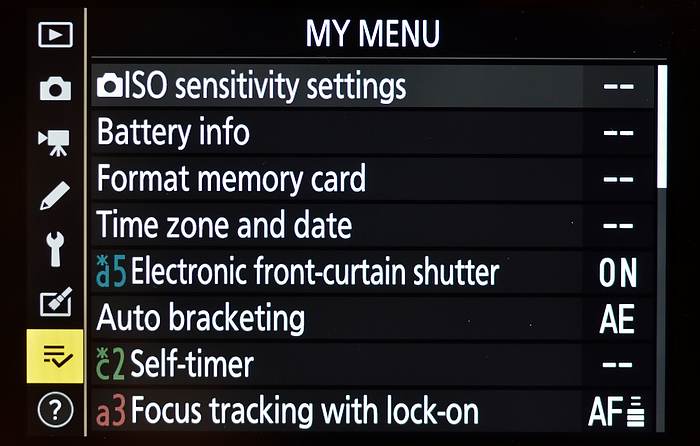
“My Menu” is a feature common to most Nikon cameras, and lets you create a custom set of menu selections and have them all available in one place. I set this up on all of my cameras, and it speeds up finding mens I otherwise would have to waste time looking for.
That’s all, nothing to it, right? As they say, “knowledge is power.” In over twenty years shooting digital cameras, I’ve learned that to get the most out of each new camera, it’s not enough to simply read about what the new buttons and menu options do. More important is to test them, and push each camera to its limits. Truly understanding what each camera is capable of is my goal. If I’m lucky, that will make me a better photographer and teacher. (if you’d like to see an example of this, check out a recent blog post on using high-resolution cameras for sports)
(If you like this story, please share it with your friends and let them know about the links on photography that I post on my business Facebook page. I’m also on Instagram and Twitter, @reedhoffmann. And if you’re curious about the workshops I teach, you can find them here.)
Thanks Reed, did your settings change with the release of firmware updates? I would think that the changes to 2.20 and the AF upgrades it could effect how the Z’s are set up.
Hi Louis. The settings I list in my post are with the current firmware. However, I think they would still apply to the earlier firmware as well, since the update didn’t change any menus, just upgraded some of hte features.
Very well done!
Coming from you, Bob, I take that as a great compliment. Looking forward to getting my hands on a Z50. I see you’ve been shooting one a lot.
Thanks Reed…great summary!