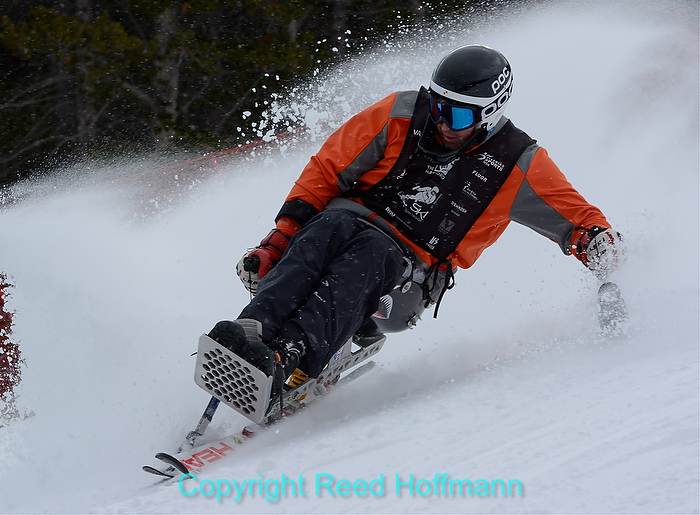
Seven years ago, thanks to a generous grant from Microsoft, I began a project to help Disabled Sports USA build a photo and video library from their events. DSUSA is an organization that helps disabled people become active in sports and is run by a great team of people. In time that grant ran out, but I continued working with them on a volunteer basis. Because of that, I’ve been in Breckenridge, CO the first week of December for the last six years. That’s because they run a huge event there, The Hartford Ski Spectacular, helping hundreds of disabled people learn to ski and giving race training to current and future Paralympians. As with many volunteer activities, it’s one of the most personally rewarding things I’m involved in each year.
When people hear about this, their reaction is usually, “you get to spend a week skiing?” Which is partially true. I spend a large part of five days on skis, but actually ski very little. The reason, of course, is that I’m there to take pictures, not ski. And over the years I’ve had enough people ask questions about how I do this that I thought I’d write a story. As with any big event, proper preparation is the first step.
This begins every fall with a number of email and phone conversations with the DSUSA staff, to understand what their priorities are this year. That helps me determine what equipment I’ll need to bring. For the past several years they’ve primarily wanted videos on various athletes. This time, though, they wanted a new set of still photos. The events would be both indoors and outdoors, mostly action, but not all. That meant I’d need to bring some lighting gear. I also keep an eye out on the weather forecast starting a week out, because that determines what clothing I’ll need.
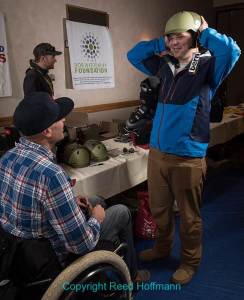
One flash in an umbrella to the left, another in a softbox to the right, and the third on the table in back to light up the banner. Nikon D750, Manual exposure, ISO 320, 1/100 at f/6.3, EV 0.0, 24-120mm lens at 24mm. Photo copyright Reed Hoffmann.
Arriving early Monday afternoon, my first assignment was to photograph helmet fittings. DSUSA had a new sponsor who was providing free helmets to all the injured military participants, and they needed photos to show that. Knowing it would take place in a poorly lit conference area, I’d brought along a lighting kit. That included two seven-ft stands, one umbrella, one small softbox and three Nikon Speedlights (SB-910, SB-700 and SB-500). I’d use two of those lights on the stands, and the third (SB-500) on a table nearby, to light up the sponsor banner. Shooting with the Nikon D750, I used its menus to turn on Commander mode, which would allow me to control those flashes from the camera. I spent about two hours shooting that, moving the lights at times to create different looks, before heading to my room to download and deliver the pictures.
These days I almost always have a computer with me, and for the last four years that’s been either a Windows ultraportable (Lenovo or Asus) or now a Mac Retina Pro 13”. While the deadlines for some clients are weeks away, in cases like this it was important to be posting images to social media every day. For the rest of the week I’d make sure to come in at noon to download the morning’s shoot (using Photo Mechanic) and email a few selects to DSUSA, then do the same thing again at the end of the day. That was the easy part of my daily workflow.
In the evenings I’d also go back through the entire day’s shoot, marking the best photos (again in Photo Mechanic). Then I’d import those photos into Adobe Lightroom for any editing (such as lightening the shadows if the subject was backlit) and cropping, then outputting JPEGs to a “Best of” folder. Getting that done every day meant I’d have an easier time finishing the project at the end of the week. Speaking of JPEGs, that was the format I had my cameras set to most of the the week. Doing that gave me smaller files and a faster workflow. If the light was difficult or white balance unsure, then I’d switch to RAW (NEF for Nikon).
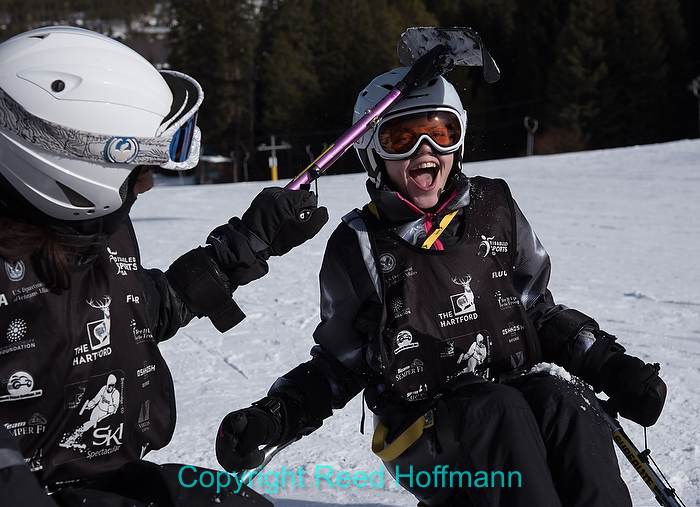
Two teens horsing around before starting a day of race camp. Candid moments like these are as important as the race photos. Nikon D750, Aperture Priority, ISO 200, 1/1250 at f/8, EV -0.3, 24-120mm lens at 65mm. Photo copyright Reed Hoffmann.
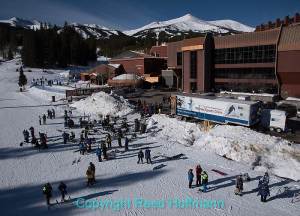
From the lift it’s easy to see how many people are involved just in the staging area. Nikon D750, Aperture Priority, ISO 200, 1/1600 at f/8, EV -0.3, 24-120mm lens at 24mm. Photo copyright Reed Hoffmann.
One of the priorities was to get lots of photos of young people in the programs. So the second day I spent most of my time following either one teen or a group of them. There was also a need for a variety of generic shots from the event, so I was on the lookout for that type of image too. Riding the lift was a great way to get a different angle, as well as making some of the “beauty” images they always like for their website and magazine. That second day I used the D750 again, with either the 24-120mm f/4 or the 70-300mm f/4.5-5.6. People are always surprised when I use that 70-300mm, since they know I have faster, more expensive zoom lenses. The reason is two-fold. One, I have to carry whatever I’m using while skiing, so the less weight and bulk the better. Plus most of the time I’m skiing with the camera hanging off me, not in the pack, because I’ll miss photos if I have to get it out. And secondly, that 70-300mm is very good quality for a relatively small, inexpensive lens, so I’m not sacrificing much using it. Plus, in daylight with snow, there’s usually plenty of light so a fast (wide) aperture is less important.
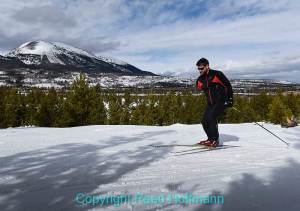
Shooting at the Nordic center gave me an opportunity to get closer to the athletes and use the environment in more photos with wide-angle lenses. Nikon D750, Aperture Priority, ISO 200, 1/1000 at f/8, EV 0.0, 24-120mm lens at 29mm. Photo copyright Reed Hoffmann.
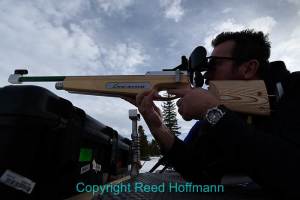
Again using a wide-angle, I laid down to include the sky in this shot of a VI participant (visually impaired) who was trying his hand at the shooting portion of biathlon. Nikon D750, Aperture Priority, ISO 100, 1/500 at f/8, EV -1.3, 20mm lens. Photo copyright Reed Hoffmann.
I spent the third day at the Nordic Center in nearby Frisco. There, in addition to the gear above, I added a 16mm fisheye and 20mm f/1.8 lens to my pack. With the slower pace of Nordic (cross-country skiing and biathlon) I’d be able to get closer to the action, which would let me use wide-angles more effectively. And I’d spend that day walking, not skiing, so it would be easier to shoot different angles, using trees for framing or trying for grand scenic shots. The 20mm worked great, but the 16mm was just a bit too wide for most of what I was doing. Nordic was a nice change of pace, and not just because of the slower speeds. With downhill, everyone’s wearing helmets, which is necessary, but also means their faces are mostly obscured. Faces show emotion, and are an important part of photography. So seeing those faces at Nordic would let me bring a little more life to the photos.
Day four was set aside for snowboarding and ski racing. In this past winter’s Paralympics, snowboarding was added as a sport, and all three medalists were from the U.S. They and other team member and hopefuls were in Breckenridge for race camp, and my job was to get good action shots of everyone. Since I also wanted to have a nice variety of photos, I’d planned to shoot the start gate as well as the racing. To do that I first needed to get to the course early, to scout for good spots to shoot from.
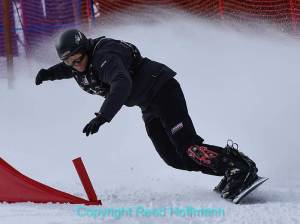
While I didn’t love the red fence in the background, if the boarder threw up enough snow it was hardly noticeable. Nikon D750, Aperture Priority, ISO 250, 1/1000 at f/7.1, EV +0.3, 70-300mm lens at 300mm. Photo copyright Reed Hoffmann.
I always preach “subject, light and background” as being the keys to good photography, and that’s where I started. With the subject, I needed to find a spot where the athlete would be coming around a gate with good body position, leaning into the turn and up on the edge of their board. The day was going to be mostly overcast, so light wasn’t much of an issue (fairly bright but diffused). In this type of situation, I’ve learned that background can make or break a picture. One side of the course had orange fencing, which I’d prefer to avoid if possible, but would probably have in some shots. At least there were dark trees behind it. On the other side, there was a rope with flags to define the other edge of the course. The only other option was shooting uphill, using the course as a background. Since I didn’t love any of those backgrounds, and wanted variety, I tried working all three. I’d have to hope the action would be strong enough to overcome the background.
It’s also good if you can talk to the coach or officials ahead of time. In this case I’d done that, and asked if at some point I might be able to go out onto the course to shoot while lying down. He thought that might be possible, so we’d give it a try. After the first five or six runs, I approached him during a break and asked about doing that. He suggested a spot two gates down, and I headed there to check it out. Although it was overcast, the sun was trying to burn through, which meant a hot spot in the sky. One way I deal that problem is to use something to obscure the sun, often the subject. In this case the boarder would be going by too fast to try that, so instead I put the sun behind the blue flag of the gate. That would both dampen its brightness and give me a nice block of shape and color on the right side of the frame. Now came the hard part…
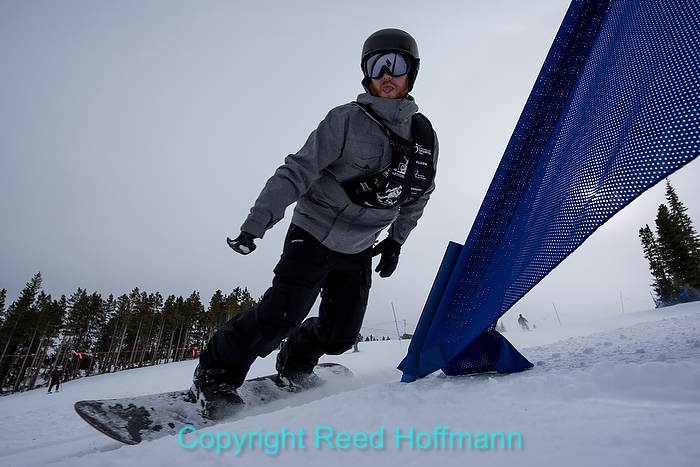
The boarders were going so fast that I had to keep my shutter speed above 1/1000 to avoid getting much blur, and also needed some plus exposure compensation to hold detail in the subject. Nikon D750, Aperture Priority, ISO 400, 1/1600 at f/7.1, EV +0.7, 20mm lens. Photo copyright Reed Hoffmann.
What makes most action pictures special is timing – catching just the right moment. And contrary to popular belief, that’s not done by simply holding down on the shutter button and letting the camera blast away. It’s done by anticipating, pressing the shutter button just BEFORE the moment you want. If you see the moment and then press the button, you’ll have missed it. Which is why I spent over an hour lying there, trying to time my shot to catch the boarder coming around that gate. Now lying on snow is a great way to get very cold, so I’m not a fan of it. But this had the potential to be a great shot, and by golly, I was going to stay until I was sure I had a good one. Unfortunately, by the time the snowboarders finished, the ski racers were nearly done too. That meant I’d need to catch up with them the next day.
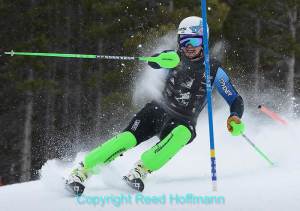
I used Continuous, Dynamic 21-point for my autofocus settings to be able to track the skiers and keep them in focus as they ran this section of the course.
Nikon D7100, Aperture Priority, ISO 400, 1/640 at f/6.3, EV 0.0, 70-300mm lens at 230mm. Photo copyright Reed Hoffmann.
For day five the plan was to shoot curling and sled hockey. But since there were sessions both in the morning and afternoon, I skipped the morning sessions to go back up the mountain for the ski racers. Once again I was working with subject, background and light. Again I wanted to find a spot where I’d have a good view of the athlete coming around a gate. And again I was looking for a clean background. The good news this day is that there was a dip to one side of the course, where if I knelt down the background fence would be hidden and all I’d have behind the skiers were dark trees. That dark background was going to be important in the photos, because as they came around the gate, there was a good chance their skis would be kicking up snow. And if that spraying snow was against a dark background, it would really stand out. Finally, to make the photos more powerful, I’d want to frame tight, and for the ski racing I knew I’d probably be a bit further from the action. So I switched cameras. Instead of the D750, I took the Nikon D7100.
Today we have choices not just in cameras and lenses, but in sensor sizes. The D7100 is one of Nikon’s “DX” cameras, meaning it has a DX sensor, smaller than the “full-frame” FX sensors in cameras like the D750. That means a less expensive camera, and a sensor that essentially “crops” in on the image area. What that meant for me on that hillside was that I could get a narrower angle of view with the D7100 than with the D750, using the same 70-300mm lens. I do that on a regular basis with sports and wildlife, using a DX camera like the D7100 for tighter framing. In effect it gives my telephoto lenses more reach than I’d have with the FX camera.
After a quick trip to the bottom for a bite to eat and emailing some photos for social media use, I changed gear and headed to curling and sled hockey. Knowing those were both taking place indoors at an ice rink, I switched to faster aperture lenses. Leaving the 24-120 and 70-300 behind, I took the 24-70mm f/2.8 and 70-200mm f/2.8, as well as that 20mm f/1.8. And I swapped camera bodies back to the D750. It and the D7100 both have 24-million pixels (megapixels), but since the D750 has a larger sensor (FX), its pixels are larger, and thus give better quality at high ISOs. Being indoors shooting action, I knew I’d be using high ISOs. I also brought along a small lighting kit – two stands and two speedlights – just in case the available light was awful. Fortunately, I didn’t need it.
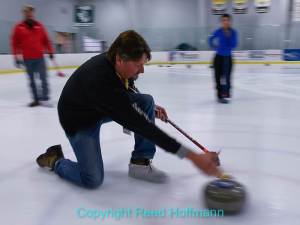
Lowering the ISO and closing the aperture to get a slow shutter speed let me do “pan” shots, moving the camera with the action to blur the background but hold the subject in fairly sharp focus. Nikon D750, Aperture Priority, ISO 500, 1/25 at f/9, EV +0.7, 24-70mm lens at 27mm. Photo copyright Reed Hoffmann.
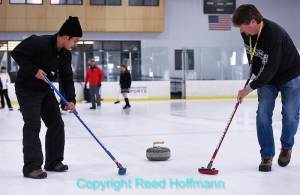
To catch the action of the sweepers running with the stone, I raised the ISO to get a faster shutter speed, and set my AF sensor on the subject at right. Because of the brightness of the ice, once more I was using plus exposure compensation. Nikon D750, Aperture Priority, ISO 2000, 1/400 at f/4, EV +0.7, 70-200mm lens at 70mm. Photo copyright Reed Hoffmann.
If you’re not familiar with curling, it’s like shuffleboard, but played on ice with 42-lb stones, and teammates can “sweep” in front of the stone after it’s tossed to try to steer and speed it up. It’s actually a lot of fun to watch and play, and there was a great group of local experts to teach the game. The best moments come when a player starts the stone on its way, and the sweepers running along beside it. For the toss I usually chose to drop my ISO and use a slow shutter speed to make a panning shot, emphasizing the action. And for the sweepers I did the opposite, using a higher ISO and fast shutter speed so I could freeze them running along.
That was followed by a session of sled hockey, which is just what it sounds like – hockey played on sleds. Each person has a pair of small, short hockey sticks with metal teeth on the end of the handle. They use those to push themselves around the ice, and the other end for passing and shooting the puck. To avoid taking pictures through the glass (and the image problems that would cause), I worked from the penalty boxes, where there is no glass. And for this I used the 70-200 f/2.8 almost exclusively. I needed that reach and the wide aperture as I tried to capture the action while they chased the puck and ran into each other. It’s a bit like bumper cars on ice, and everyone was having a great time.
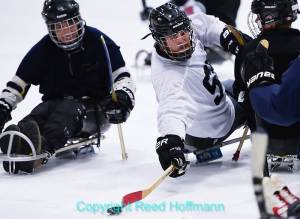
One great thing about shooting hockey (or any activity on ice) is that the light reflects up off the ice into the players’ faces. Nikon D750, Aperture Priority, ISO 2000, 1/640 at f/2.8, EV 0.0, 70-200mm lens at 170mm. Photo copyright Reed Hoffmann.
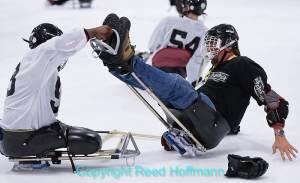
Everyone’s having fun, and while it’s not legal, you can easily flip an opponent’s sled to take them out of the game for a bit. Nikon D750, Aperture Priority, ISO 2000, 1/640 at f/2.8, EV 0.0, 70-200mm lens at 116mm. Photo copyright Reed Hoffmann.
The last day they hold a fun race for anyone who wants to sign up. I approach it like the other ski racing, with the added goal of making sure everyone who takes part can have a nice shot of themselves afterwards.
By the time I fly home to Kansas City on Sunday, my goal is to have all the images processed and ready for delivery. I ship DVDs with all images, sorted by day and event, to DSUSA. I also ship another DVD, which has the best photos from the week, edited and cropped, to make it easy for them to choose from and use. Any photos that I shot as NEFs (RAW), I convert before burning to DVD to keep things simple on their end. And the last part of the job is creating web galleries for the athletes. This year I built four, and DSUSA will share those URLs with the athletes so they can not only see the photos, but download hi-rez copies to keep or use to promote themselves (most of the racers have sponsors).
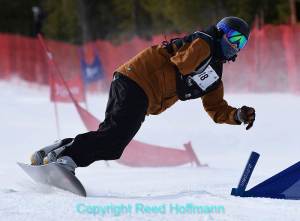
I like to shoot the lens near maximum aperture (f/6.3 on an f/5.6 lens here) to keep the background nicely out of focus. And note again that I’m using plus exposure compensation to keep the snow bright and be able to see detail in the racer. Nikon D750, Aperture Priority, ISO 400, 1/1250 at f/6.3, EV +1.0, 70-300mm lens at 300mm. Photo copyright Reed Hoffmann.
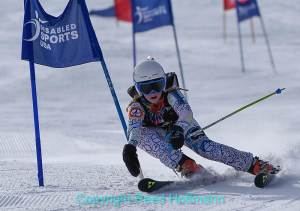
By the end of the race I’d moved to the other side of the course to shoot against the sun. And that meant I had to be very careful with exposure – too much and the snow would overexpose, too little and the subject would be a silhouette. Nikon D750, Aperture Priority, ISO 250, 1/2000 at f/6.3, EV +0.3, 70-300mm lens at 300mm. Photo copyright Reed Hoffmann.
By the time I get home, I’m exhausted. It’s been a long week and a lot of work, but with proper planning and a good workflow, manageable. As I said at the beginning, they’re a great bunch of people, and the most worthwhile and inspiring event I’m involved in each year. Which means that as long as they want me back, I’ll be there.

