I’m guessing that most of you know there’s a total solar eclipse coming to parts of the U.S. on August 21. I live in one of those areas, and between shooting it for a client and being asked to speak on photographing it at the Kansas City Library, I’ve been doing a lot of research. That’s what this post is all about – sharing what I’ve learned. Most of which has come from the websites of people who are serious about this, plus organizations such as NASA. That means a big part of this story will be links to those who I think know what they’re talking about, and do so in a way that makes sense to the rest of us. So let’s look into photographing the solar eclipse.
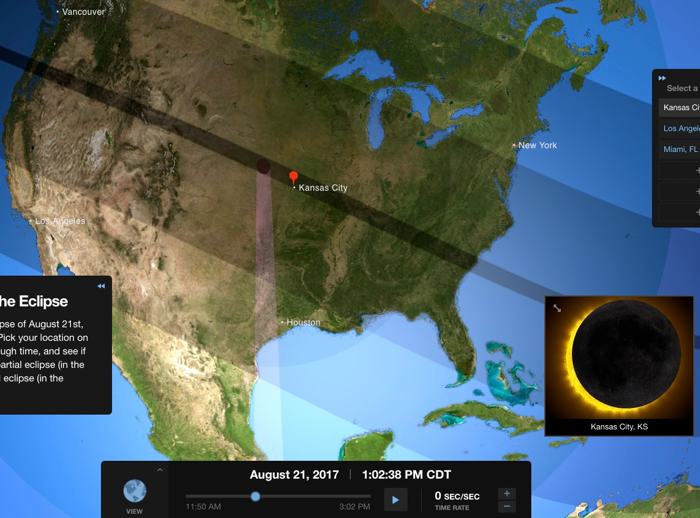
Click this image to go to an interactive map made by NASA that shows where the eclipse will happen, what time in each location and what you’ll see if you’re there.
First off, the big deal about this is what’s called “totality,” which is rare. What that means is that if you live in one of the 12 states affected, and are inside the 70-mile wide path, the moon will line up to completely block the sun. Because of that, for a short period of time, it will look like nighttime (about as bright as when there’s a full moon). That darkness will be relatively brief: from up to two and a half minutes in the center of the path to just a few seconds at the edge. Why so short? That shadow is traveling at over 1000 miles-per-hour! I plan to be near the center, and you can too (see the locator map here).
If you want to view or photograph this unique event, the single most important thing to know is that you need eye protection. Because of the strength of the sun, and the IR and UV radiation it puts out, looking at it without proper protection can damage your eyes. So before doing anything else, read this page by NASA on viewing safety.
During the eclipse there are a number of stages from start to finish, called “Contact” points. C1 is when the moon first begins to cover the sun. In my location (northwest Missouri), that starts at 11:42am. C2 is when the moon completely covers the disc of the sun, and for me that will be 1:08:42pm. For the next 2.5-minutes, I’ll be in an area of totality, after which C3 begins, as the sun starts to reappear from behind the moon. C4 is the end, when the sun is no longer even partially blocked (2:36pm). Start to finish, that’s just under three hours. Which is a lot of time until you remember that most of the cool stuff happens during the brief period of totality. So you need to plan and prepare ahead of time if you want to make the most of that couple of minutes.
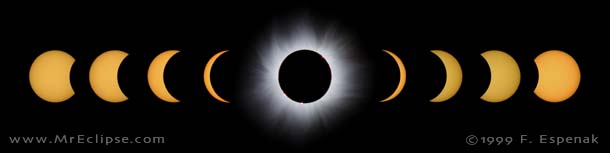
This illustration by Fred Espenak, a former NASA Atrophysicist and known as “Mr. Eclipse,” shows the stages of a total solar eclipse. Click the illustration above to go to his website, a great place to for eclipse information.
As photographers, we have to think through the different possibilities for pictures. The most obvious is of the sun/moon through the four stages. Whether you use a smartphone, telescope or DSLR, you’ll need a filter. If you’ve ever tried to photograph the sun at mid-day with a clear sky, you’ll know it’s not possible. Even at the lowest ISO, highest shutter speed and smallest aperture, the sun will be a blown-out (overexposed) blob. This means that if you want to make pictures of the eclipse from C1 to C2, and C3 to C4, you’ll need a special filter. They’re called either “Solar” filters or “White Light” filters. Using one of them over the lens will allow you to safely view the sun as well as make properly exposed pictures of it. However, between C2 and C3, during totality, you’ll need to remove the filter to make pictures. More on that below.
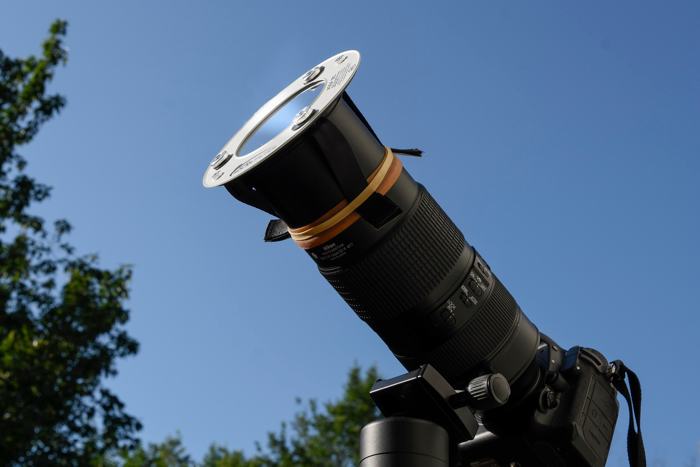
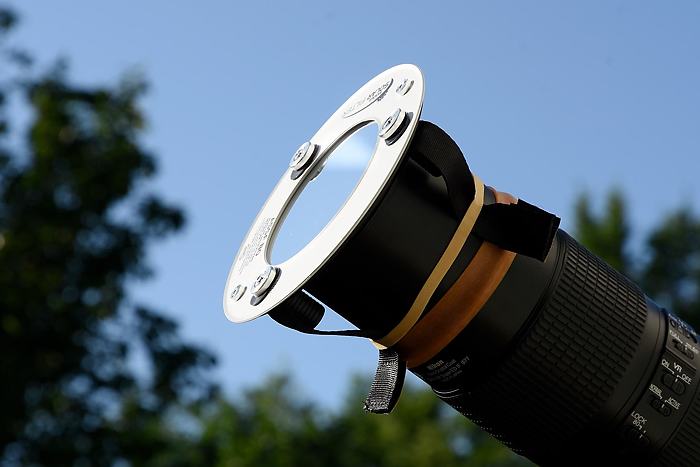
Alpine Astronomical Baader Astrosolar filter on my Nikkor 80-400mm lens. Note the two rubber bands, one to keep the lens at 400mm, the other on the straps to keep the filter in place.
You might be tempted to use a neutral density filter instead, but there’s a real danger in doing that. While a ten-stop ND, paired with a lens that can create a very small aperture and a camera that offers very high shutter speeds might allow you to get a good exposure, you can easily damage your eyesight if using the viewfinder. That’s because ND filters don’t block IR or UV light. You’d need to use the LCD (or electronic viewfinder, if you camera has that) to frame and focus. Plus, most camera manufacturers warn against this because of possible damage to the sensor. Obviously, there are real drawbacks to this approach, so it’s best to simply use a solar filter.
Determining your base exposure is one of the easy parts. Simply put the solar filter on your lens and shoot some tests of the sun now, at approximately the same time of day. Figure out what ISO, shutter speed and aperture combination you like, and use your camera on Manual exposure to shoot at that from C1 to C2 and C3 to C4. Between C2 and C3, though, the exposure will change dramatically. You can also figure out a base exposure for the edge of the corona during totality. Its brightness will be about the same of that of a full moon, so do some tests on that as well.
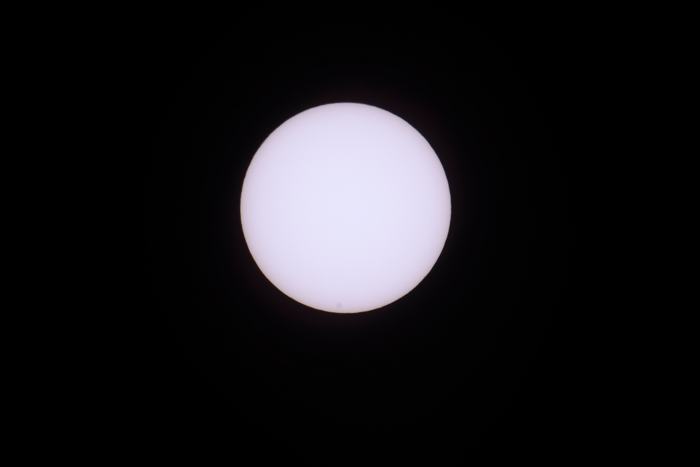
This is my base exposure for photographing the sun with the solar filter attached. It’s what I’ll use for C1 to C2 and C3 to C4 on August 21. Nikon D500, Manual exposure, Daylight white balance, ISO 400, 1/250 at f/16, Nikkor 80-400mm f/4.5-5.6G lens with Nikon TC-20 teleconverter for 800mm (1200mm. equivalent, with APS-C sensor). Photo copyright Reed Hoffmann.
Focus is also something you should set ahead of time. Put on your filter, focus on the sun (manually if autofocus doesn’t get you there), then turn off autofocus and tape down your focus ring. Your distance to the sun won’t change, so there’s no need to re-focus. If you’re using a zoom lens that extends when you zoom it, tape that down as well. If it’s pointed up, it’s possible the lens will slowly retract on its own thanks to gravity.
As the moon completely blocks the sun, C2 (totality), the most fascinating part of the experience begins. The “Diamond Ring,” Baily’s Beads, red prominences, chromosphere and corona are all visible at times during that brief window. And if you want to photograph them, you’ll have to remove the filter (there’s not enough light otherwise). This is also the only time during the eclipse that it’s safe to view the sun with your eyes without protection. The corona is the most spectacular of the group, but to capture it you’ll need to shoot a series of bracketed exposures and assemble them later in software (what’s often referred to as HDR, high dynamic range imaging). Fortunately, there are people who’ve spent their lives chasing and photographing eclipses, and they’ve shared suggested exposures.
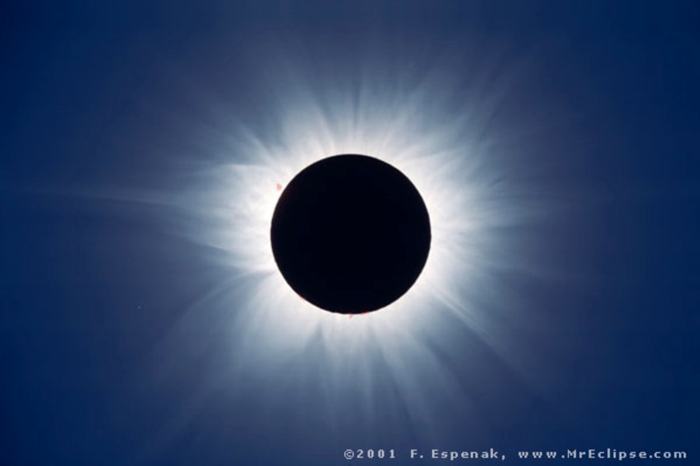
One of Fred Espenak’s excellent composite photos showing the corona. To create this you need to shoot many frames at different exposures, then put them together in software later. Click the image to see more of Espenak’s photos.
When it comes to what lens to use, most folks naturally think telephoto. And to maximize the angle of view of the telephoto, using an APS-C camera (cropped sensor) makes sense too. However, there’s a good case to be made for using a wide-angle lens as well. Some beautiful pictures can be made during totality of the dark sky and ring of sun (around the moon). If you can find something to have in the foreground, like people or a tree, all the better. And, of course, you could also try a time-lapse, or multiple frame sequence, throughout the whole event, from C1 to C4.
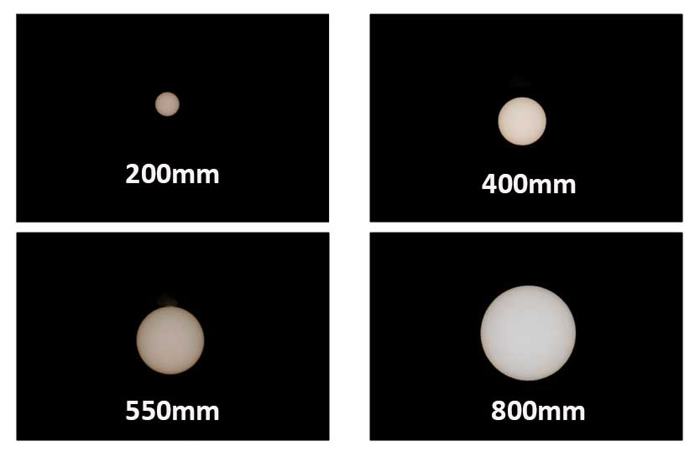
I shot these four photos to show the size of the sun at different focal lengths. All of them were taken with a Nikon DX camera, which has an APS-C sensor, to maximize the angle of view. Using a full-frame camera (what Nikon would call an FX camera) would result in a smaller image size.
Of course, while it would be smart to use a good tripod during the entire eclipse, if you want to capture the feathery tendrils of the corona you’ll need slow shutter speeds and a telephoto lens. For that a tripod is mandatory. Double-check ahead of time to make sure your tripod head will tilt back far enough to frame the sun at that time of day. And use a release of some type to trigger the shutter, to minimize your touching the camera and possibly adding movement blur.
Do keep in mind that since the earth is moving, the sun will change position in your frame. It will move about one diameter every two minutes, so plan for that (adjust your framing as necessary).
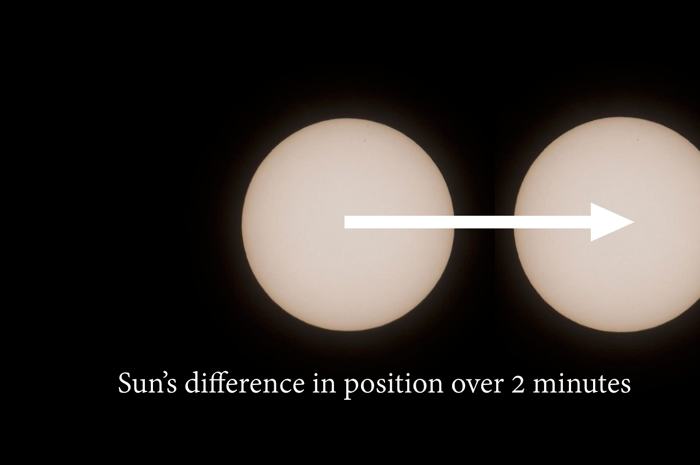
Thanks to the earth’s movement, the sun will appear to move during the eclipse.That distance will be about a diameter’s width every two minutes. If you’re using a long telephoto lens (anything over 200mm), that movement will also be a concern if using slow exposures during totality.
Anything you can do to automate the process will mean less chance of mistakes. Having a cheat sheet taped to the tripod, with reminders of when to remove/replace the filter and exposure recommendations will be helpful. If you have an intervalometer, or a camera with that capability built in, the camera can do the shooting for you. For instance, I’ll use that with my Nikon’s ability to shoot a nine-frame bracketed sequence to have the camera automatically firing during much of totality. With my ISO and aperture fixed, that would let me capture nine frames ranging in shutter speed from 1/2000 second to 1/8 second, over and over throughout totality.
What if you don’t have a “real” camera with a nice telephoto lens? Since you’ll have eclipse glasses anyway, if you’re planning to shoot with a smartphone or small point-and-shoot camera you could simply hold the glasses in front of the lens. Since you can’t get much of a close-up with a phone, it might make more sense to simply shoot photos of the scene around you when it gets dark, with the small glowing ring in the sky. You could also choose to shoot video with your phone, and show the area getting dark during the eclipse and the sounds of people around you reacting to that.
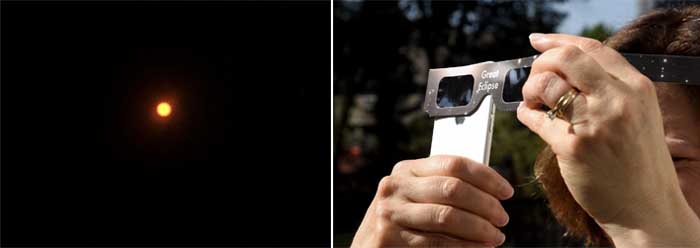
Holding a pair of eclipse glasses over the lens of your smartphone will allow you to get a picture of the sun. Without the glasses, it would be an overexposed mess. You also will probably need to set focus on the sun and use your phone’s camera controls to underexpose the scene.
If you have a telescope, and a filter for the front of it, you could also simply put your phone up against the eyepiece. That sometimes works with point-and-shoot cameras too. And there are “T-mounts” for larger cameras that allow them to be mounted to telescopes, using the telescope as your telephoto lens. Again, be careful of movement when shooting. In addition to cable, IR or radio remotes, you might also be able to use a smartphone app to trigger the camera.
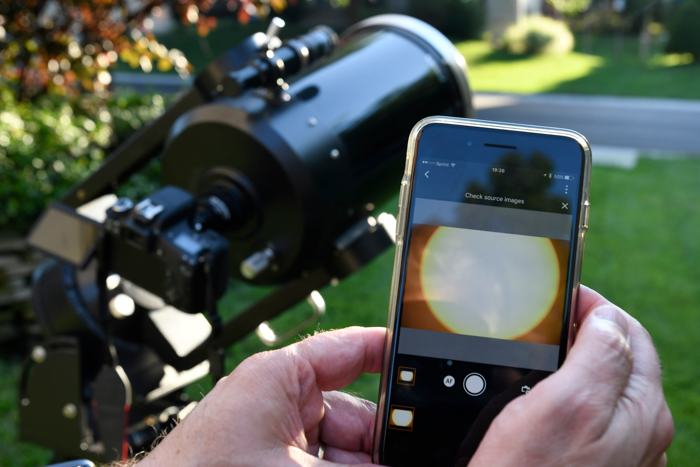
With a camera attached to his telescope via a “T-mount,” my brother-in-law was able to control exposure and capture the photos through an app that communicated with his camera. This is a good way to avoid moving the camera while shooting, which could introduce blur at slower shutter speeds while using big telephoto lenses (or telescopes).
Of course, you could also skip the hassle of trying to make pictures and just enjoy the moment. These are rare events, and likely an experience you’ll never forget. If you do want to photograph it, though, you’ll need to plan carefully and be prepared ahead of time. Figure out where you want to be. Get your eclipse glasses and solar filter(s). Do exposure tests. Decide how you’re going to use your camera(s) and what other gear you’ll need (spare cards and batteries, remotes, tripods, etc.). Come up with a written plan of action with what steps you’ll take and when. Finally, consider shooting video from just prior to just after totality. Watching the sky go dark, and hearing people’s reactions should make for great viewing later.
If you’re curious what I’m going to do, here’s my plan:
Camera 1, on heavy tripod – Nikon D500, Nikkor 80-400mm lens with TC-20 (2x) teleconverter for 800mm focal length. Alpine Astronomical AstroSolar filter on the front of the lens from C1 to C2 and then C3 to C4. Single frames occasionally during those time periods. Manual exposure, 400 ISO, 1/250 at f/16, white balance of Daylight, with cable release. The purpose of this camera is to capture the sequence of the moon sliding across in front of the sun. When near totality, I’ll turn on the intervalometer (as with Camera 2, below) to automate the firing at that point, then remove the filter and shift exposure.
Camera 2, on heavy tripod – Nikon D500, Nikkor 500mm f/4 lens for C2 to C3 (totality). No filter. I’ll use the camera’s built-in intervalometer to shoot a frame every one-second, with Exposure Delay mode set to one-second delay as well. I’ll have auto bracketing turned on in the camera, for 9 frames with a one-stop differential, shooting at f/4 from 1/4000 to 1/15-second, Daylight white balance. I’ll start that sequence at 100 ISO just before totality, then shift to 400 ISO halfway through, then back to 100 near the end of totality. The goal here is to capture the Diamond Ring, Baily’s Beads and be able to create a composite of the corona.
Camera 3, on mid-weight tripod – Nikon D810, 18-35mm lens with 8-stop ND filter. ISO 64, f/22, 1/4000 second, intervalometer, one frame every five minutes. I hope to frame up a wide shot with this camera that has something in the foreground (a tree?) and create a composite or time-lapse showing the three-hour progression of the eclipse. After C2 I’ll need to remove the ND filter and change exposure for the low ambient light for a few frames, to show the surrounding sky and area before going back to original settings for C3 to C4.
Camera 4, hand-held – Nikon D750, 24-120mm lens. This is to photograph what’s happening around me. People getting ready, using eclipse glasses, telescopes, cameras, etc.
Camera 5, on mid-weight tripod – Video. I haven’t decided which camera to use for this, but I plan to frame up a wide-shot video from just before C2 to just after C3 to see the sky darken and hear the reactions of people around me.
Whether you photograph the eclipse or simply watch it happen, I hope you enjoy the show. They don’t happen very often, but if you miss this one, mark your calendars for April 8, 2024. On that date another total solar eclipse will sweep across the U.S. from southern Texas up through Vermont and Maine. I’ll see you there!
(If you like this story, please share it with your friends, and let them know about the links about photography I post on my business Facebook page. I’m also on Instagram and Twitter, @reedhoffmann)
Resources
“Mr Eclipse,” Fred Espenak:
His solar exposure guide:
http://www.mreclipse.com/SEphoto/image/SE-Exposure1w.GIF
Interactive map:
http://www.eclipsewise.com/solar/SEgmap/2001-2100/SE2017Aug21Tgmap.html
American Astronomical Society – How to Shoot a Solar Eclipse:
https://eclipse.aas.org/imaging-video/images-videos
Shutter Speed Calculator for Solar Eclipses:
http://xjubier.free.fr/en/site_pages/SolarEclipseExposure.html
NASA interactive map that show what you’ll see based on where you are, and exactly what time all of that will happen:
https://eyes.jpl.nasa.gov/eyes-on-eclipse-web-app.html#
Eclipse apps:
https://eclipse.aas.org/resources/apps-software
Photographer who’s also into astrophotography:
http://www.astropix.com/html/i_astrop/2017_eclipse/Eclipse_2017.html