I’ve spent a lot of time teaching software, which means I’m always looking for anything new that might be better or easier. Sometimes that means software packages, like Mylio. Other times it’s plugins, like Nik (now owned by Google), which attempt to simplify the process of working on images. A few weeks ago I had an email from a relatively new company, Sleeklens, asking if I’d be interested in trying some of their products. Sure, why not?
First things first. These packages are sometimes referred to as Plug-ins, Photoshop Actions or Presets, which means they have to be used from within another program. They’re not standalone software. For Sleeklens, you need Lightroom or Photoshop. The advantage to this is that you’re working within a piece of software you already have, and can take advantage of the power of that software. It’s important to understand that these products don’t do anything you couldn’t do yourself – they’re only able to use the tools that are available in the software they’re installed in. If you’re already an expert with those tools, you could likely do exactly the same thing. So why use one of them? Because you don’t have to be an expert with the primary software (Lightroom or Photoshop). It’s a bit like cooking. An expert chef may not need a recipe, but the rest of us do. Tools like these help automate procedures you might otherwise not know about or be able to do.
I decided to give the Sleeklens “Through the Woods” landscape package a try (for Lightroom, $39). That includes a set of Presets and a set of brushes, with instructions on how to install them. Both are accessed from the Develop module in Lightroom.
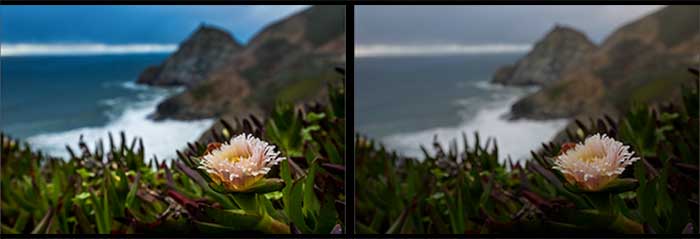
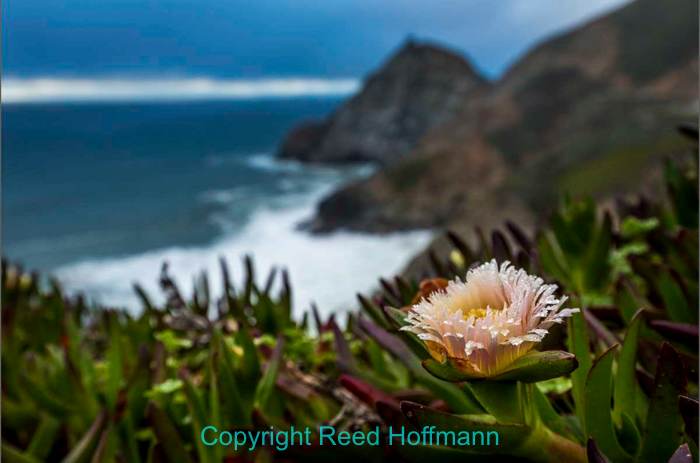
On the right is a good example of the type of photo the Sleeklens landscape package is designed to improve. The image is flat (lacking contrast) because it’s an overcast days. The color needs to be punched up, and the green around the flower needs to be brought out. On the left is the result after running a couple of the Sleeklens Presets, then doing some selective editing with the brushes to bring out the green surrounding the flower.
When working on images I always start with global adjustments, then move in for the smaller, selective adjustments. That means I’m looking to fix or enhance things like overall color or tone, then areas like skies or faces. That’s also the approach Sleeklens uses. The Presets are organized by group, starting with “All in One,” then “Base,” then “Exposure,” “Color,” Tone/Tint” and so on. It makes sense to work though them like that, using what’s needed, and since one Preset can be used on top of another, you can take advantage of multiple Presets. Also – and this is important – since the Presets use Lightroom’s tools, you can choose a Preset and then further adjust its settings in the right panel for more or less effect.
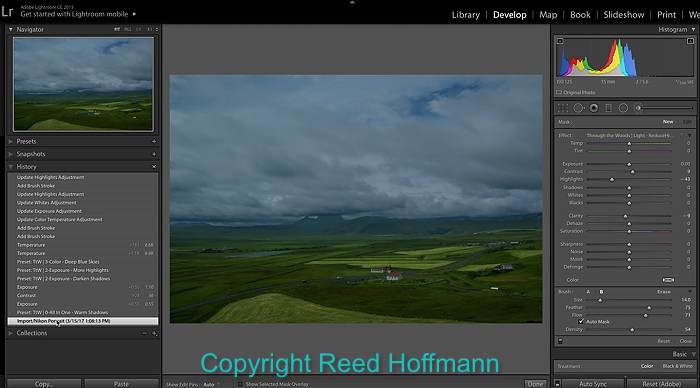
I’ve used the History palette at left to show what this photo from Iceland looked like when first imported into Lightroom. Like the flower photo above, it was taken on an overcast day, so lacking in contrast and saturation, and a bit underexposed.
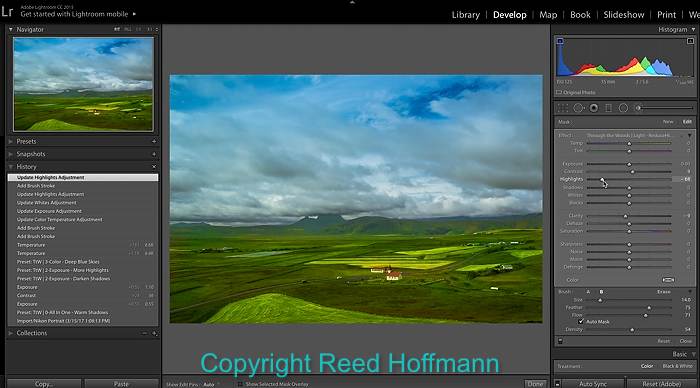
This is the “after” version, and you can see what a difference it made running a few of the Sleeklens Presets, followed by some work with the brushes (at right).
After using the Presets, which are essentially global adjustments, you can start doing selective work with Lightroom’s Adjustment Brush. This is where the Sleeklens brushes come in. After installing them, you can click on the “Custom” button at the top of the Adjustment Brush panel to select one. Again, they’re organized in groups, like “Basics,” “Color” and “Light.” And once again, you’re not limited to using just one. They’ll brighten, darken, add or remove color or do more advanced things, like adding definition to cloudy skies. Finally, like the Presets, they’re just starting points since you can change the effects in the brush sliders.
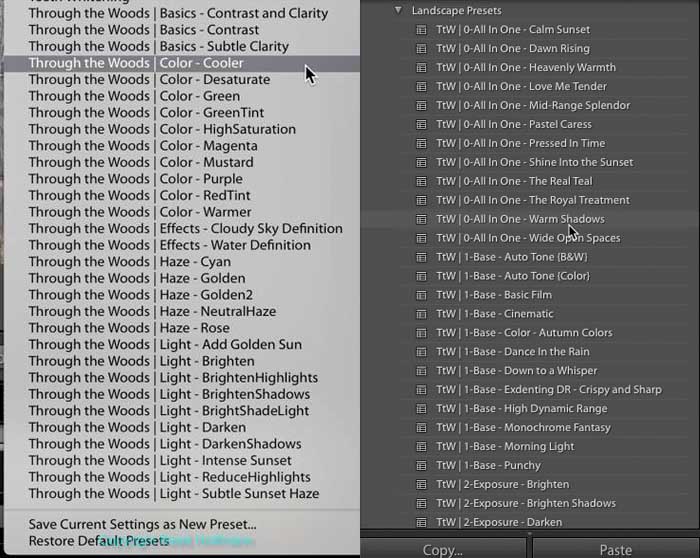
On the left are the “Through the Woods” brushes, and you can see how they’re grouped by effect. I I also like how the names clearly state what the brush is designed to do. On the right are the Presets (all of them wouldn’t fit into one screenshot), and you can see how they’re organized to help guide you through the edit process.
So what did I think? For someone who doesn’t want to spend the time to learn all the ins and outs of Lightroom or Photoshop, these tools are a good option. They let you leverage the power of those programs to fix or enhance your photos without becoming an expert in that program. I particularly liked the fact that I’m not locked into the adjustments their tool starts with, but am able to go into the edit panel to make them stronger or weaker, or shift how they affect the color or other things (like contrast, clarity, vibrance, etc.). And they’re best for those images where where the light wasn’t very good. They can really add some “pop” and color to otherwise flat pictures. My only quibble is the cutesy names that some of the Presets use. “Wide Open Spaces,” or “Pressed in Time” don’t give me any clue as to what the Preset actually does. I much prefer the naming they use for their brushes, like “Reduce Highlights,” or “Subtle Sunset Haze,” since they make it clear what that brush is designed to do. But, as with most plugins or add-ons like this, you’ll probably find a few you really like, and rely on them most of the time.
For people who want a simple way to do more with their landscape pictures on the computer, this set of tools is a good solution. Sleeklens also has other packages, for everything from portraits to HDR to black and white, to name just a few. Plus, lots of tutorials and “how to’s.” If this sounds like something that might be a good fit for you, I’d suggest you check them out. You can learn more about them, and also download a free starter set of Lightroom Presets and brushes here.
(If you like this story, please share it with your friends, and also let them know about the links about photography I post on my business Facebook page. I’m also on Instagram @reedhoffmann and Twitter @reedhoffmann)
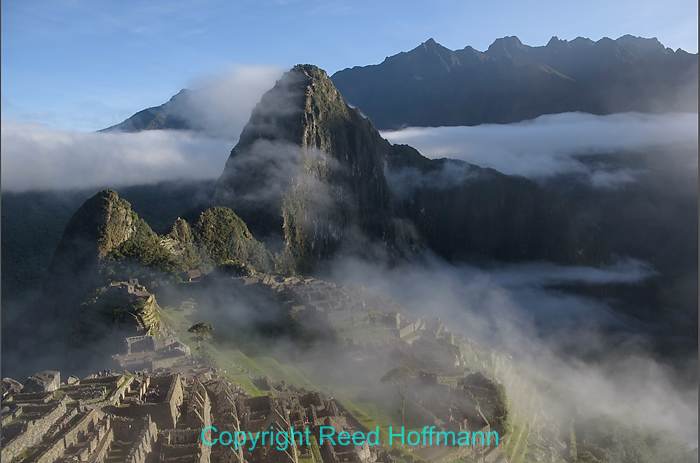
This photo of Machu Picchu, from Peru has some strong light and contrast, but could use a bit of warming and bringing up some of the colors.
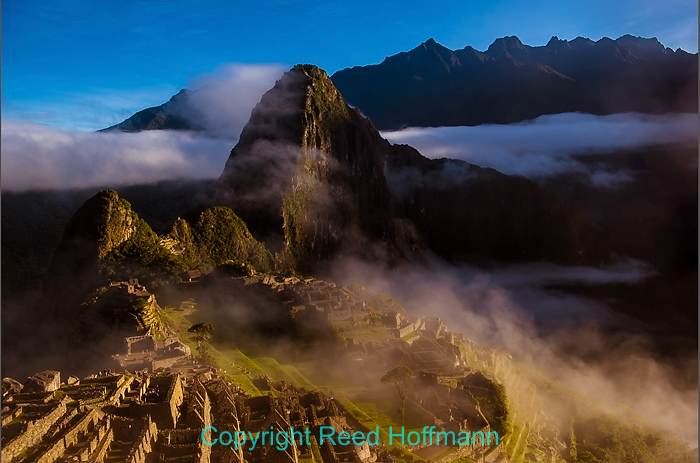
Making those changes was pretty easily achieved with the “Through the Woods” landscape set, again starting with overall adjustments using Presets, then some more selective changes with the brushes.