Whenever I see people taking pictures, whether with their phones or “real” cameras, I often wonder what they do with them aside from sharing on social media. After all, if you’re passionate about photography, then you should also be passionate about managing your pictures. And that means making sure you have them not just today, but years from now. So while everyone else is talking about all the great things they plan to do in the new year, why don’t you review the plan you have for backing up your photos. You do have a plan, right?
Managing photos is usually referred to as “digital workflow.” And whenever I teach that, the first thing I say is that the best workflow is one that’s easy to repeat and makes sense to you. I’ll explain mine below, but that doesn’t mean it’s the right one for you. Remember, if it’s not easy to do, you probably won’t do it. However, there are three steps that are critical, which means everyone should be doing those three, at the very least.
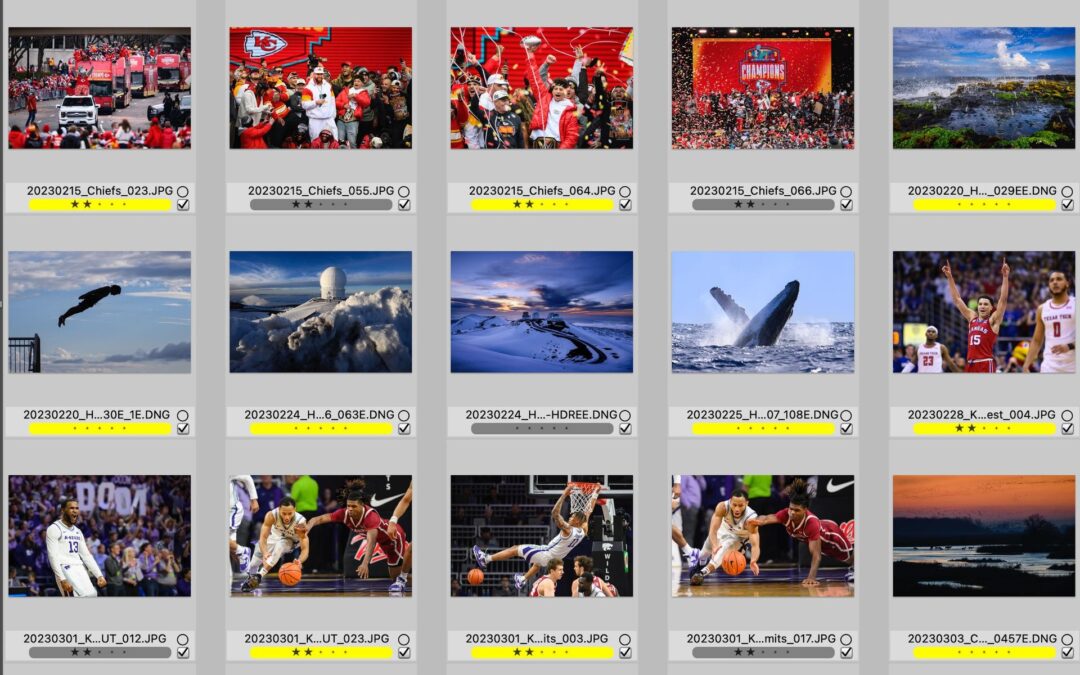
1 – Rename your photos. The name your camera creates for each image, like DSC_2187.JPG, has no meaning outside the camera. And since cameras will re-start that number sequence at some point (once it hits 9999), what happens when you have a second DSC_2187.JPG (or third, or fourth…)? Almost every image management/editing program I’ve ever seen, whether free or paid, offers an easy way to rename photos. Plus, they can do an entire batch at once – you don’t need to rename each image individually. What should you rename them? Something that makes sense to you, and that can never be repeated (unlike DSC_2187.JPG). That’s why I always recommend making the date a part of any renaming sequence. There will never be another December 4, 2023. And to make sure my photos sort in chronological order, I use the year first, then month and day. So that day becomes 20231204. After that, I like to have something that indicates what it was I was shooting, followed by a sequential number. So, if I was at Loess Bluffs National Wildlife Refuge that day, the filenames of the pictures would begin with 20231204_Loess_001. And again, it’s easy to have software do that quickly, as a batch process. (I’ve written a “how-to” on automating that process with three common software packages, here).
2 – Organize your photos. This is probably the most personal decision you’ll make concerning your workflow. I prefer to use a folder-based system, meaning there’s a folder for every day I take pictures, and for its name I use the same convention I do for file naming. Which means that the photos I took of birds at Loess Bluffs in the example above would be inside a folder named “20231204,” and that folder resides inside the folder “2023 ALL.” But again, since the goal of a good workflow is that it make sense to you, you could just as easily have your photos organized by event (“Vacations”) or activity (“Birds”). Or, you could be one of the many photographers who prefer a catalog system (like Lightroom). All of these systems will work, it’s just a matter of finding the one that’s best for you.

Here you can see my entire system. At far left is the 4TB “mirrored” hard drive that I download my pictures to. Then the folder organization, all the way through to how I rename those photos.
3 – Backup your photos. This is the most important of the three, and can be the most challenging as well. With film, whether you made a print or generated a copy of the negative (or slide), it was derivative and there was a loss of quality. With digital, that’s no longer the case, since you can have as many exact duplicates of your original image as you like. The question then becomes how many copies should you have? And the answer is, at least three: two copies at home and one offsite. The simplest way to do this is to have three large external hard drives. One at home hooked up to your computer that you download to and work off of. A second, also at home, that you can connect and backup photos from the first one to regularly (which helps protect the majority of your images in case that first hard drive fails). And the third hard drive should be kept away from your home (a friend’s house, your office, a safe-deposit box, etc.). Regularly bring that hard drive home and update it from the first hard drive. That off-site drive helps protect your images from a disaster that may destroy the first two hard drives.
As I said at the beginning of this story, these are the three steps everyone should be doing, at a minimum, to organize and protect their photos. Of course, there’s always more you can do if you want to be better protected, and are willing to do the extra work (and perhaps pay additional money). For instance, my primary hard drive at home is a mirrored RAID array, meaning the housing contains two hard drives that “mirror” each other. If one should fail, I’ve lost nothing since the second hard drive has the exact same data. And my backup hard drive at home is also a mirrored RAID array. My off-site drive is actually two hard drives, that alternate between my home office and a safe-deposit box. I also pay an annual fee to Backblaze, a cloud service which provides immediate, automatic backup of my key hard drives to their servers. And finally, at the end of each year I burn all photos from that year to Blu-ray discs, in case of hard drive failure. If you’d like to read about how I do all this, in greater detail, you’ll find that story from last year here. Again, what works for me, and lets me sleep soundly at night, will probably be different for you.

The final step of my archiving process is backing up each year’s photos to Blu-ray discs.
If your digital workflow’s a mess, or you haven’t had one before now, the best way to get started is to figure out what makes sense to you, then set a date and begin. If you haven’t shot anything yet this year, then January, 2024 will work. Or February. But regardless, get started. And what about all those photos you have from years past? Once you’ve figured out your system, it’s pretty easy to go back and sort your older photos into that system, slowly chipping away at it when you have a free hour or two. Years from now, you’ll be glad you did!
(If you like this story, please share it with your friends and let them know about the links on photography that I post on my business Facebook page. I’m also on Instagram and Twitter, @reedhoffmann. And if you’re curious about the workshops I teach, you can find them here. Finally, you can subscribe to this blog on my home page.)
Thanks Reed. Great tips!