What if you could have precise GPS location information for every photo you shoot? And better yet, you could do that for free? You probably can, and here’s how.
During the Africa workshop I taught this summer, the other instructor (Bob Smith) told me he was using a smartphone app to track our days’ travels. That’s called “GPS logging,” and he was doing it with a free iOS app called “Trails.”(I’m not using that app anymore, see the “UPDATE” note below). That app generated a log file, which could show him exactly where he was for each photo he took, and afterwards create a map of the entire trip. Back home, I decided to try that myself on workshops to Iceland and South Dakota. I couldn’t be happier with the results. Here’s how it works, and how I’ve used it.
— UPDATE April 8, 2018 – the Trails app changed, so I’m now using a different one, also free, called myTracks. It’s available for both Android and iOS, and was free at the time I started using it. One nice feature with it is there’s no limit on tracks, and they’re all saved in the same folder, by date. That means when you export them, they all go at once as a ZIP file, making file management easier. AND, you’ll want to turn on “Use Google Format” to get .kml files for the Google map (the GPX will sometimes be too big for Google Maps to use), but also want to export them with that feature turned off, which will give you .gpx files. Those are what Photo Mechanic and Lightroom will want —
First, you need a smartphone with GPS. Next, an app that uses the GPS receiver to log your travels. I used that Trails app (iOS only), but there are others for both iOS and Android. Of course, since it runs constantly to create a track, it does drain the battery. But I could get through an entire day on one charge, with a two-year-old iPhone 6 (not the 6 Plus, which has a larger battery). And better yet, using the GPS can work without using data (with iOS versions newer than 8.2), so you won’t incur extra charges, and can even use the app when you don’t have service (or even in Airplane Mode, with newer iOS versions).
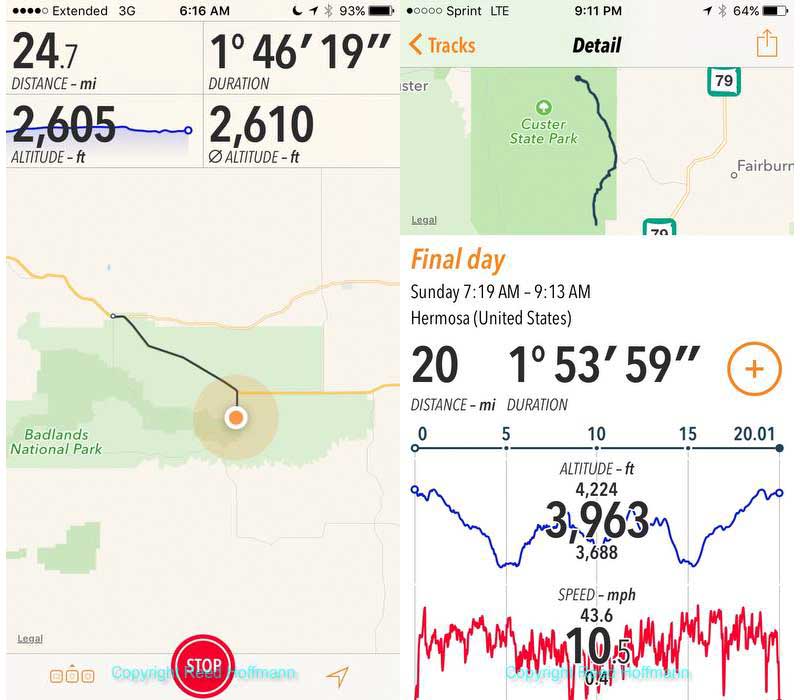
On the left is the screen you see in Trails while recording, on the right is what you’ll get when you stop, a summary of the track.
You start recording at the beginning of the day and stop when you’re finished. That creates the track, but then you need to export it. Trails can do that, giving you choices of different formats and ways to send the file. GPX is the format I chose, because my photo software can read that. I simply had Trails create the GPX file, then email it to me (using WiFi if no data service). Once I received that on my laptop, I saved it to the same folder the photos are in. At that point, of course, I can delete it from my phone. The next step is mating up the log file with the photos.
The software I use for download/sort/organize is Photo Mechanic (by Camerabits), because it’s faster than anything else I’ve tried. It can import a GPX file and match those data points with my photos using the date/time stamp on the images. That’s one of many good reasons to be sure and set the date and time of your camera to local time. When adding the track to your photos, you may have to set an offset – the difference between the GPS recorded time and the camera’s. Honestly, remembering to start the app and calculating the offset are the two most challenging parts of doing all this.
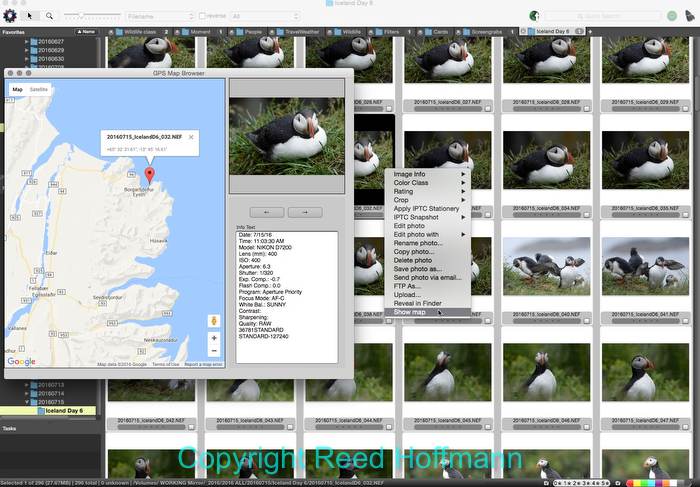
With the GPS log imported and matched to shooting times, I can see exactly where I was in Iceland when photographing these puffins. Cool!
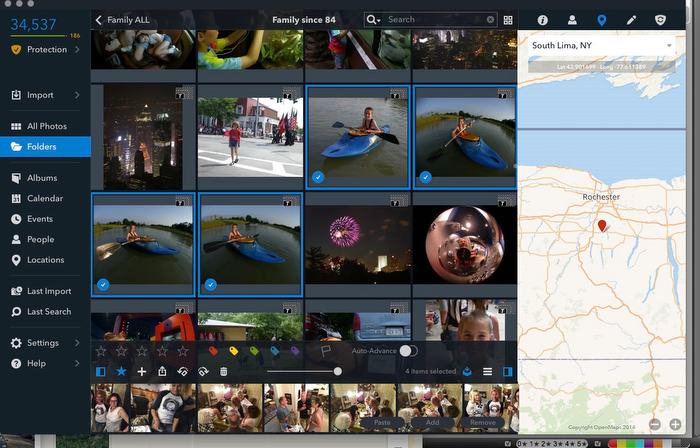
Photo Mechanic embeds the Latitude, Longitude and Altitude into the files, whether they’re JPEG or RAW. Which means it stays with the file as you move and copy it. If you’re posting or transmitting the image, and you don’t want that information included, be sure to strip it out. To see the location for a photo, simply right-click, choose “Show Map,” and Photo Mechanic does just that.
Adobe Lightroom can also embed GPS data collected through a logging device. To do that, go to the “Map” module and choose “Load Tracklog…” from the bottom of the screen. Again, if an offset is needed, you can apply it then. As with all image information in Lightroom, the GPS info becomes part of the catalog. But if you choose to “Export” a file, LR will include the GPS data with the other metadata unless you tell it not to (in the Export dialog).
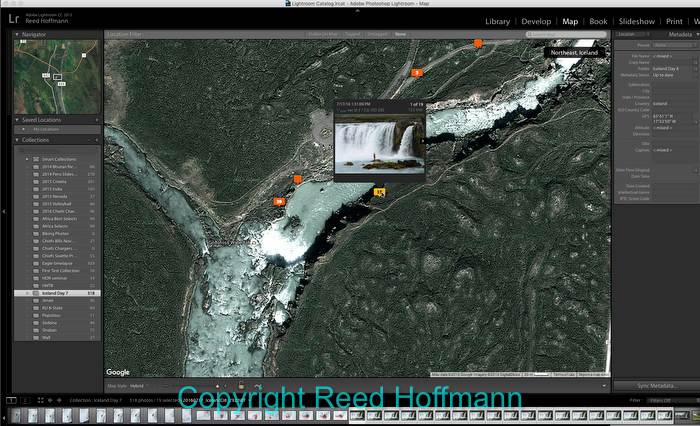
Lightroom does a similar thing once I’ve added the GPS data, showing me a map with little squares that indicate where I took a picture. If I click on one, I can see what the photo is.
Once you start adding GPS data, you’ll likely wish you’d begun doing it earlier. But there is a way to time travel, of sorts. Both Photo Mechanic and Lightroom will let you manually enter GPS data. And it’s easier than it sounds. You can bring up a map within either program and then simply show the software, on the map, where the photo was taken.
These aren’t the only two programs that will do this for you. I’ve been using Mylio for backup, organizing and synchronization for over a year now, and it also lets me add location data to photos. Through it, I’ve been worked back through decades of old photos, at the very least including the city and state they were shot in.
With Mylio, as with the others, I can add location information after the fact. Here I can see where we were July 4, 2002, while visiting friends in upstate New York.
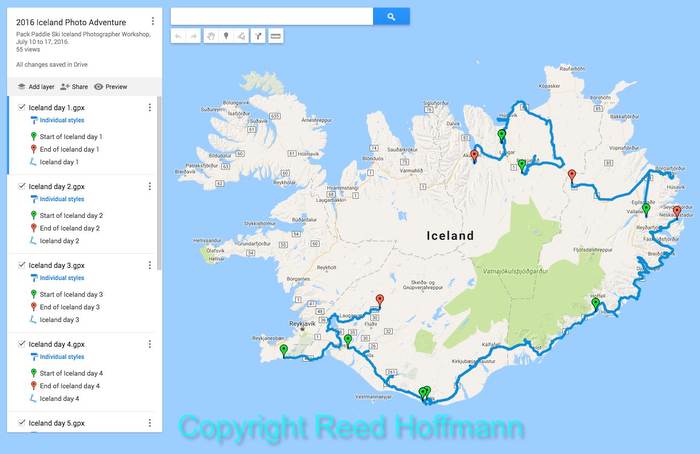
One more thing you’ll want to do is create a map of your entire journey. To do that, you simply need to gather your track logs and open Google Maps (online, you don’t need it on your computer). Once there, you’ll import each log, one by one. Each one becomes a separate layer in the map you create, but you’ll be able to see them as one continuous track when finished. It makes a great addition to the memories of your trip.
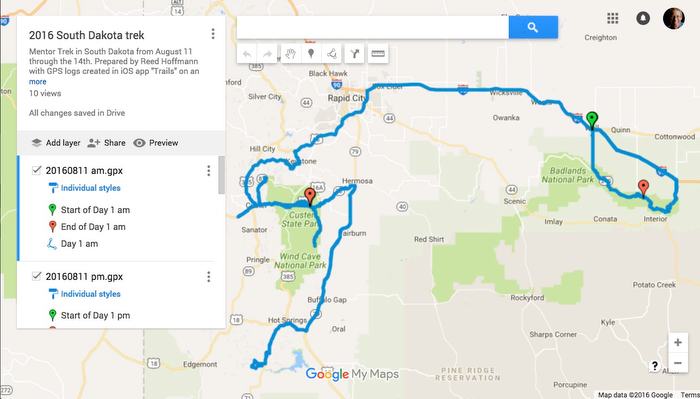
From the recent South Dakota workshop, I was able to build a map of the entire trip using my GPS logs and Google Maps. I can follow from where we started in Wall, S.D. and the Badlands, right through Mt. Rushmore and Custer State Park.
GPS data, whether collected while shooting, or added afterwards, will help you in the long run. After all, if you want your photos to be more than simply a mess of pictures you waste a lot of time digging through, you need better organization. And one great way to do that is to use your smartphone to create GPS logs. Once you start, you won’t stop.
(If you like this story, please share it with your friends, and also let them know about the links about photography I post on my business Facebook page)