I recently heard a photographer say he’d spent 17 hours going through 10,000 images, deciding which ones were worth saving. My first thought was, “I hope he’s retired.” My second thought, though, was that he badly needed a lesson on speeding up his workflow. Which led me to write this story on how to turbocharge your photography workflow.
I started shooting digital for my newspaper in the fall of 1996. By spring of 1997 I’d been tasked with helping convert the entire department to digital. I quickly learned that the gear was the easy part. It was the workflow – downloading, organizing, renaming, adding valuable information to the photos (names, locations, etc.) and then being able to find the images – that was the hard part. Over the next half-dozen years, as I left my paper and began a freelance career, I carved out a niche of helping other newspapers make the transition to digital. And again, gear was the easy part, workflow the challenge. My attitude was that with computers and the right software, photographers should be able to handle more photos more quickly than ever before. But that wasn’t as easy as it sounds.

In 2007 I was hired by the Associated Press to lead workflow classes for their photographers at different locations around the world. In addition to this class in Mexico City, I also ran sessions in Bangkok, Delhi, Tokyo and Lima, Peru.
The two keys to any good workflow are that it’s easy to repeat and accomplish whatever goals you have. In a company, that means it has to be designed to fit the company’s needs and then everyone has to follow it. Both of those can be challenging to accomplish when a large number of people are involved. For an individual, though, it’s much simpler. I’m often asked what my workflow is, and am happy to share it. But what really matters is that it makes sense to you and is easy to do. Here are the five basic steps that any photographer can (and should) take to make the process as painless and efficient as possible.
1 – Automate the download
Computers are great at automating things, so why not have them do that? The best photography applications out there can automate the download process. They can create a folder structure, name the folder(s), rename the images and add important metadata (like copyright, location and caption information). If your workflow has you plugging the card in, creating a folder on the computer and dragging the images to it, you’re not just wasting time, you’re making every step after that more difficult. For years now I’ve posted a PDF on my website explaining, step-by-step, how to accomplish this with Photo Mechanic (my favorite), Lightroom and Adobe Bridge. It covers everything from folder structure to captions and renaming (which is critical). Here’s where you can find the link to that paper.
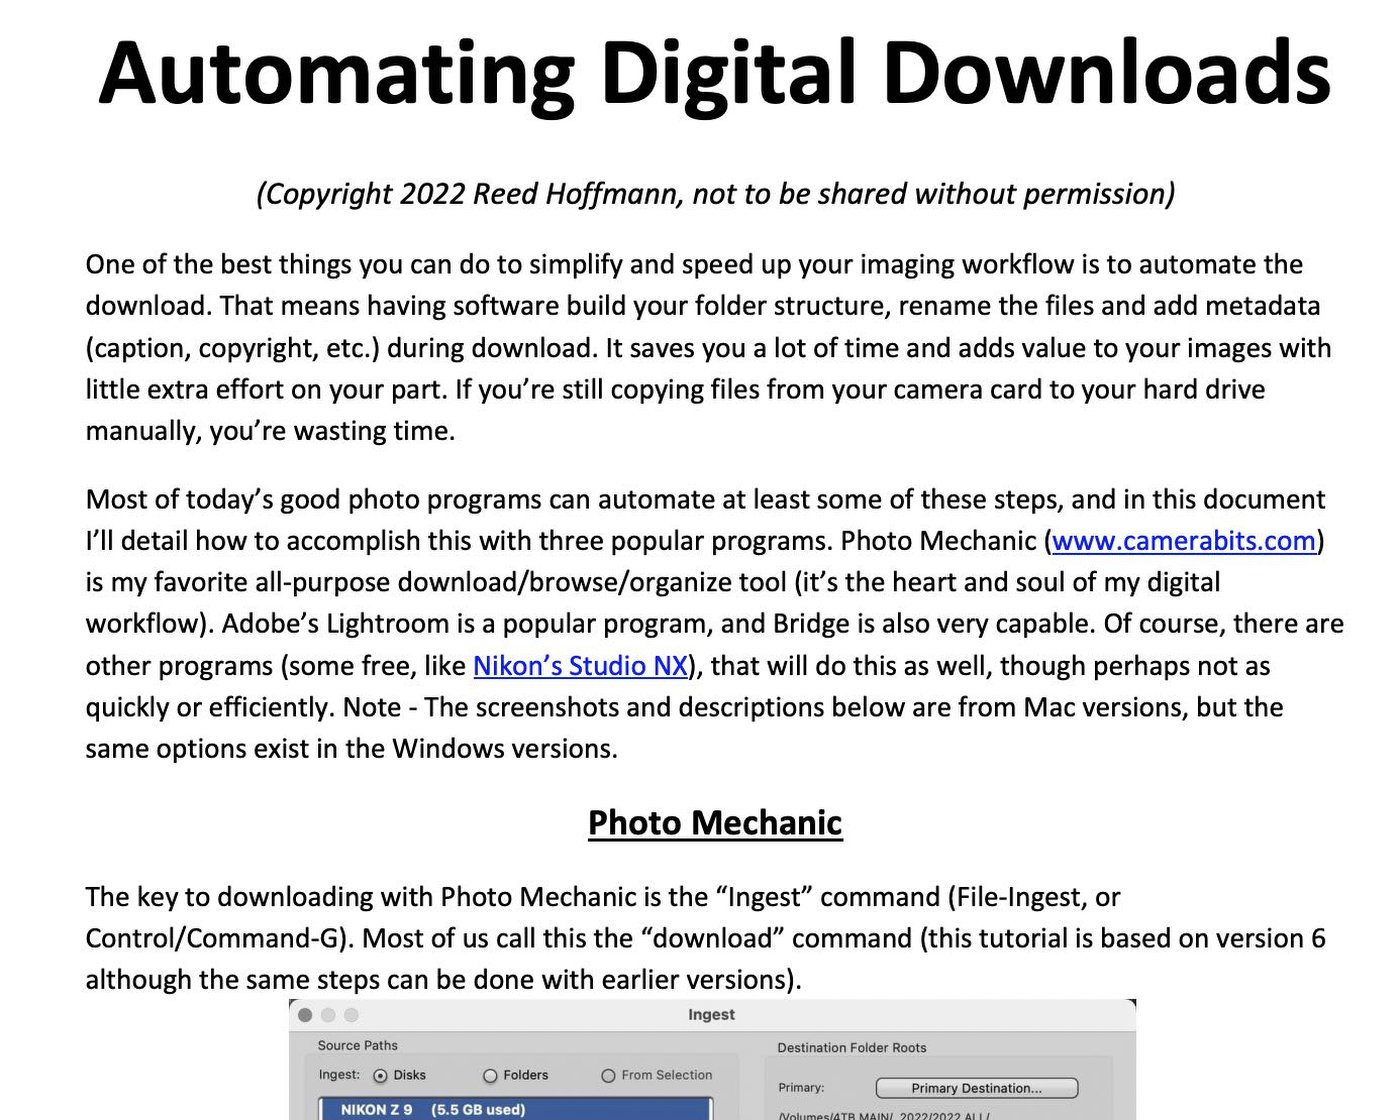
This is the PDF I’ve written explaining how to automate the process using Photo Mechanic, Adobe Lightroom or Adobe Bridge. Click the link in the text above to go to the download location for it.
2 – Keep or delete?
In the early days teaching workflow, one of the things I always preached was, “Why waste time looking for bad photos?” That meant storage was cheap, so don’t spend time looking for photos to delete. Download, find your best photos, work them up and move on. Then I got my first truly high-resolution camera, a Nikon D800 (36-megapixels). Shooting RAW, each time I pressed the shutter button I was creating a file around 50MB in size. Which made me change my tune, and flipped that part of my workflow upside down. Now, after downloading, I still go through and look for my best photos. But as I do that, I mark them (“tag,” “flag,” whatever your software calls it). I’m overly generous doing that, not looking at images critically and marking any image I may have a possible use for (I shoot a lot of “before” and “after” photos for teaching). Once I’ve marked them, I tell the software to select the photos I didn’t mark (“Untagged,” in Photo Mechanic terms) and delete them. That means that on most shoots, I end up keeping about 25% of what I shot. Going through 1000 images takes me less than an hour.
3 – Master files
The goal here is to always work on your images non-destructively, meaning the original pixels remain untouched. That could be through a catalog program (like Lightroom or Mylio), where the edits are virtual, or saved with Layers or as a DNG file (with more traditional editing programs, like Photoshop or Adobe Camera Raw). All of those mean that whatever you’ve done can be undone easily, allowing you to go backwards or forwards without starting all over again, from that “Master” file. If using a catalog program, then you should have a way of marking your very best images (color or number rating) so they can be easily searched for and found. If you use a folder-based workflow (like I do), then those best images should be saved as PSD or DNG files. In that case, for me, it makes sense to save those “Master” files back into the folder with the RAW or JPEG originals.

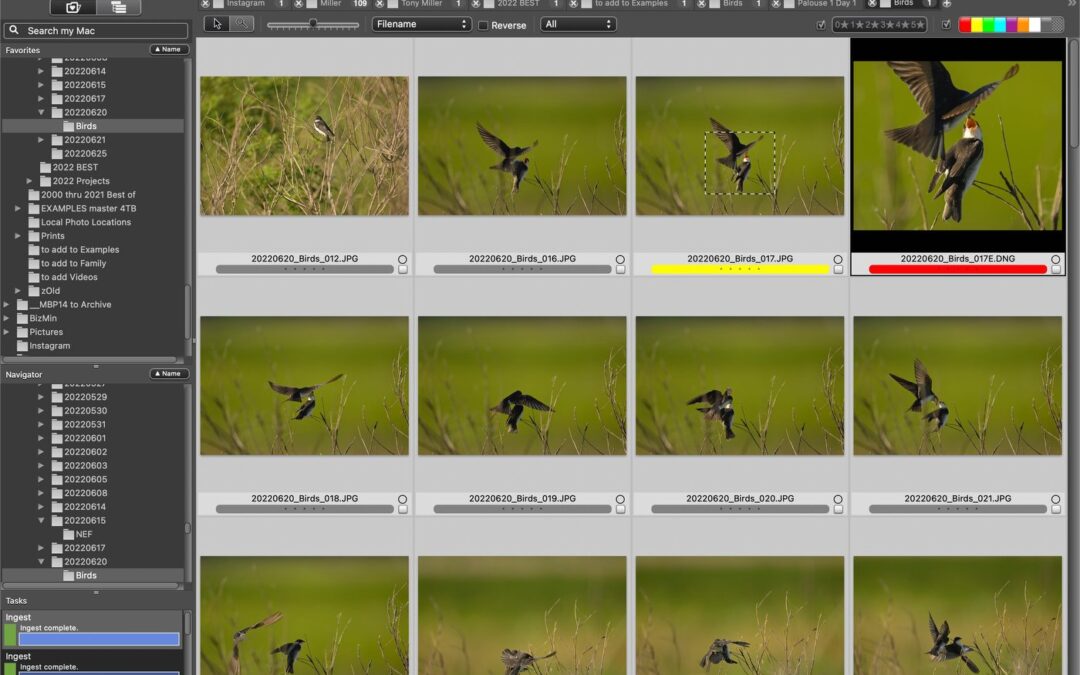
Here’s a contact sheet (in Photo Mechanic) from some bird photography I did earlier this week. The image marked yellow was one I chose to edit, the red one is the version after being edited and saved as a DNG file, and what I used to generate a lower-rez version with PM to share on Instagram.
4 – Create smaller “Best of” collections
Obviously, any time you need to find one of your best photos, you don’t want to search the entire archive. So easy access to smaller sets, or collections of images, is important. And once again, how you do this will depend on whether you use a catalog system or folder-based (like with Photo Mechanic or Bridge).
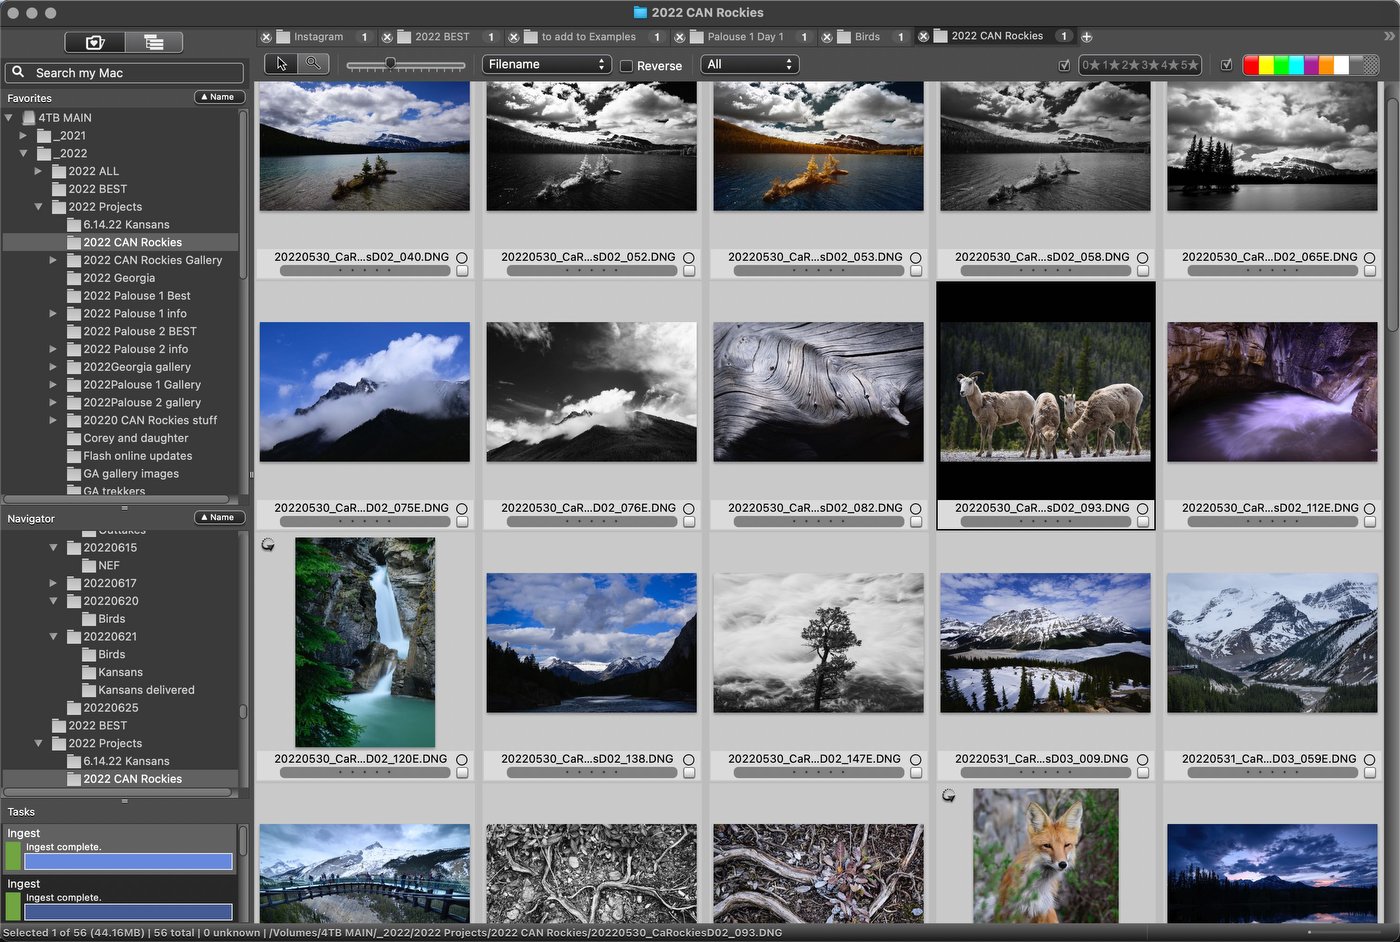
Each trip I take, or workshop I lead, results in a folder of my favorite images. I do everything date based, starting with the year, making it easy to sort and find chronologically. Here’s the folder with my favorite 56 photos from the Canadian Rockies photo trip I recently led.
Catalog – Lightroom calls this ability to group virtual images together “Collections.” The advantage to a catalog is that you only need one original. You can then have as many virtual copies of that image in as many different collections as you like without copying it over and over. The disadvantage is that you need to be very careful to keep that catalog, as well as the original files backed up in multiple locations. Otherwise, a hard drive failure or other loss could be catastrophic, since all the work you’ve done lives in that catalog.
Folder-based – On the other hand, a folder-based system means that as you create different collections, you’re copying that original (and edited version) to multiple locations, which automatically creates multiple backups. The advantage here is that those original files live in multiple different places. The disadvantage to this system is that it requires more storage capacity (hard drives).
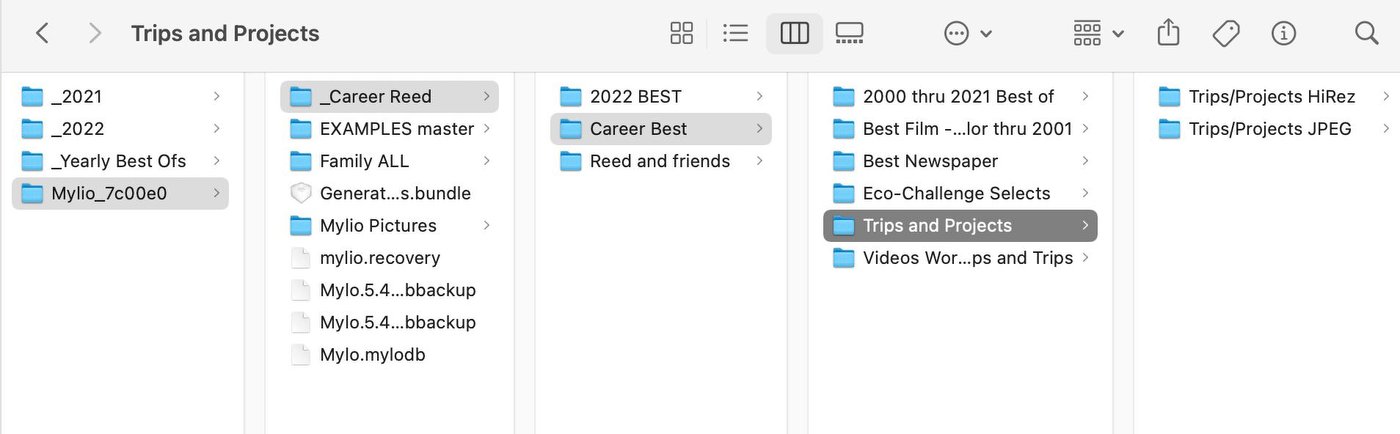
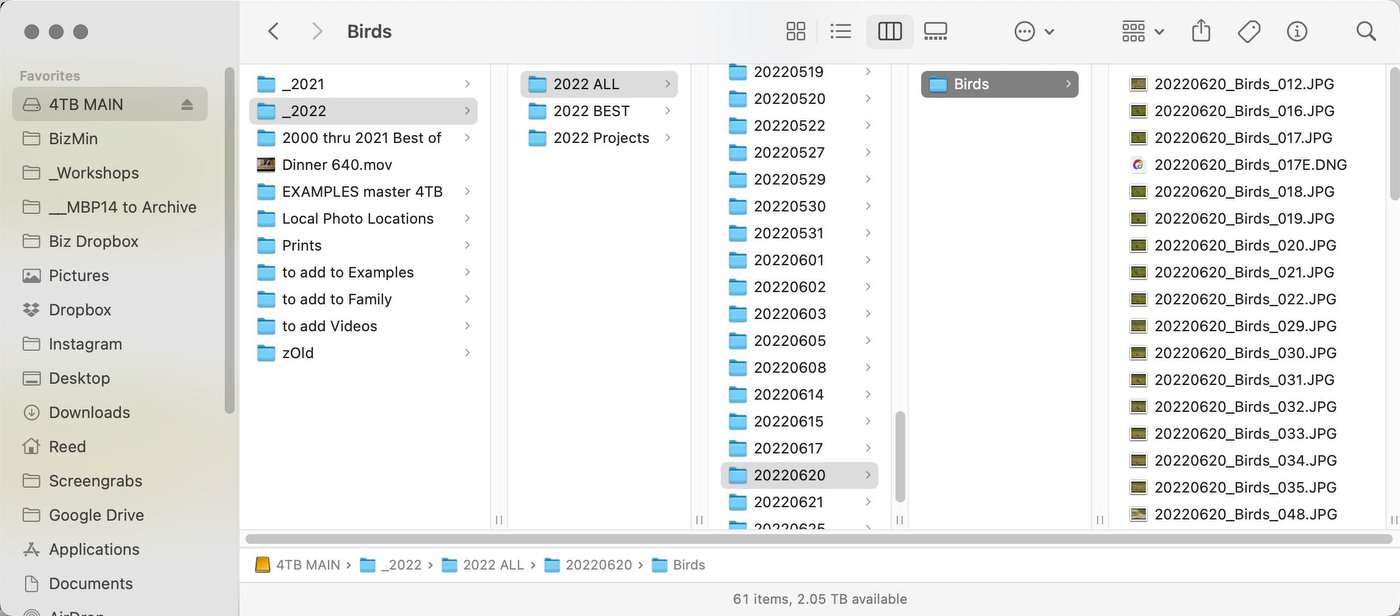
Here you can see the folder structure for my long-term archive. I use Mylio to synchronize the images to other devices (from hard drives to my phone), as a way to both backup the files and make them easily accessible.
Regardless of which system you use, creating smaller collections of your best images will make it much easier to find the ones you want, quickly. For instance, right now I’m building a “Best of 2022” for my very best photos from this year. I also have a “Best of 2000-2021” which is the cream of the crop from each of my yearly “Best of” collections. And in early 2023, I’ll select the very best from 2022 and add them to that larger collection, then changing the name to, “Best of 2000-2022.” This is how my system looks right now:
2022 ALL – contains dated folders for every day I’ve taken pictures this year.
2022 Best of – every couple of months I go through my recent shoots and add some photos.
2022 Trips – I create “best of” collections from every trip or workshop each year. So far:
2022 April Georgia
2022 May Palouse 1
2022 May Palouse 2
2022 June Canadian Rockies
5 – Storage and Backup
Whenever I’m asked how many backups people should have, my answer is always, “However many lets you sleep soundly.” In other words, there’s no magic number, just whatever makes you feel comfortable your photos could survive a disaster. But the rule of three is a good starting place. One copy on your primary hard drive (I use a RAID array, mirrored, as that primary drive). One copy on a second hard drive you can connect and backup to regularly (in other words, at home). And a third hard drive that’s kept off-site, whether at a friend’s home, an office or safe deposit box, that you can easily bring home, backup to and then return to that off-site location. If you have high-speed internet, then taking advantage of a cloud option is a good idea as well. However, considering the amount of time it would take to download everything from the cloud, I hope to never need it.
The second part of backup is to ask what you really need backed up. After all, should my home be destroyed, I don’t care about recovering every photo I’ve ever taken, just the best ones. My backups focus on those best-of collections (and that’s what I backup to the cloud as well).
And thinking long-term, past my lifespan, what photos are truly the most important? My family photos, not my career ones. So that collection/folder is the one I put the highest priority on. I want to make sure my kids have those photos once I’m gone.
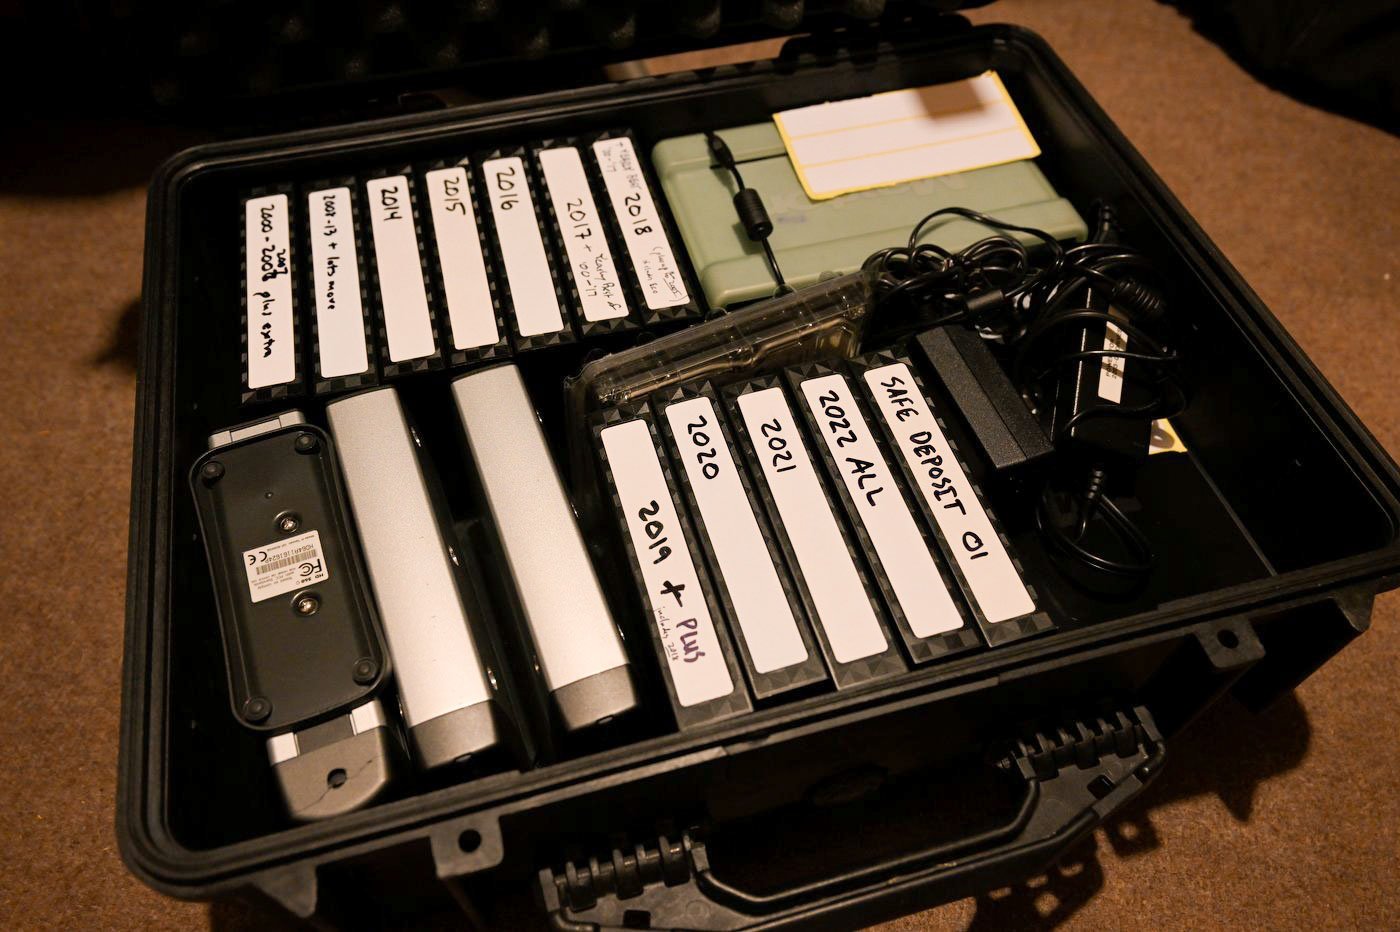
Here’s part of my own backup strategy, a Pelican case (waterproof) that I keep at home with hard drives containing all of my best images throughout my career. That includes scans of film-based photos prior to 1997.
Remember, the key to any good workflow is that it works for you. If you struggle to follow a routine someone else suggested, that’s not a good workflow. Sit down with a sheet of paper, start sketching out plans until you find one that feels like a good fit. Set a date that you’ll start using that plan. Then make a list of those steps, put it next to your computer and start following them every time you download and work on photos from that date forward. In time, it will become second nature. What about your older photos? There’s no reason you can’t go back and start shifting them into your new workflow (collections/folders, renaming, batch captions, etc.) when you have time. It’s mostly about better organization.
If you’re doing photography for fun and find the workflow part painful or frustrating, you’re doing something wrong. And in my experience, most of the time that pain comes from a poor workflow. Fix your workflow, then start having fun with photography again.
A note about Photo Mechanic
I’ve outlined what I consider a good, basic workflow above. My personal one incorporates all of that, but I’m going to take a moment now to explain why my primary tool for achieving it is Photo Mechanic. When I started shooting digital in 1996, I was using a Kodak DCS camera (a converted Nikon N90s body) and Kodak software that was clunky at best. Enter Dennis Walker. He started a small company, Camerabits, and created a much better software solution for handling those image files, Photo Mechanic. As news organizations around the world converted to digital, all of them also adopted Photo Mechanic. A browser, not an image editor, it was that key step between the camera and Photoshop that took care of the download, captioning, renaming and organizing/sorting, among other things. It was (and still is) the fastest program (that I know of) for doing that, which is why every news organization I know of still uses it.
When people ask me why I use it instead of something else, I explain that it’s the hub of my digital workflow, so speed is essential. Every image I shoot comes into my system through it, is managed with it, and goes out through it. I spend more time in Photo Mechanic than with any other piece of software, and have used it so long it’s second nature. There are keyboard shortcuts to about anything you’d want to do – I only need the mouse when I want to click a specific area to check sharpness and zoom to 100%. And that’s where one of the big speed gains happens, when zooming. If you shoot RAW, when you click an image to get a larger preview (or zoom), most software takes a moment to process that RAW data. Photo Mechanic doesn’t. It simply takes the JPEG that’s embedded in every RAW file and uses it for the preview/zoom. That, of course, is much faster than processing the RAW data. Think about how many times you look at a preview of images, or zoom in. If you’re saving one or two seconds each time you do that, it adds up quickly. Simply said, it’s the best, fastest program I’ve ever found for managing images.
Here’s my basic workflow:
1 – Put card in reader, Ingest (download) with PM, having it create folder structure, caption and rename.
2 – Browse through photos, “tagging” (“t” key) all that I want to keep.
3 – Invert the selection (“Select untagged”) and delete.
4 – Go through a second time, now marking my favorites with a yellow mark (“2” key).
5 – Sort by “Color Class” to view those images.
6 – Zoom to 100% to check sharpness (“z” key), find the very best and give them a red mark (“1” key).
7 – Use the “e” key to launch any of those images into Adobe Camera Raw (set in Preferences) to edit, saving back to the original folder as DNG files (non-destructive, edits intact).
8 – Use Cmd/Ctrl-S to save any of those images out as JPEGs at whatever resolution I need for Instagram, Facebook or any other use requiring JPEGs (and PM can convert the color space to sRGB at the same time, which is important because I shoot in AdobeRGB).
9 – At a later time, I’ll use Cmd/Ctrl-Y to copy any favorites to the “2022 Best of” folder.
“4 TB MAIN” is an eight-terabyte mirrored drive attached to my home computer. That’s where I keep all the images I need immediate access to, and where all current images are downloaded to via Photo Mechanic, using a date-based system. As a RAID array, that means it has two four-terabyte hard drives inside, and they “mirror” each other. So if one should fail, the other still has everything intact.
What else do I do with Photo Mechanic?
- Create galleries for my website.
- Open images into other editing programs (DXo PureRaw 2, PhotoMatix Pro, Nikon NX Studio, etc.).
- FTP images to various clients.
- Run slideshows.
- Burn images to disc (CD, DVD, Blu-ray).
- Import and embed GPS coordinates.
- Show on a map where those photos were taken.
- Use Code Replacement (automates the input of names/teams/numbers in sporting events) when doing work for wire services.
- Manage/change Metadata/IPTC information like Keywords.
- Search even large folders of images (thousands) quickly.
- Sort by almost any criteria imaginable, from ISO to resolution to camera to focal length…
- Change capture dates and times (if I didn’t set the camera properly when traveling).
- Create “Snapshots” to further automate things like captioning, renaming, gallery creation, FTP transfers, etc.
- Have multiple contact sheets open at the same time.
- And there’s much, much more.
If you don’t take a lot of pictures, or do much with them, then you probably don’t need Photo Mechanic. But if you do, and aren’t happy with your current system, then you might want to give the 30-day free trial a go. It’s not for everyone, but if it works for you like it does for me, it’s well worth the cost (and is regularly updated without asking for more money). There are two versions, the regular and the “Plus” version, which adds database/cataloging capability. You can find more information about both of them here.
(If you like this story, please share it with your friends and let them know about the links on photography that I post on my business Facebook page. I’m also on Instagram and Twitter, @reedhoffmann. And if you’re curious about the workshops I teach, you can find them here. You can subscribe to this blog, to be notified when new ones are posted, on my home page.)