Recently I got a case of tennis elbow from shoveling snow (a rare one-day, 12-inch snowfall here). And since we don’t get snow very often in Kansas City, and it never lasts long, I decided to make that elbow pain pay off. I got out my cross-country skis and took one of our dogs for an outing at a nearby golf course. I also took along my Nikon D5300 with the18-140mm f/3.5-4.5 kit lens. Snow on a sunny day can present exposure challenges, so I decided to get out and shoot some examples.
In-camera light meters make exposure much easier, but sometimes they can create problems. We become so reliant on automatic exposure that it’s easy to forget those systems don’t have brains. Meters simply read the amount of light coming through the lens and determine what shutter and/or aperture combination is appropriate at that ISO setting. Understanding how this works is the first step to becoming more successful with exposure. And to do that you need to understand the different metering choices you have.
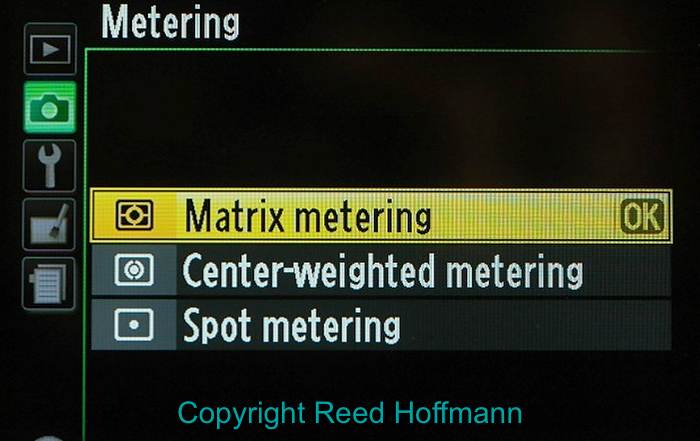
In the menu of a Nikon camera today, you’ll find Matrix, Center-weighted and Spot metering choices. Photo copyright Reed Hoffmann.
Most cameras today (both SLRs and compacts) offer three choices of metering. Spot and Center-weighted metering simply average the light in the area they cover. For Spot that’s a small circle in the center of the viewfinder, and for Center it’s a larger circle. Averaging the quantity of light in that circle, the camera then determines – based on ISO – what the proper shutter and aperture combination would need to be to render that area as a middle gray (metering doesn’t think in color). By doing that, the hope is that the exposure would then record whites as white and blacks as black, with the midtones falling between. If you have an even mix of white, black and midtones, then your exposure will be at least close to correct. But what if the area inside that circle is made up mainly of just dark or light
If there’s an even balance of light and dark tones, like in this shot, then leaving the meter at 0.0 should result in a good exposure. Nikon D5300, ISO 200, Aperture Priority, 1/1600 at f/8, with exposure compensation at 0.0, 18-140mm f/3.5-5.6 lens at 20mm. Photo copyright Reed Hoffmann.
tones? That’s why today’s cameras offer a “Matrix” metering option (sometimes called “Evaluative”). It breaks the entire frame into a series of separate areas and calculates exposure by determining the amount of light in those areas and applying that against a database of thousands of photos. This means that Matrix is the “smartest” of the three options, and the default for most cameras (and what I use 95% of the time). However “smart” it is, though, there are still times where the exposure it calculates will be darker or lighter than I want it. And that’s when I use exposure compensation. Let’s look at an example of that.
Since the meter works by averaging information, if you’re photographing a stage performance against a black backdrop, you can expect your exposure to be off. After all, the meter doesn’t know that the background is black, and you want it to stay
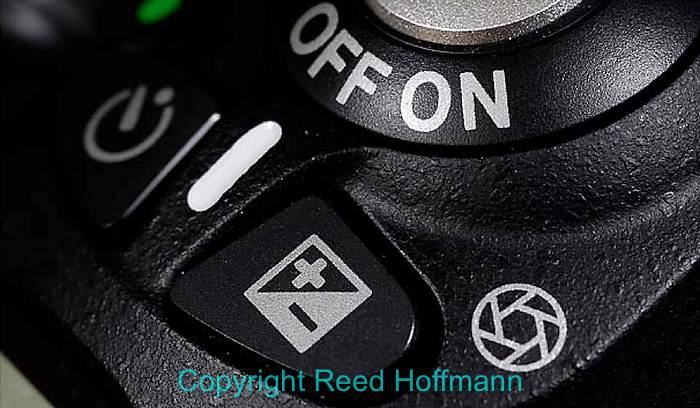
If you look, you’ll usually find a button marked “+/-” on your camera, which you hold down while turning a control dial or wheel to increase or decrease exposure compensation. Photo copyright Reed Hoffmann.
black. In trying to expose to record that black as gray, it will overexpose, resulting in any bright areas being overexposed. In that case, you’d want to underexpose, to compensate for the large areas of darkness that you don’t care about. If you’re using an automatic exposure mode (Program, Aperture Priority or Shutter Priority), then holding the +/- EV (Exposure Value) button and dialing in some minus compensation (the range is usually from .3 to 5 stops) will result in those blacks staying black, and proper exposure for the lighter areas. Using the “highlight alert” display and/or histogram while reviewing images can help you find the proper amount of compensation.
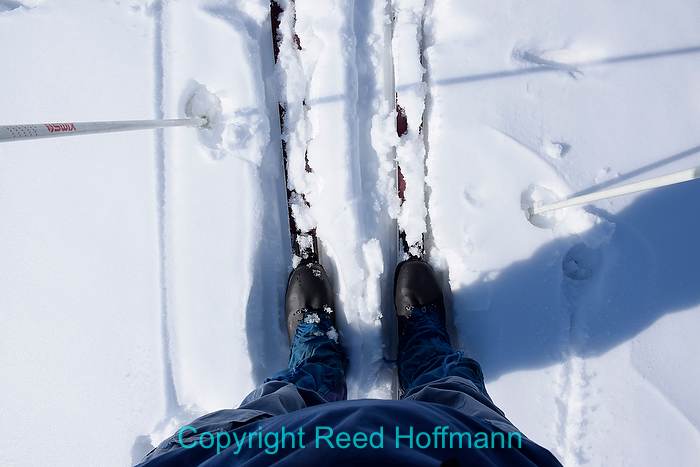
The other example is what I was going out in the snow that day to shoot. When photographing in snow, particularly on a sunny day, you want the snow to record as bright white. However, as explained above, if the majority of your scene is that snow, the meter will expose to record it as gray. In that case I’d want to dial in some over-exposure, using the +/- button to move my exposure to the plus side. If, on the other hand, I framed a scene so it had about equal amounts of dark and light areas, then leaving the EV at “0.0” would be right, because the meter would expose for the average of those two, keeping the darks dark and the whites white.
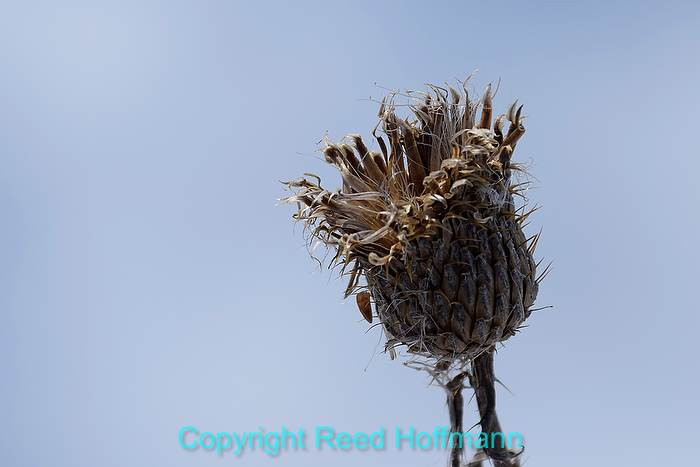
Leaving the meter untouched, at 0.0 EV, the white snow records a bit gray. Nikon D5300, ISO 200, Aperture Priority, 1/800 at f/9, with exposure compensation at 0.0, 18-140mm f/3.5-5.6 lens at 140mm. Photo copyright Reed Hoffmann.
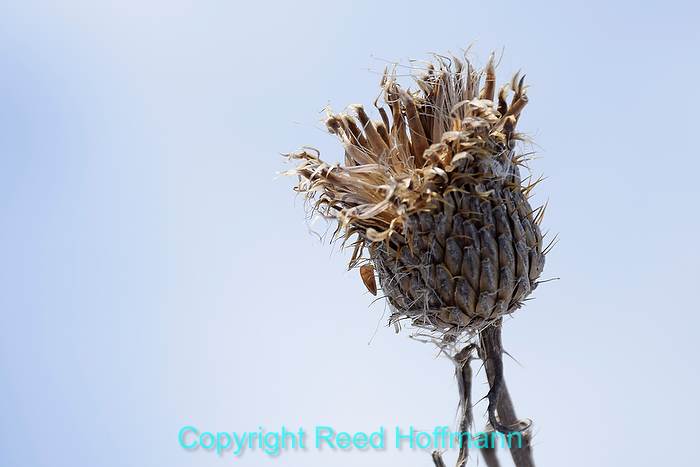
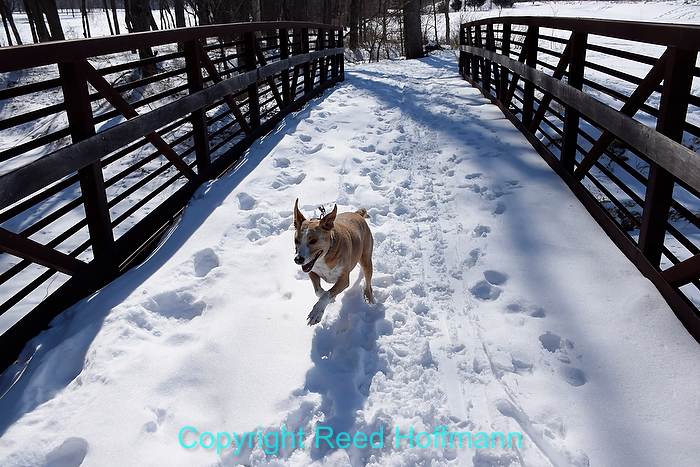
By over-exposing (using exposure compensation), I was able to keep the snow bright white, and also get more detail out of dark subject. Nikon D5300, ISO 200, Aperture Priority, 1/400 at f/9, with exposure compensation at +1.0, 18-140mm f/3.5-5.6 lens at 140mm. Photo copyright Reed Hoffmann.
Some people think that the answer to problems like this would be to change to Spot metering mode. And that would work fine, if the area inside that spot is a medium tone. If it’s dark or bright, though, then you’ll still have an exposure problem.
If you prefer to shoot in Manual exposure mode, then you’ll want to compensate in a different way. Dialing in plus or minus exposure compensation while in Manual simply changes the meter read-out, instead of the exposure. To over or under-expose while shooting in Manual, simply change your aperture or shutter speed while watching the in-camera meter, pushing that meter read-out left or right of center to get the over or under-exposure you want.
With today’s cameras we can more carefully manage exposure than ever before, if we know how. Using the +/- button with an automatic exposure mode is one of the easiest ways to accomplish that. That’s why this is one of the lessons I teach at almost every workshop I lead. And you don’t need an SLR camera to take advantage of this knowledge. Every point-and-shoot I’ve ever picked up has exposure compensation, and most smartphones do too.
So remember, if your photos are coming out too light, find that +/- button and dial in some minus, to make the next shots come out darker. And if they’re coming out too dark, dial in some plus compensation to make them brighter. It’s easy to do, and you’ll love the results.