This year, mainly due to COVID 19, I’ve been doing a lot more night photography around home. The one advantage to that is that it’s given me an opportunity to experiment with star trails photography. In the old days of film, that meant one long exposure (perhaps an hour or more), with the high risk of it being ruined by cars passing or planes flying through. Now, however, with shorter exposures thanks to an intervalometer and software to composite the photos, it’s much easier, and a lot of fun too. Here’s how to do it…
Step 1 – You need a clear, preferably moonless night. While having some moon (perhaps a crescent?) can add foreground illumination, the added brightness in the sky will lessen the apparent brightness of the stars. And of course, if there’s a moon, it has to be outside your frame (too bright otherwise).
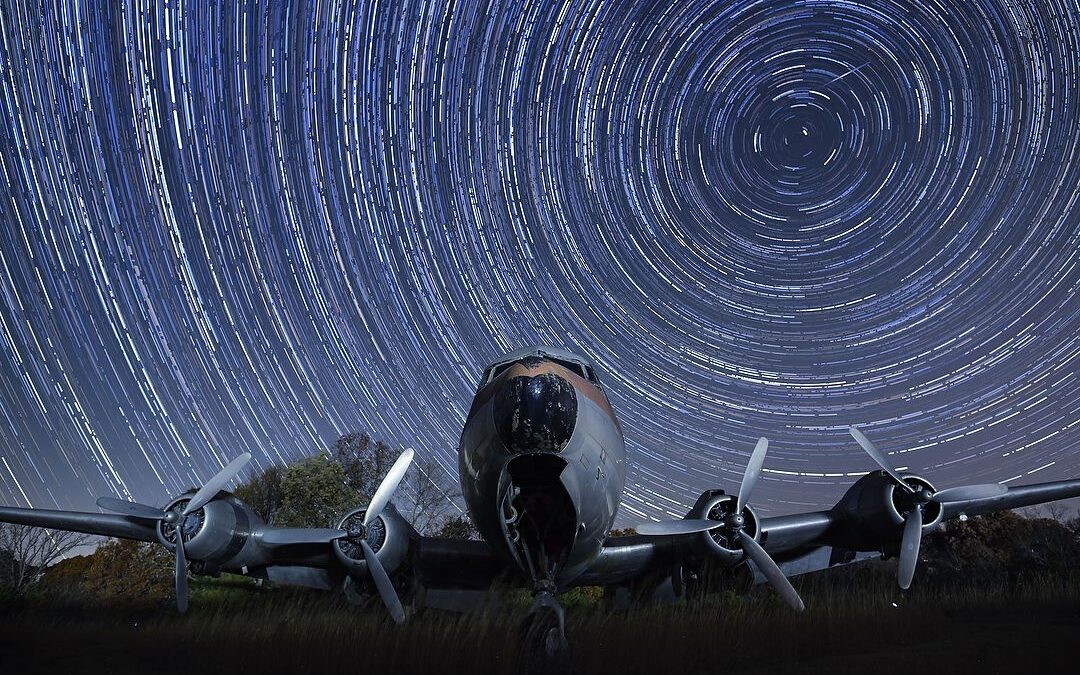
Step 2 – Find a good location. You’ll need a place that doesn’t have a lot of ambient light in the area, or much traffic driving through. Then, remember, the photo isn’t just about seeing star trails, there needs to be an interesting foreground subject as well. And when looking for that good foreground, keep in mind what’s behind it. In other words, if there’s a city or town in the background (even many miles away), it can create a horizon glow that’s annoying. Finally, keep in mind that the earth rotates, which is why the stars appear to move. That apparent rotation of the stars happens around the North Star. So, if you want to see that circular pattern in your photos, the North Star need to be in the frame. (You can see a good example of both a foreground subject and rotation with the North Star in the photo above)
Step 3 – Find your base exposure. In other words, in Manual exposure, what combination of ISO, shutter speed and aperture give you a good exposure for your scene. This is where I cheat a bit. Because you’re working at night, and photographing fairly dim subjects (the stars), you can expect your shutter speed to be around 30-seconds. Since I don’t want to waste a lot of time (30-seconds over and over) just to find my exposure and framing, I’ll start with a crazy high ISO, which on my current camera is 51,200. That lets me use shorter exposures for those test shots. Then once I’ve got my framing and exposure, I’ll do a simple calculation to determine how many “stops” I need to shift my ISO down and shutter speed up for a 30-second exposure.
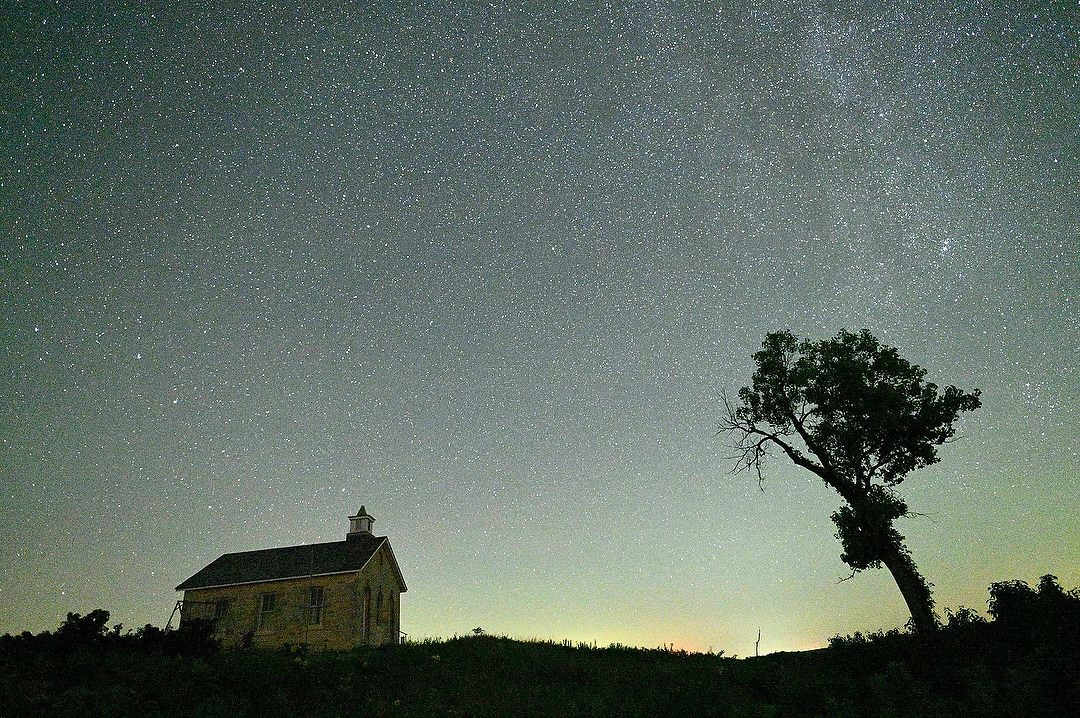
To find my framing and check focus, I cranked the ISO up to 51,200 so my exposures could be short. Nikon D780, Manual exposure, 3800K white balance, ISO 51200, 4-seconds at f/2.2, Nikkor 20mm f/1.8G lens.
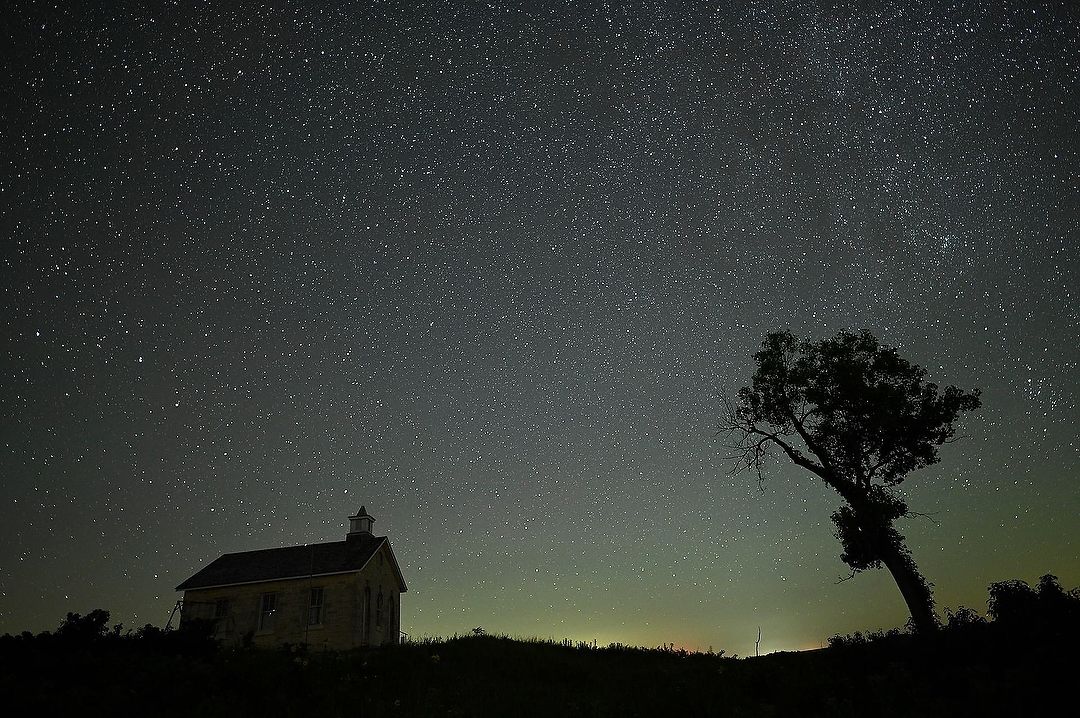
After getting the framing and focus right, I dialed in the exposure I wanted for the entire series, at a much more reasonable (less noisy) ISO. Here, you can also see some of that horizon glow I mentioned. Nikon D780, Manual exposure, 3800K white balance, ISO 2000, 30-seconds at f/1.8, Nikkor 20mm f/1.8G.
Step 4 – Use an intervalometer. This isn’t to say you can’t stand there and trip the shutter over and over and over and over, but as you can see, that gets kind of repetitive, and a pain. It’s much easier if you have an intervalometer that can automate the process. My Nikon cameras have that built in, but if your camera doesn’t, you may want to buy an intervalometer. With that you can set how often you want the camera to shoot, and for how long (or how many frames). If you’re doing a 30-second exposure, you need to make sure the interval is set for at least 31-seconds. I always turn off “Long Exposure Noise Reduction,” since otherwise that added 30-second time would mean a large gap between every frame and at least a 61-second interval. Some intervalometers offer additional settings, like “exposure smoothing,” “silent photography, “interval priority,” “focus before each shot” and even automatically creating a movie from the frames, but these are the key ones. Oh, and make sure to turn off autofocus, or the camera will try to re-focus between every frame, which it won’t be able to do and so ruin the series (that’s why some cameras offer the option to turn off “focus before each shot.”
Step 5 – Bring a chair. You’re going to be hanging around waiting, so might as well get comfortable. Here’s another thought, though – why not find a second night photo you can make nearby, and bring a second camera and tripod to work on that?
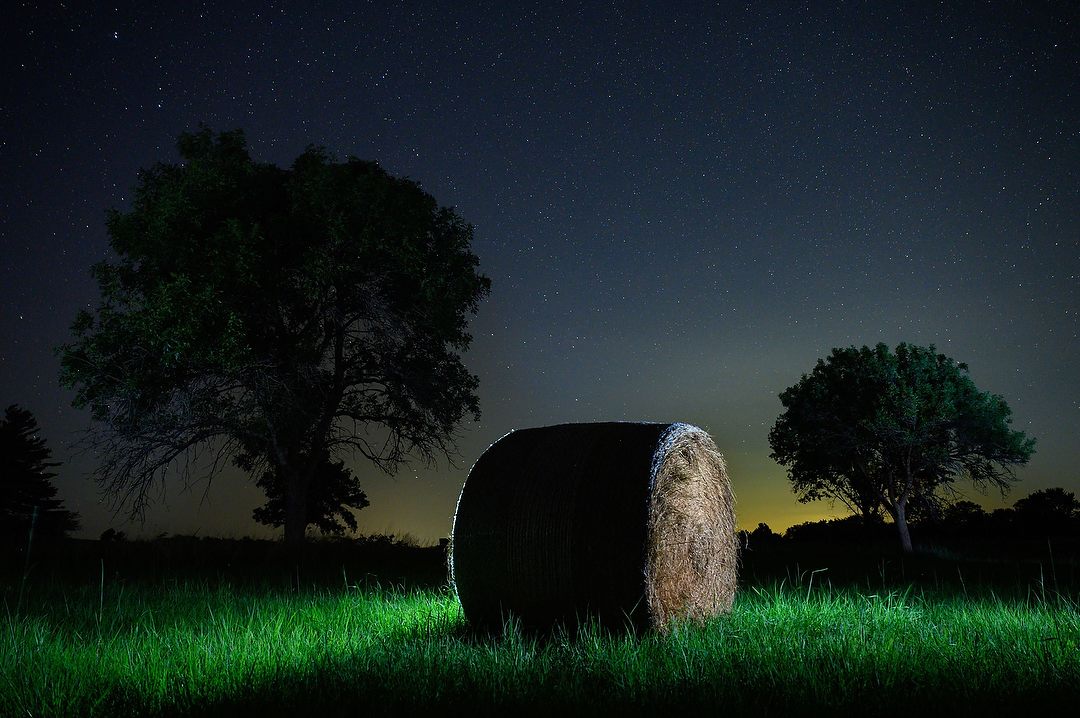
I had one camera set up in the field behind the tree to the left, shooting a series of star trails photos. During the hour it was clicking away, I came over here and did a little light painting. Nikon Z 6, Manual exposure, ISO 3200, 25-seconds at f/4, Nikkor 24-70mm f/2.8 S lens at 27mm. using two LumeCubes.
Step 6 – Sort the photos. Once you’ve downloaded the photos, you’ll want to remove any where something bad happened (like a car driving past or plane flying through). While it might be possible to edit out the airplane lights later, this is certainly easier. And car headlights that heavily overexpose parts of the scene generally aren’t fixable later. The good news is that you actually don’t need every single frame. You’d be surprised how many frames you can remove before it becomes noticeable. That’s because there are so many stars, and thus trails, that those small gaps are nearly invisible. And, while I like to have over an hour’s worth of frames to start with when doing this, even 30-minutes of images can give you a pretty good end result.
Step 7 – Edit the photos. This is where you take the first image and adjust it for color and tone, then do any selective edits. That could mean making a horizon glow less bright (and/or shifting its color) or working any other small parts of the scene to make it look better. Shooting RAW files gives you more power during the edit phase. Then, if your software allows, apply that same edit to all the rest of the photos (I use Lightroom to do this, using the “Sync” function). You need all the photos to closely match in these changes to help the stacking software do a better job. After the edits are complete, if you shot the photos in RAW, you’ll need to export them as JPEGs to use the software suggested in the next step.

I started with over an hour of 30-second exposures, but after removing the ones that had planes flying through and headlights ruining the scene, I was left with 71 frames. After culling the group down to these, I did an edit of the first and then synced that edit to the other 70 before exporting them as JPEGs.
Step 7 – Assemble the photos. This is the fun part. While there are a number of software packages that can “stack” multiple photos to create a single star trails image (including Adobe), it’s hard to beat the free StarStaX software (for both Windows and Mac). You simply point it at your folder of images and watch it assemble them.
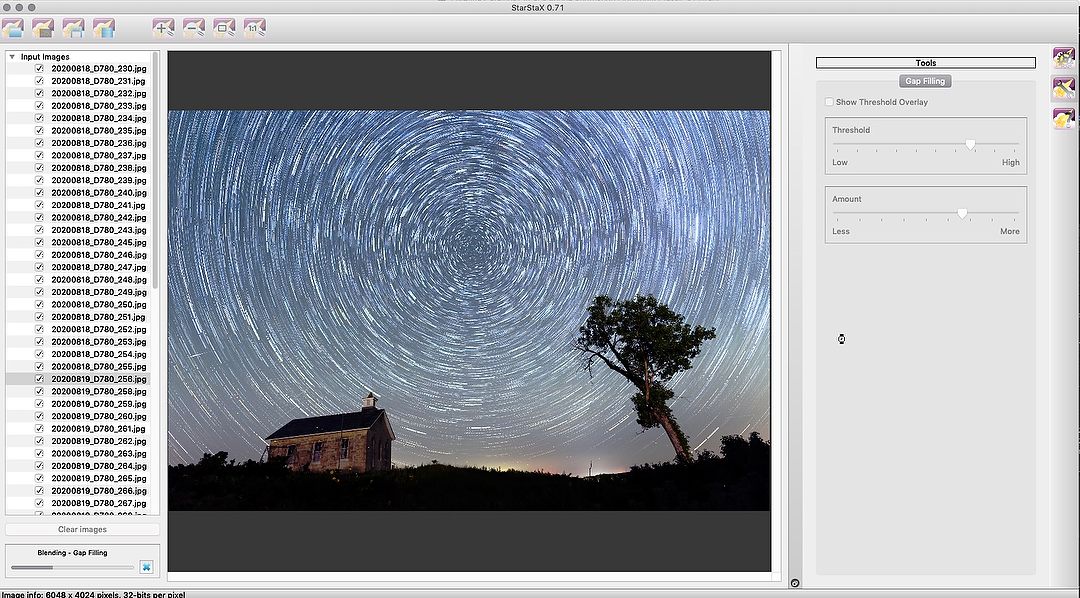
This is the StarStaX software, as it assembles the composite. While if offers various options for how it can do this, the “Lighten” one is a good starting point.
Step 8 – Make one last edit. After saving the result from StarStax, bring it back into your editor for any final adjustments.
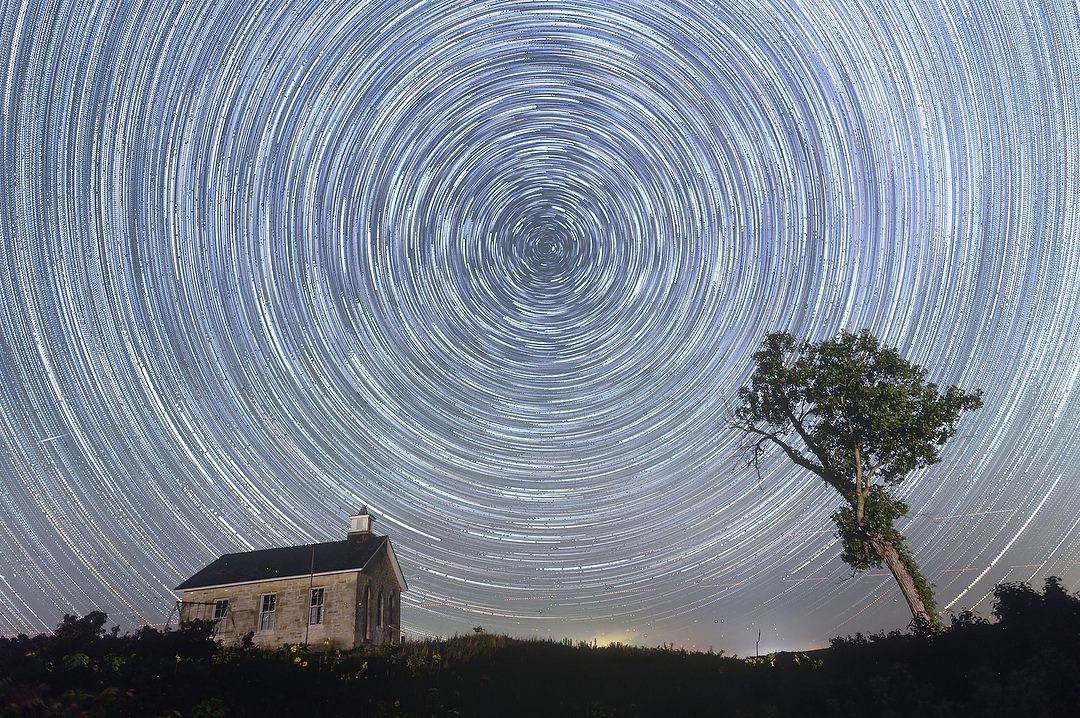
Here’s the image that StarStaX assembled for me. As you can see, it’s far from finished. I kept the frame with the planes at lower right because that’s also when a shooting star came through on the left side.
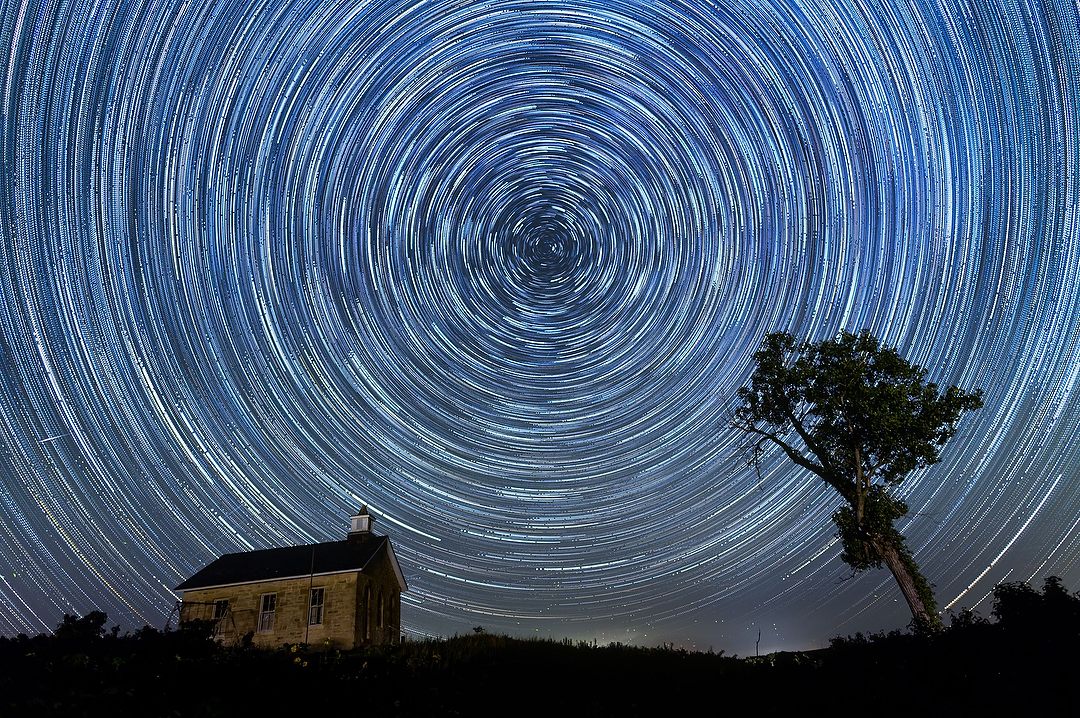
And this is after I edited it, to improve the overall look, as well as removing a those plane trails and a bunch of fireflies that showed up against the building.
That’s it! Don’t get discouraged if it doesn’t turn out great the first time. There are a lot of places where mistakes can be made. For instance, a friend of mine set his interval to 31-minutes instead of 31-seconds the first time out, and ended up with two frames. Of course, he didn’t make that mistake again, and the next time he came away with a really nice picture. So if you’re looking to add a new trick to your night photography, give star trails a try.
(If you like this story, please share it with your friends and let them know about the links on photography that I post on my business Facebook page. I’m also on Instagram and Twitter, @reedhoffmann. And if you’re curious about the workshops I teach, you can find them here. And, you can subscribe to this blog on my home page.)