One of the things I preach when teaching photography is the power of “different.” I urge my students to always be on the lookout for ways to create photos that are different from what other people are doing. That’s the reason why, after color photography became the norm, black-and-white suddenly became the “new” thing to do. It’s also the reason behind the small resurgence in film photography. Not that it’s better (it’s not), but because it’s different. And when it comes to different, infrared photography is about as different as it gets. (Note: this story isn’t a deep dive into the technical side of infrared photography. You can find lots of that elsewhere online. Here, I’ll tell you about my real-world experiences using infrared.)
In normal photography, infrared light causes problems. That’s because we can’t see it, and if cameras could, issues crop up with things like color, focus and exposure. That’s why all digital cameras today have a glass filter over their sensors, which, among other things, blocks infrared light. So if you want to try infrared photography, the first thing you have to do is defeat that filter. There are two ways to accomplish that, each with advantages and disadvantages. Since the first is less expensive (an advantage), that’s where I’ll start.
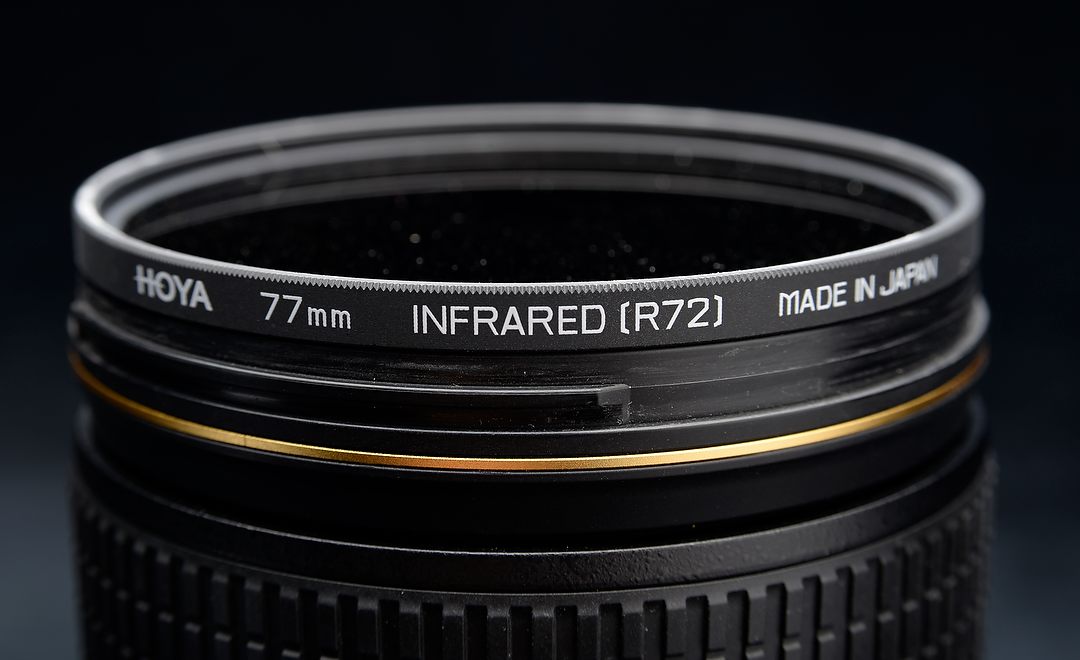
The Hoya R72 filter is like using a heavy neutral density filter, blocking visible light and only letting infrared light pass.
While your camera is designed to prevent infrared light from interfering with photography, a small amount of that light does get through. However, it’s not enough to cause any problems. But, if you add a filter to your lens that blocks visible light and only lets infrared pass (the Hoya R72 is a popular choice), the only light your camera would record would be infrared. Which brings up the first problem (disadvantage) with using a filter – it’s extremely dark. Because of that density, you need a long exposure (measured in seconds) for enough infrared to get past that blocking filter inside your camera to create an image. And, since the metering system is also designed for visible light, you’ll find a proper exposure not through the meter, but through trial and error. In my experience, an overexposure of one to four stops beyond what the meter says will get you close. That apparent overexposure will disappear when you process the image.

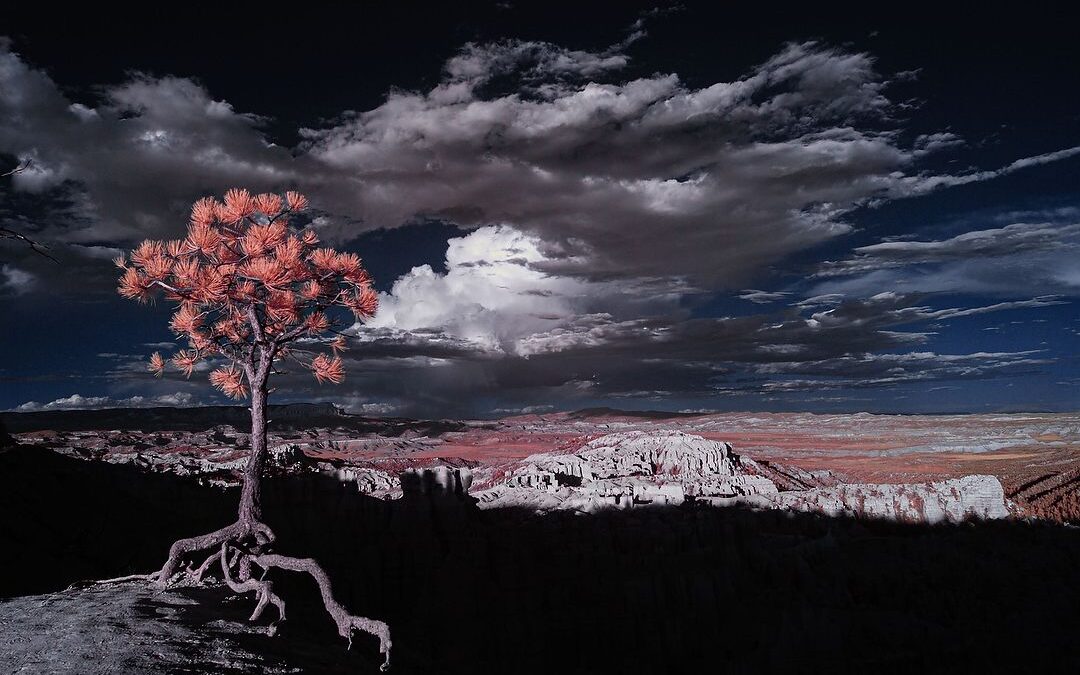
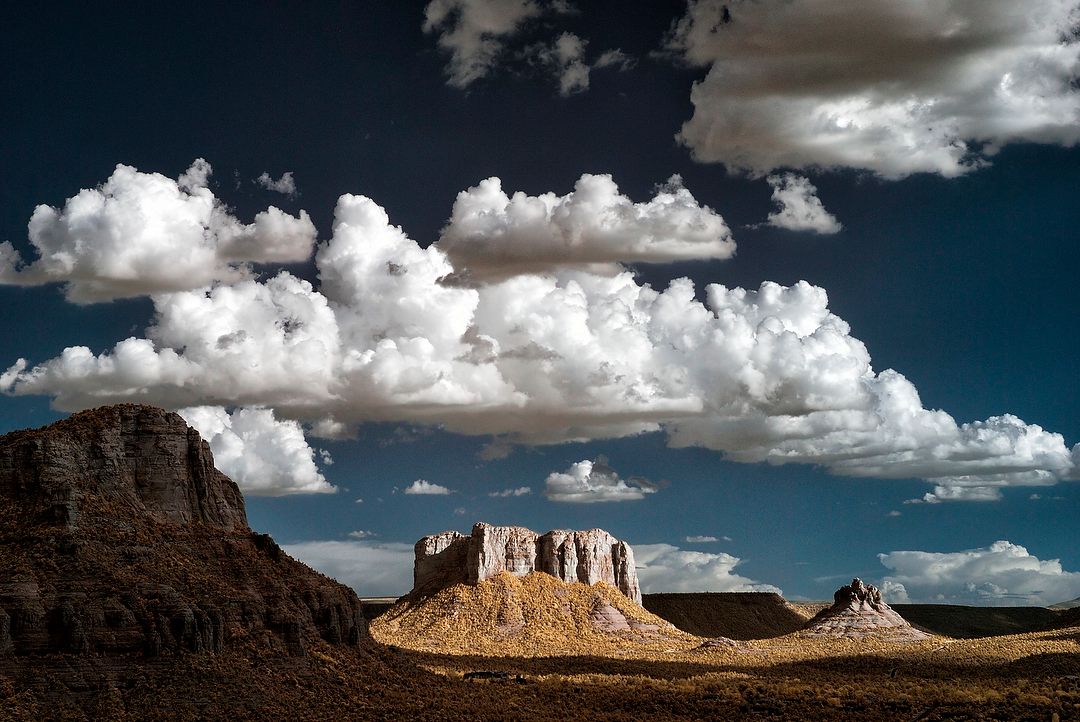
This is my original capture from a trip in 2007 using the Hoya R72 filter on my Nikon D700, at ISO 200, f/5.6 and 2.5-seconds. At that time I didn’t realize how much apparent overexposure was needed for a good infrared exposure, so this is actually pretty heavily underexposed. It should have been at least a ten-second exposure. Luckily, I was able to correct for that in processing.
After correcting for the white balance in software, I then chose to give the sand and sky a blue cast.
Working from a tripod (because of the long exposure), and with a filter that’s very dark, you’ll need to compose and focus before putting the filter on your lens. Which brings up another disadvantage: your camera’s focusing system is designed to work with visible light, not infrared. With a mirrored camera (DSLR), that means your focus can be slightly off (whether using a filter on the lens or a converted camera). Since most IR photos are shot with wide-angle lenses, small apertures (like f/11) and depth of field usually solve that problem. This isn’t an issue with mirrorless cameras, since they focus off the sensor (which is accurate for both visible and IR light). Newer mirrored cameras can often “see” through that dark filter when in Live View, which means you may be able to focus using the rear LCD, which is also using the sensor for focusing. If you do have a mirrored camera converted, there’s often an option to send a lens in with it and have the camera calibrated to that lens, to solve the focus problem. Of course, there’s an additional charge for that service.
The final disadvantage to using a filter on the lens is that you’ll be more limited in how you can process the image. It’s great for black-and-white infrared, but for the popular “false color” images, it tends to be less effective (though this depends on the model of camera being used, and how much IR it actually blocks). And that brings us to the more expensive option, which is having a camera converted to infrared photography.
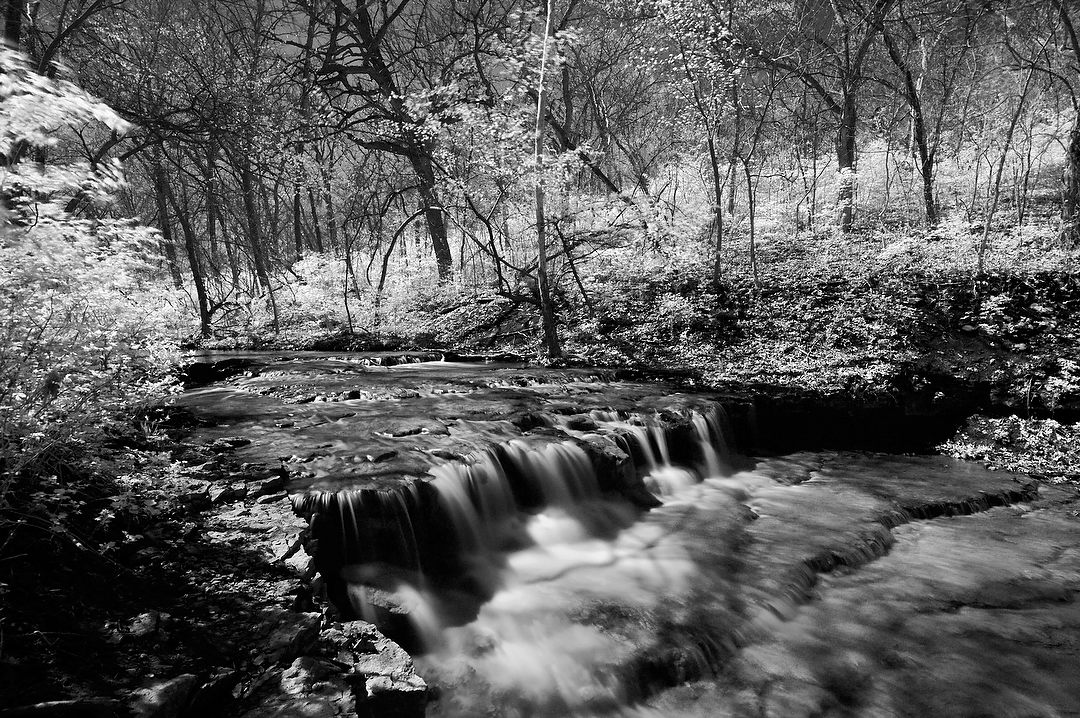
A classic infrared black-and-white, using the Hoya R72 filter on the lens for the original capture, then converting to monochrome in software. In this case, the dense IR filter, requiring a long exposure, acted as an ND filter resulting in blurred water. Nikon D780, Manual exposure, ISO 200, 60-seconds at f/10. Nikkor VR 16-35mm f/4G lens at 16mm.
An infrared conversion means removing the IR blocking filter covering the sensor in your camera. Of course, that also takes away anything else that filter does, things like UV filtration and low-pass defocusing (to prevent moire), and renders the automatic dust cleaning feature non-functional. At this point, there are two options. One, to replace that filter with an IR passing filter, or two, replace it with clear glass. The advantage with either of these options is that your exposures are now similar to what you’d have with a normal camera. With that infrared blocking filter gone, you’re now shooting at shutter speeds that don’t require a tripod. You can use the camera’s autofocus system easily (and very accurately with mirrorless or Live View on a mirrored camera). Finally, you can use the camera’s metering system too, as long as you remember you’ll need to overexpose, just like when using a filter on the lens.
The least expensive of these two options would be replacing the camera’s stock filter over the sensor with an IR passing filter, which usually costs around $250-$300 (depending on the camera model). While you can save money by doing that yourself, it’s also pretty easy to ruin the camera (Life Pixel has tutorials on doing it yourself. Take a look, they’re not for the faint of heart). Not being that brave, I’ve now sent three cameras to Life Pixel since 2007 to have them replace that filter (there are other companies that do this too, like Kolari Vision). When having that filter replaced, you have multiple choices. After reading about the different ones and what they do, each time I chose the “Super Color” filter, as it would give me the most flexibility in how I process the photos afterwards. But remember, doing this makes that camera an IR camera only – it can no longer be used for “regular” photography (although you could pay again to have the process reversed later).
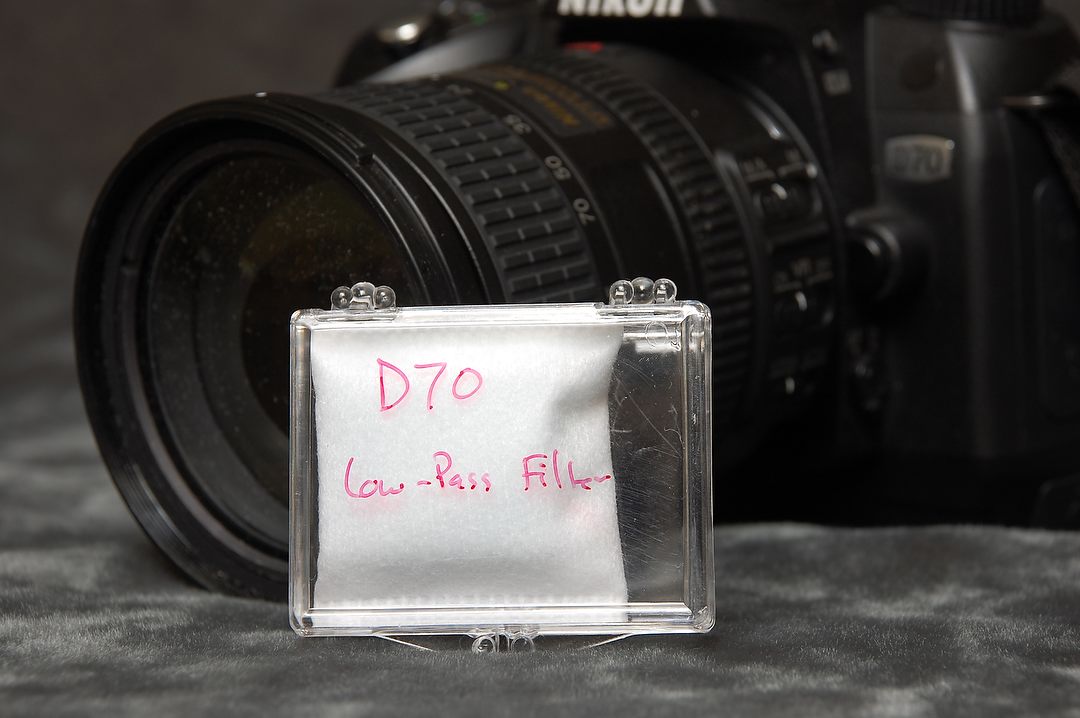
This is the first camera I had converted to infrared back in 2007, a Nikon D70. I had Life Pixel replace the built-in low-pass filter with a “Super Color” filter, meaning the camera could only record infrared from then on. However, they did return the low-pass filter with the camera in case I ever wanted to have it converted back for “normal” photography.
By 2015, I was using a Nikon D80 converted to infrared, again by Life Pixel, again with a “Super Color” filter. This is one of the photos created with it, from outside Sedona. Note that I no longer need a tripod for daytime photography. Nikon D80, Manual exposure, ISO 100, 1/320 at f/8.
The third camera I had converted, wanting more features and resolution than the D80, was a Nikon D7000. This photo is from February, 2020, when I took it along on a workshop I was teaching in Cuba. Nikon D7000, ISO 100, f/8 at 1/250, with Nikkor AF-S Nikkor 18-35mm f/3.5-4.5G ED lens at 24mm.
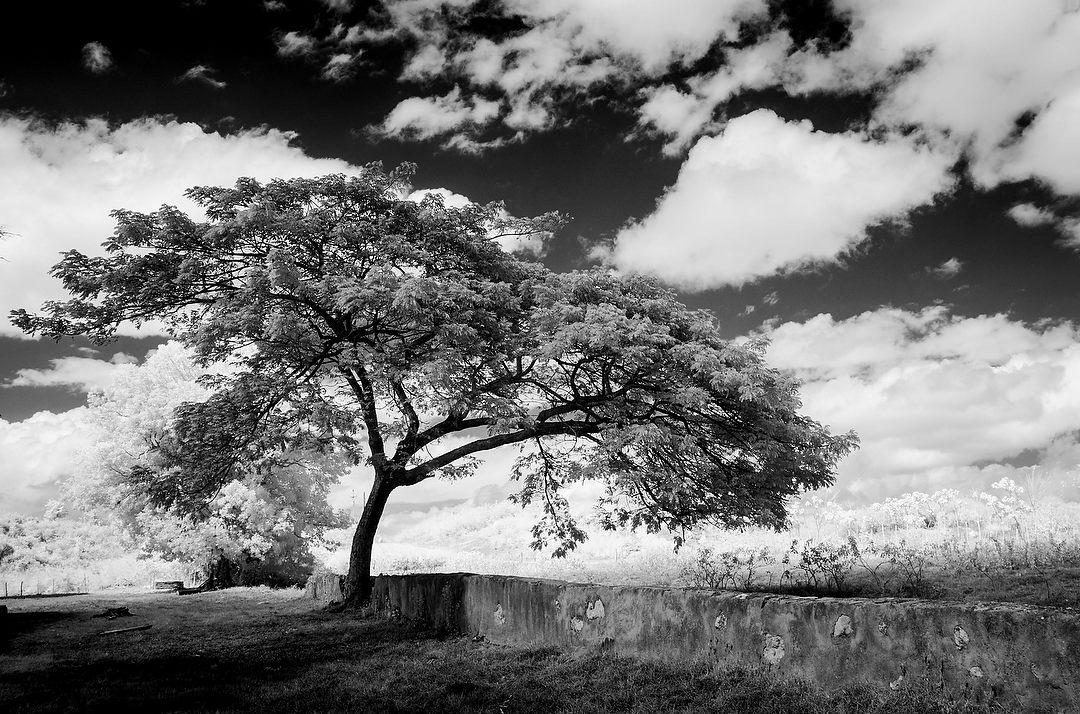
And one more photo from the Cuba workshop, only this time I chose a black-and-white conversion of the infrared capture. Nikon D7000, ISO 200, 1/200 at f/11, Nikkor AF-S Nikkor 18-35mm f/3.5-4.5G ED lens at 21mm.
The other option is to have a conversion done that would let you use the camera for different types of infrared photography, in addition to astrophotography and visible light (regular) photography. That option is the most expensive, but gives you maximum flexibility. It’s called a “Full Spectrum” conversion, because now the camera “sees,” and can record, visible, infrared and ultraviolet light. The process involves removing the factory filter covering the sensor and replacing it with what is essentially clear glass. With that done, you can now add a filter to your lens for the type of photography you want to do (for astrophotography, no extra filter is necessary). While you can shoot the camera without any filters, the results look a bit off due to the variety of wavelengths of light being captured. So in addition to paying for the conversion, you’ll need to buy the filters you want, which is why this is the most expensive of the options. And that’s just what I did for my most recent IR conversion.
When Nikon introduced the Z 6 II last year I bought one, and then no longer really needed my original Z 6. But selling it used would only get me back about half of what I paid for it. And I really, really like the camera, especially for its low noise performance at high ISOs. That’s when I decided to keep it, and instead send it in for a full spectrum conversion.
As I mentioned, I’ve had three older cameras converted to infrared (all with the “Super Color” filter installed). The downside each time was that they didn’t have all the features my newer cameras did, and were lower resolution. But the conversion made infrared photography easier than using a filter, and I had a lot of fun with each of them. However, it also meant that if I wanted to shoot infrared, I needed to bring along an extra camera (and as DX cameras, I often needed to bring a super-wide DX zoom to get the focal lengths I prefer). Since I always travel with two cameras, choosing to bring that infrared camera meant bringing a third camera and extra lens, which wasn’t always possible. Even when it was possible, it meant I had to choose which bodies to carry when out shooting. For instance, on my Cuba workshops in early 2020 (pre-COVID, thankfully), I brought my infrared Nikon D7000, but each day would have to choose whether that would be my second camera or not – carrying three cameras was simply too much. Having the Z 6 converted to full spectrum not only solved that problem, it gave me other options as well.
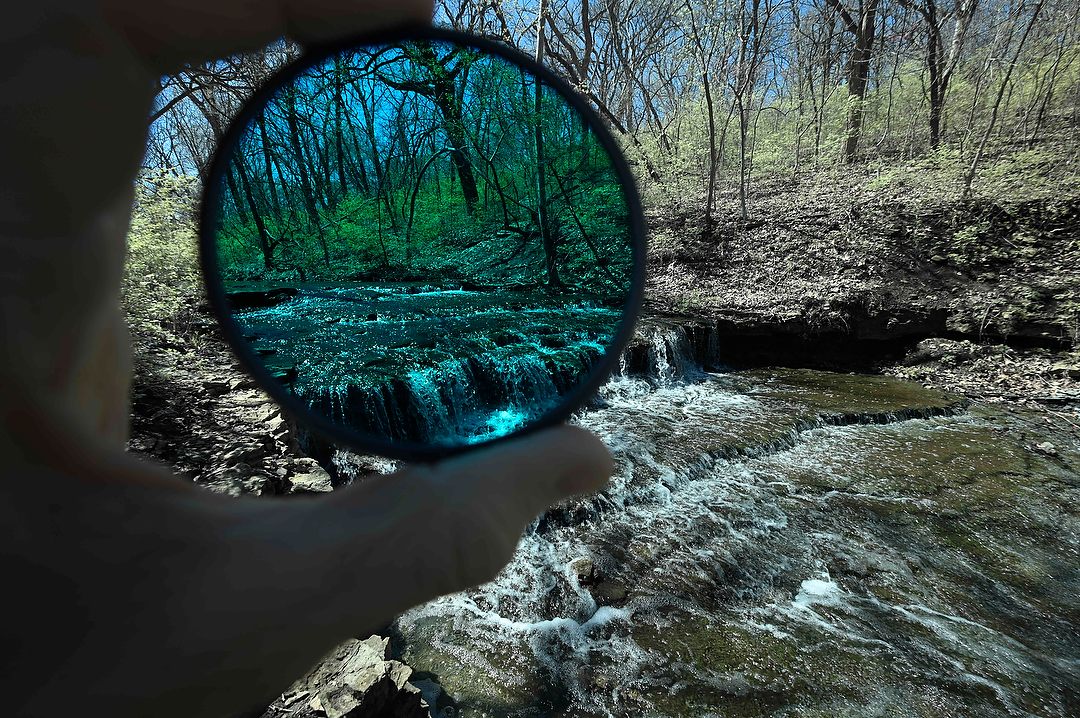
The scene around the filter is how daylight looks with a full spectrum conversion and no filter. The filter I’m holding is a “Visible Bandpass” filter, which blocks IR and UV to return proper color to the scene. Nikon Z 6 converted to full spectrum, ISO 100, f/9 at 1/200, Nikkor Z 14-24mm f/4 lens at 15mm.
Adding a “Visible Bandpass” filter to the lens returns the Z 6 to shooting as it did before, visible light photography. Putting a “Super Color” infrared filter on it lets me shoot the type of infrared I prefer. I also bought a “Hyper Color” filter, which is better suited for infrared black-and-white as well as infrared portraits. And, without any filter, it’s an even better night photography camera than before (and it was excellent before!). So the Z 6 has now become the second camera I can take with me on trips. Changing filters changes what light passes through the lens, and thus what kind of photography I can do with it.
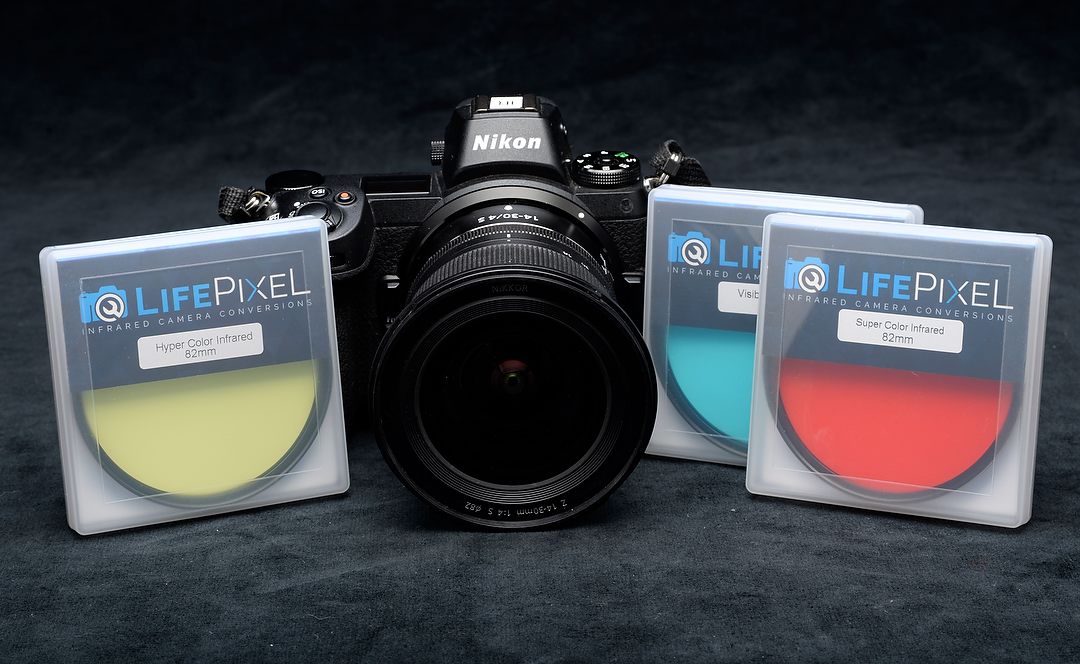
My Nikon Z 6 converted to full spectrum and the three 82mm filters I’m using with it. The Hyper Color (yellow) is for black-and-white and IR portraiture. The Visible Bandpass (blue) lets me shoot the camera as a “normal” camera. And the Super Color filter (red) is for classic IR false color photography.
Are there drawbacks to a full spectrum conversion? Sure. First, it’s more expensive. Then you have to buy filters for what you want to do (one at a minimum, but at least two to get the most out of this conversion). You have to carry and care for those filters. When using the Visible Bandpass to shoot “normal” photos, you lose about a half-stop of light due to its light blue color. When buying those filters, you need to get the size for the largest lens you normally use (for me that’s 82mm, so I can’t use that Z 6 with my long telephoto lenses). To use those filters with small lenses, you need to buy step-up rings (about $15 each) for each of them and bring those along as well. Despite all that, I believe the advantages in doing this will outweigh those disadvantages. I hope I’m right!
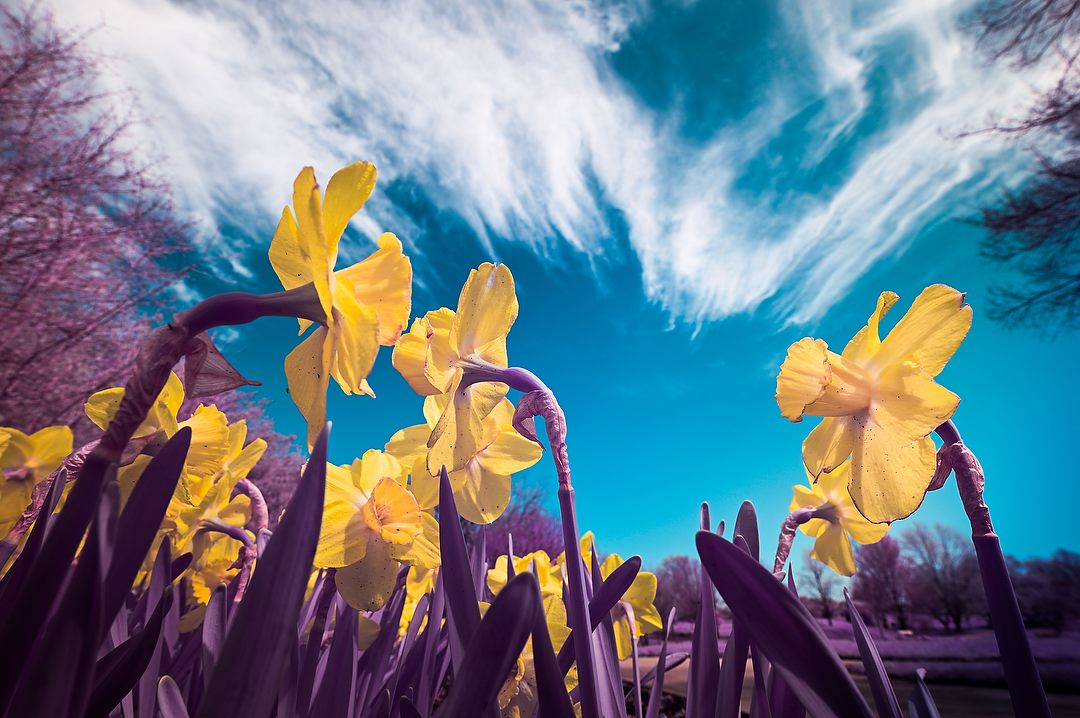
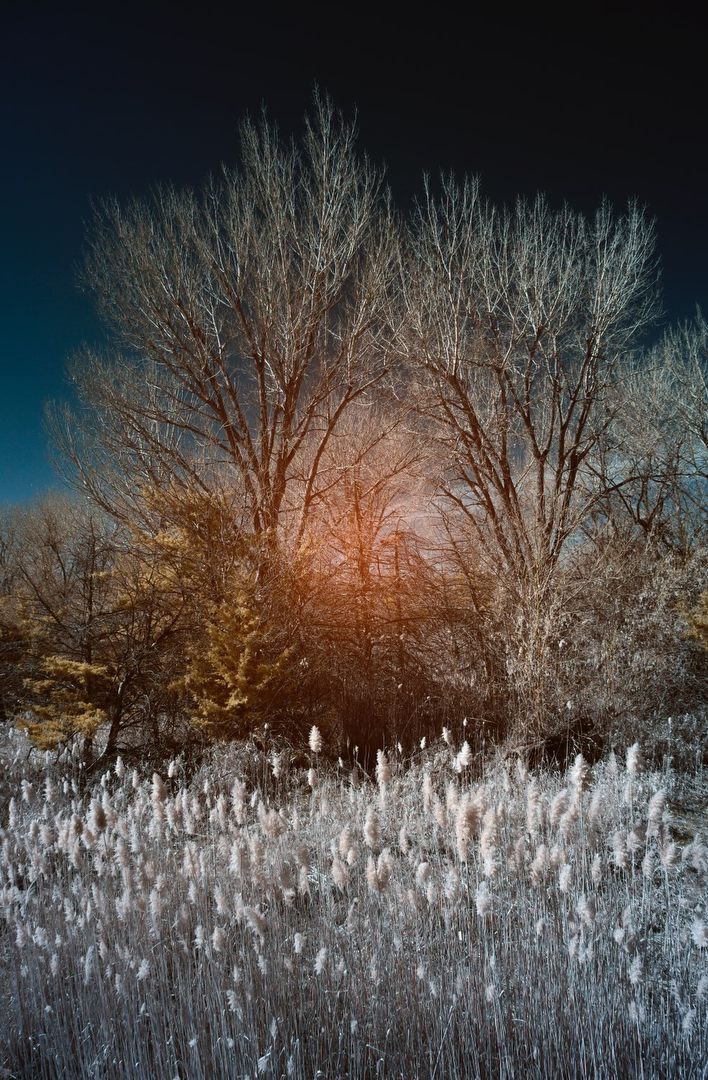
Daffodils at my local arboretum photographed with the full spectrum Z 6 and the Super Color filter. Nikon Z 6, Aperture Priority, Preset white balance, ISO 200, 1/320 at f/11 in Matrix metering, +1.0 EV, Nikkor Z 14-30mm f/4 S lens at 17mm.
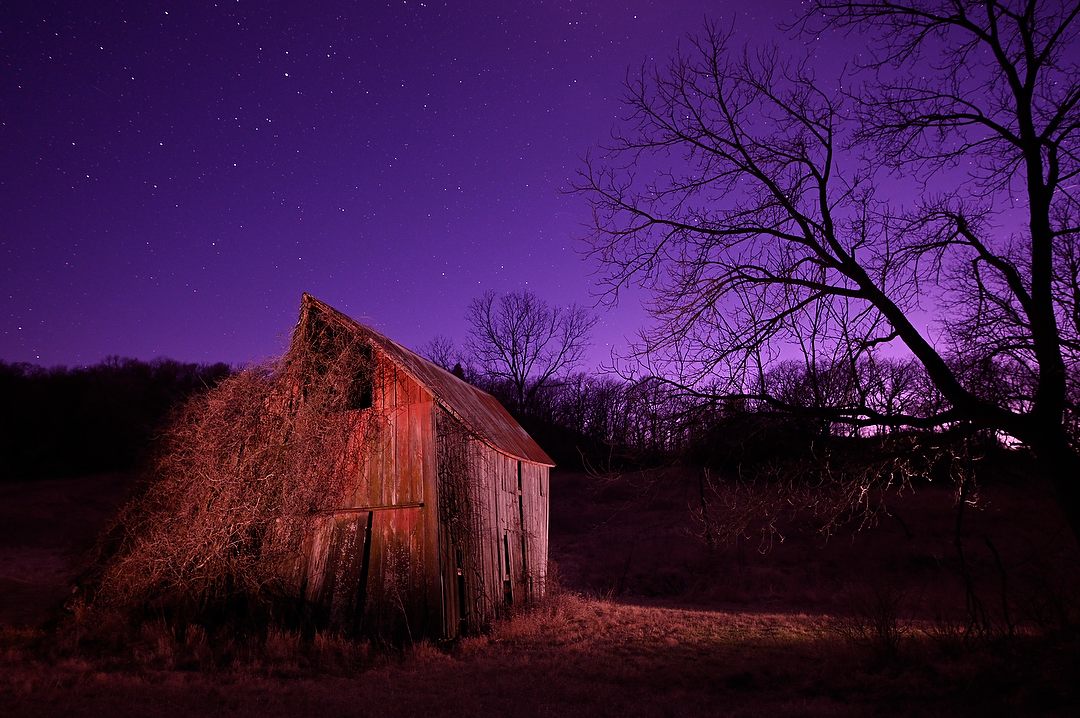
This is how the original capture on one of my recent night shoots looked right out of the camera with no filter, full spectrum only. I’m using a pair of Lume Cubes to light the barn. Nikon Z 6, IS0 2000, f/4.5 at 8-seconds, Nikkor Z 14-30mm lens at 21mm.
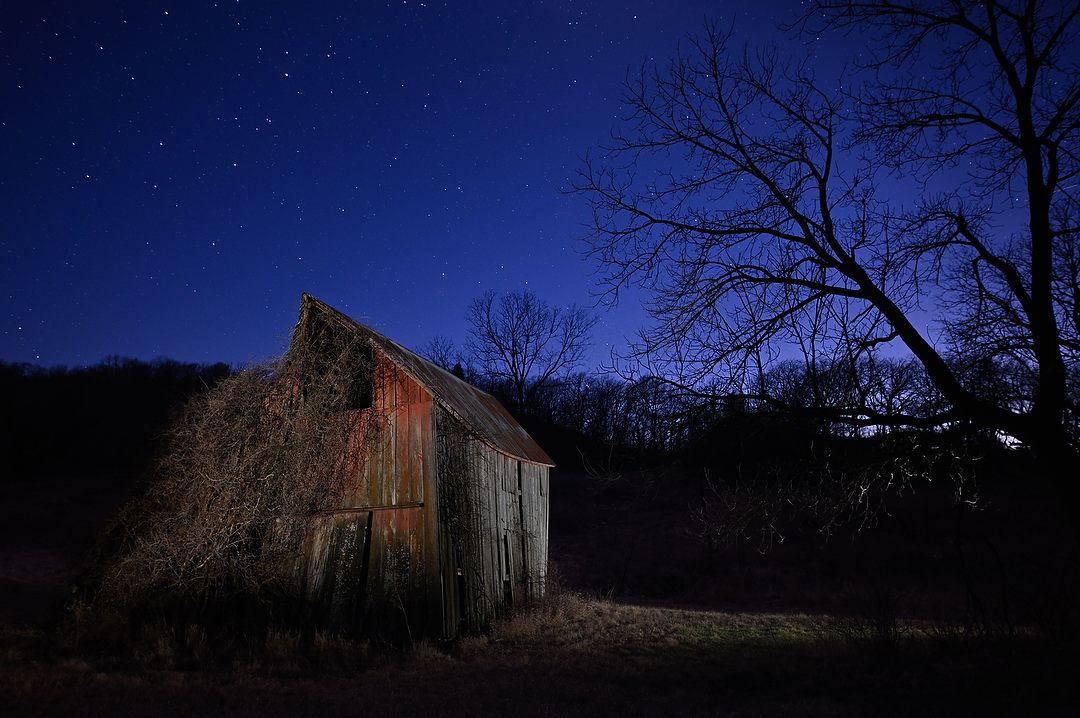
And here’s that same image, after setting the white balance in Nikon Capture NX-D from a grey card lit by the Lume Cubes. Nikon Z 6, ISO 2000, f/4.5 at 8-seconds, Nikkor Z 14-30mm lens at 21mm.
Before we get to the actual shooting of photos, there are two more things I should mention – flare and hot spots. IR is much more susceptible to flare than normal photography, so anytime the sun (or any bright light source, like the moon) is in front of you, you may get flare. Lens hoods are helpful, and I’ve also held my left hand out over the top of the lens to stop, or minimize flare. Hot spots happen when using some lenses (it has to do with IR light and what it does inside the lens), and are more pronounced at small apertures. They’re just what they sound like, a bright area in the center of the frame. In black-and-white, if noticeable, they can sometimes be dealt with in software. With color, though, they become much more challenging. I had hoped my Nikkor Z 24-200mm lens would be a regular lens for IR, but it suffers from this when shooting color. However, when shooting black-and-white IR, it’s fine, as is my Nikkor Z 28-400mm lens. For color, though, my Nikkor Z 14-30mm doesn’t show hot spots, which is lucky for me because I shoot most IR with a wide lens (and I love that lens). After some testing, I’ve also found that my Nikkor F-mount 24-120mm f/4 lens doesn’t show hot spots shooting color, so I now have a step-up ring to allow those 82mm filters to be used on it. You can find lists on the internet where people have posted what lenses do and don’t work for them, but those lists aren’t very comprehensive.
Here’s what you might see if the lens you’re using (Nikkor Z 24-200mm f/4-6.3 in this case) is susceptible to hot spots. This doesn’t mean there’s anything wrong with the lens, just that it’s designed for working with visible light, not infrared.
As for shooting infrared, here are a few tips.
– Sunlight is your friend. It has lots of infrared, where overcast days don’t. Contrasty, mid-day light, which photographers often avoid, is actually great for infrared.
-Infrared is reflected and absorbed differently than visible light, which is one of the reasons it looks so different and why foliage can go white and skies black. Most artificial light sources lack infrared, although flash has a lot of it.
– Since the color you see with your eyes is due to visible light, you need to think composition, not color.
– White balance is still important, though, and the traditional way to start is by creating a custom, or “Preset” white balance off a patch of sunlit green grass. Without that custom white balance, your entire image will be red. If you shoot without a custom white balance in JPEG, you’ll be very limited in how you can process the image. However, if you’ve shot in RAW format, it’s not a problem, because then you can set the white balance after the fact, in software. (Here’s more info about white balance, and other topics like hot spots and lens flare.
– In normal photography, as long as you’re close with exposure and white balance, JPEG is fine. When shooting infrared, however, you’re working with light that the camera’s not designed for, so you need the power that comes from having RAW data. With that, you now have the ability go much further when editing your infrared images.
But even with RAW data, there’s disagreement in the infrared community over the best way to start processing an infrared capture. Traditionally, that RAW image was best opened and initial white balance set using your manufacturer’s software, which is free (I use Nikon’s Capture NX-D, but the newer NX Studio would work as well). This gives you more latitude in setting the white point and shifting color than you’d get by going straight to Photoshop. After starting with the manufacturer software, you’d then open into Photoshop, or whatever your preferred editor is, to continue. This is my workflow. Some people believe you can create what’s essentially a profile, using Adobe software, that gets around the limitation that going straight to Photoshop would have. I prefer the manufacturer software route, but of course, that’s your decision to make, and just the first in many choices you have in editing your photos.
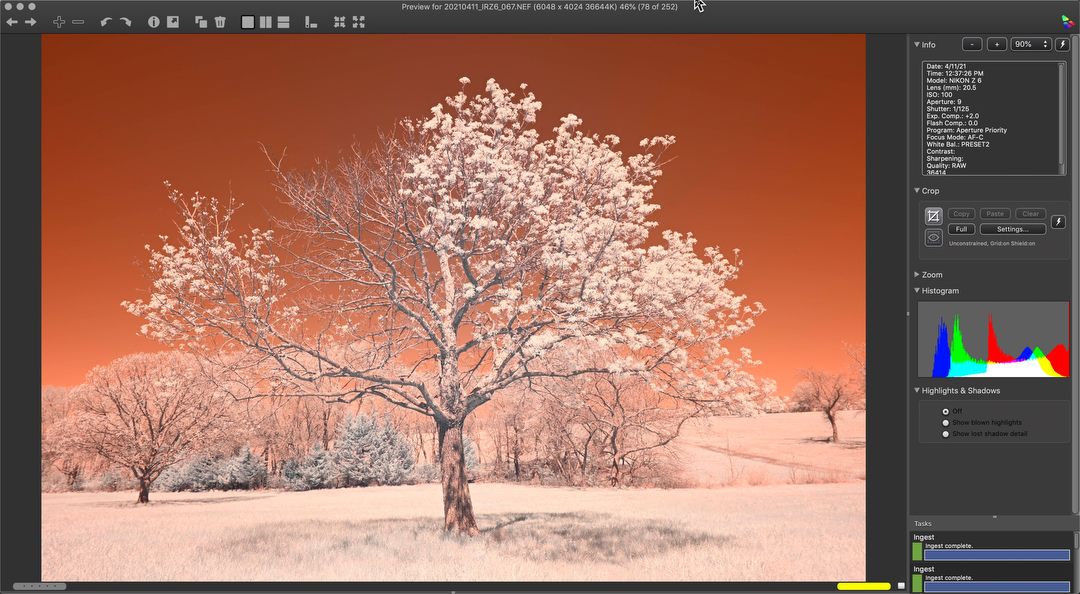
This is the original RAW image shot with the Super Color filter on my Nikon Z 6, as viewed in Photo Mechanic, the browser I use. You can see by the EXIF data and histogram at right that it would appear the image is badly overexposed. But since it’s infrared, that’s not actually the case, as you’ll see in the next screenshots.
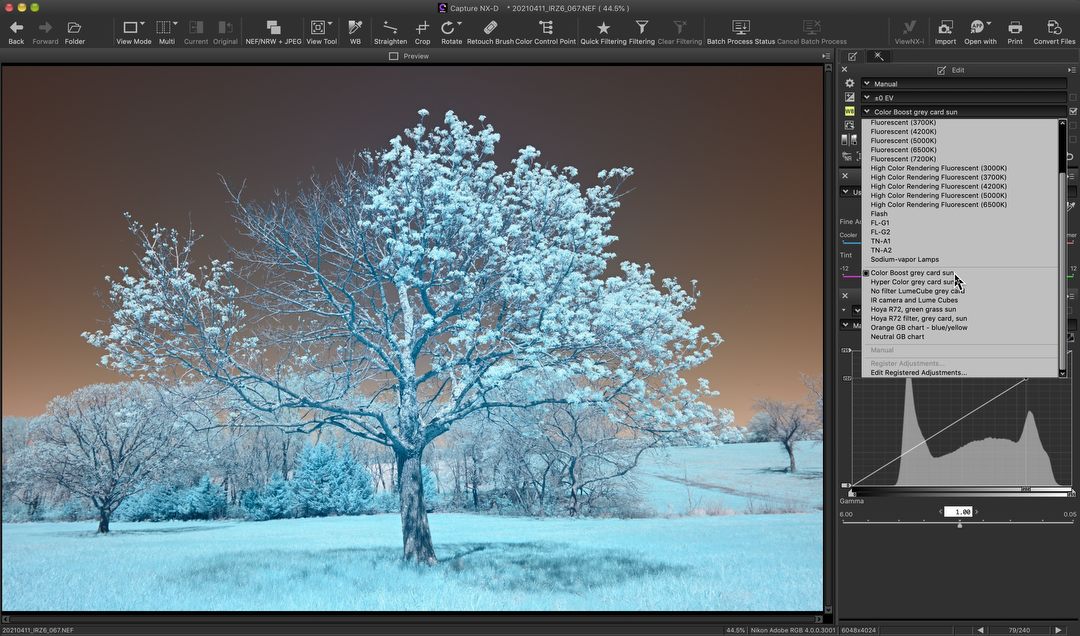
Opening that RAW image into Nikon’s free Capture NX-D (or now the newer NX Studio), I then set the white balance using a preset that I had created earlier by photographing a grey card in sunlight with this filter. Sometimes, after the conversion, it’s difficult to creat a preset white balance in-camea. In that case, I’d simply use the “Gray Point Sample Tool” in the White Balance menu to set the gray point on the grass. Alternately, you could shoot a gray card at that time and set your white balance off of it. I coud then use the “Open with” command in Nikon’s software to launch the image into Photoshop.
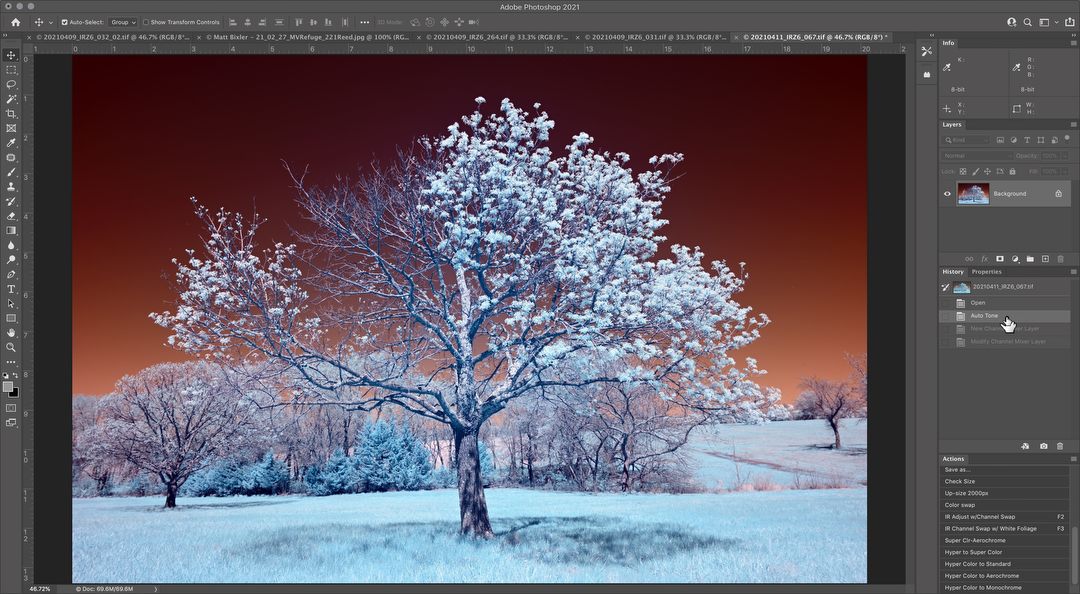
Now opened in Photoshop, I use “Image – Auto Tone” to boost the contrast. That will help with any adjustments I may do afterwards.
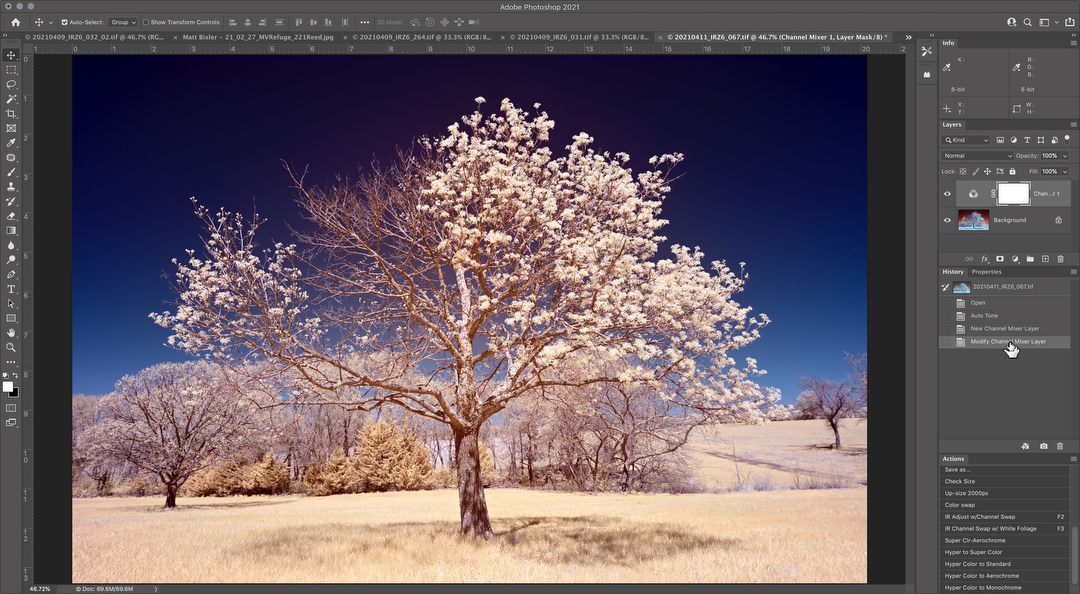
In this case, I chose to do a color swap, where I used the Channel Mixer to swap the red and blue channels, resulting in this look.
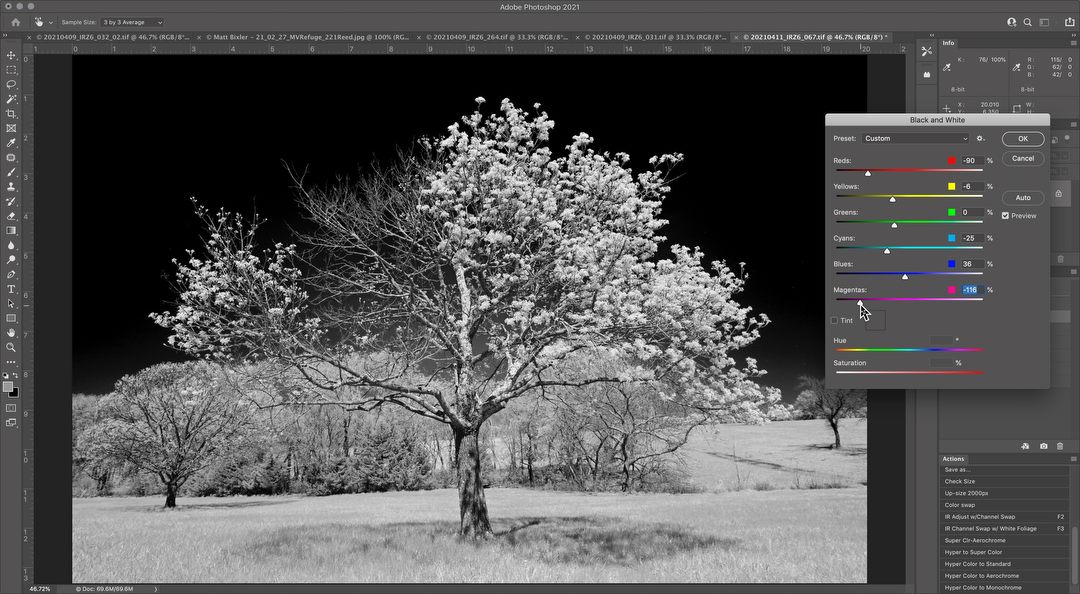
Or, I could select “Image Adjustments – Black and White…” and adjust the color sliders to create an infrared monochrome image to my liking.
One of the fun things about infrared is that there’s no one “right” way to process them. Yes, a good white balance choice with RAW data is the correct first step, but from there you can do whatever you want. As I mentioned before, contrast is your friend with infrared, so using Adobe Photoshop’s, “Image – Auto Tone,” can be a good second step. After that, for a traditional IR black and white image, try the “Image – Adjustments – Black and White…” tool, which lets you shift the tones based on the colors that are there. For a false color “color swap” image, use “Image Adjustments – Channel Mixer…” starting with the Red channel and making Red 0 and Blue 100. Then switch to the Blue channel and make Blue 0 and Red 100. Hue/Saturation is also great to play with, especially if you use the eyedroppers to target the exact colors you want to change. These are all good starting points, although there are no rules here, and it seems there are an endless number of ways to process your infrared images. Not surprisingly, then, there are an endless number of YouTube tutorials on doing that. It’s really the wild, wild west when it comes to processing infrared.
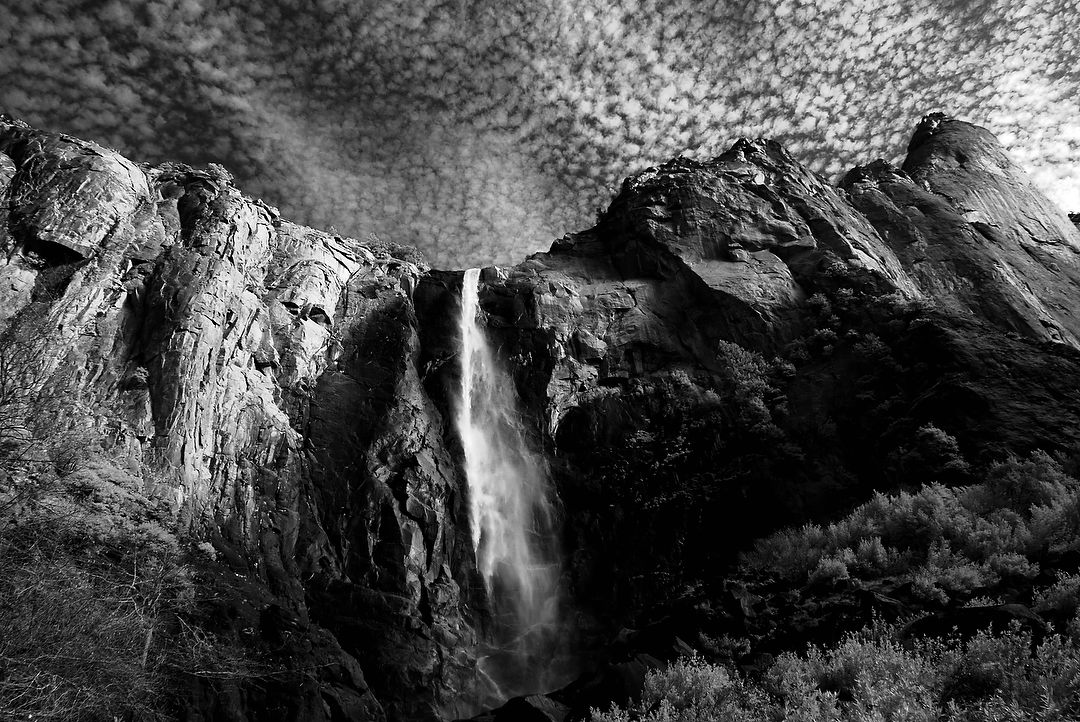
Bridalveil Falls in Yosemite shot with my Nikon D80 and the Super Color filter that was installed in it. This is another example of a classic infrared capture converted to black-and-white. ISO 200, 1/60 at f/10.

While I shoot most of my infrared images with a wide-angle lens, sometimes a telephoto is called for. In this case, in the Palouse region of Washington, I used my Nikkor 70-300mm f/4.5-5.6 lens with the Super Color converted D7000. If I was closer to the subject, I’d shoot a series, bracketing focus, to compensate for the likely shift in focus caused by infrared. But at this distance, everything is at infinity. ISO 100, f/8 at 1/320.
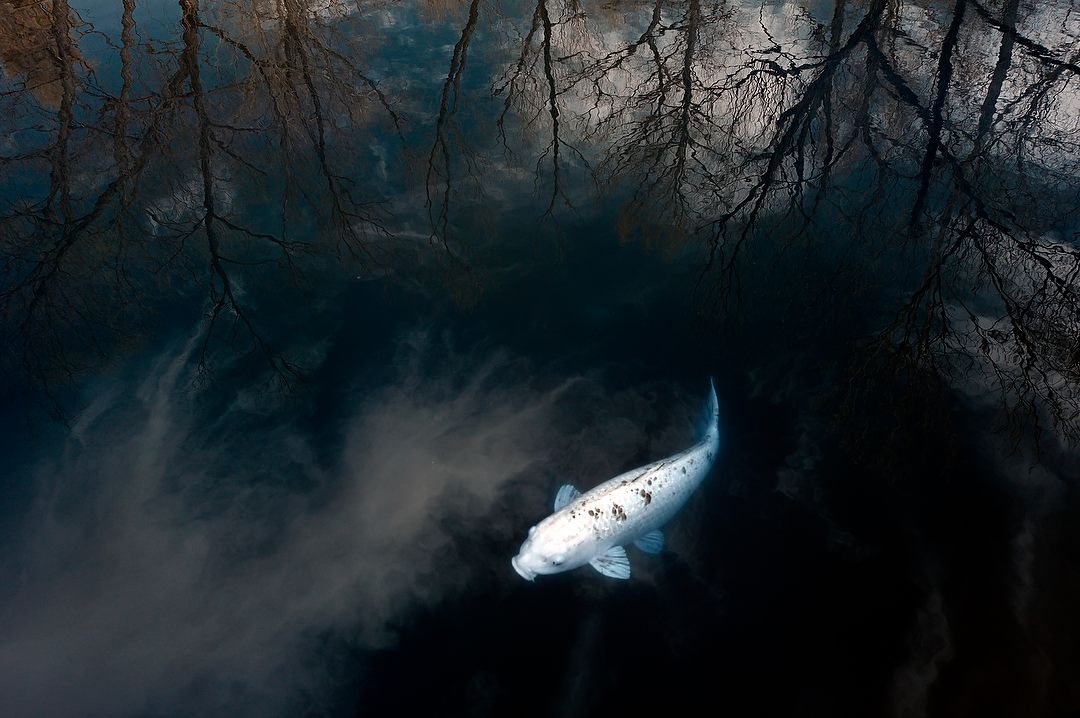
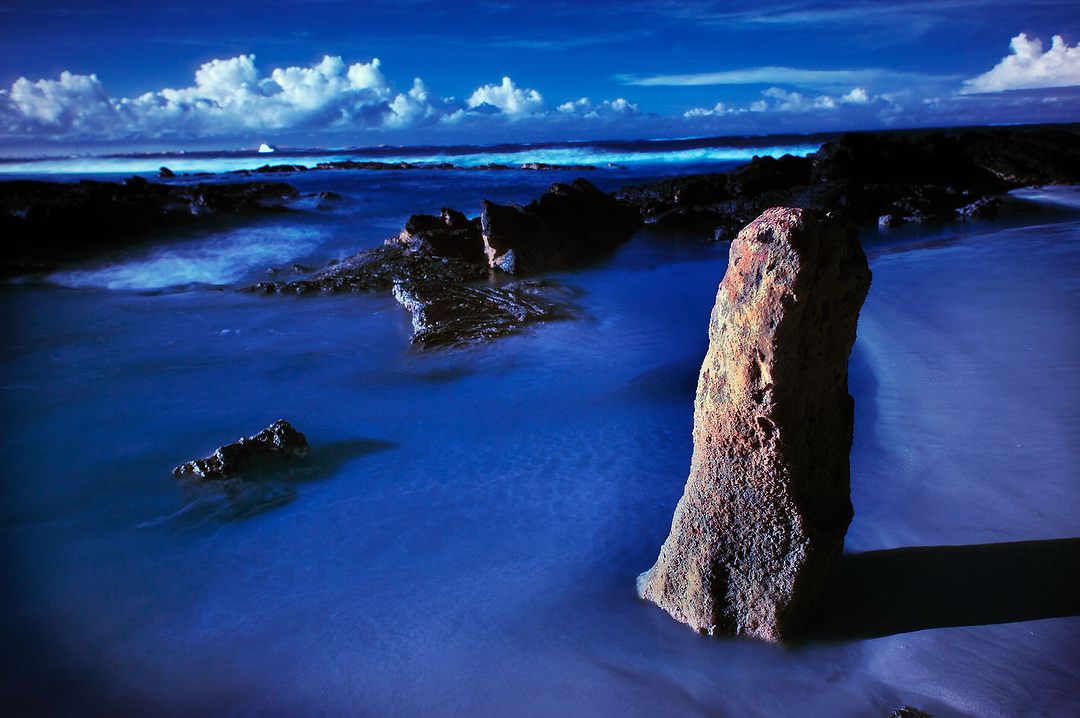
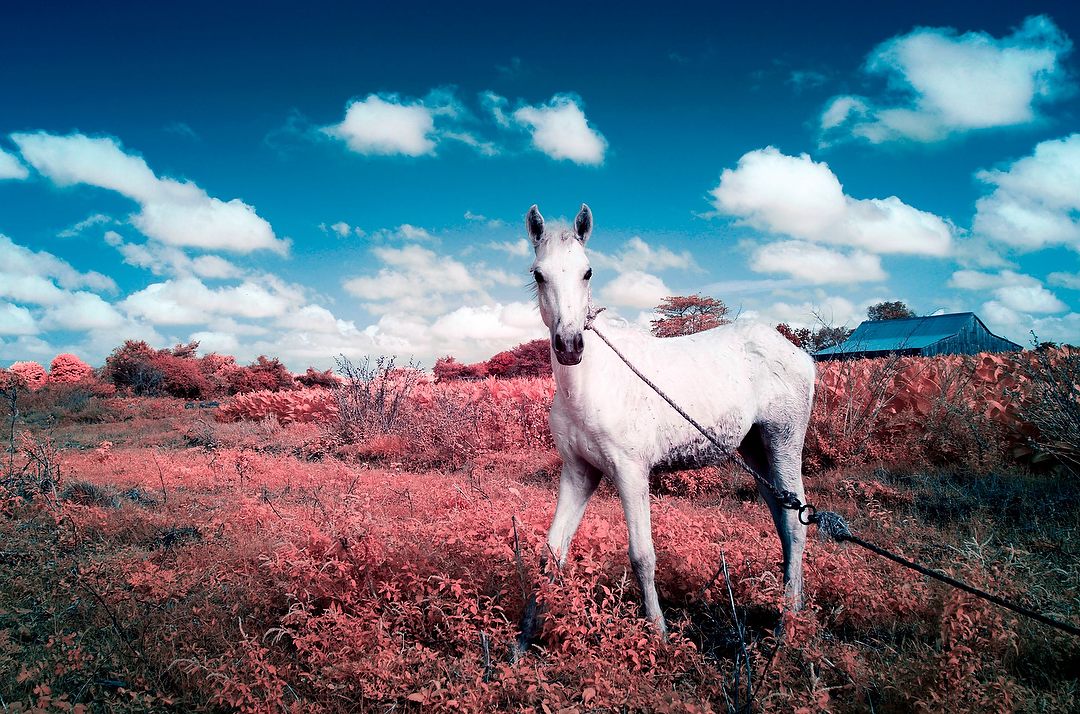
Here’s a koi (which is really just a big orange carp) at the local arboretum, with some trees reflected in the water. But using my full spectrum Nikon Z 6, and an infrared Super Color filter on the lens, it becomes something else entirely. Aperture Priority, Preset white balance, ISO 400, 1/320 at f/6.3 in Matrix metering, +1.0 EV, Nikkor Z 14-30mm f/4 S lens at 25mm.
So why did I first do an infrared conversion? For the same reason we often buy new camera gear – to do something new with photography. And with the flexibility that this full spectrum conversion gives me, I look forward to doing much more infrared than I have in the past. An added bonus comes when I do night photography, which is another “new” area I’ve been enjoying more and more over the last several years. With no filters attached, this converted camera will give me even more capability after dark. Stay tuned, I’ll be posting more photos to Instagram with my newly converted camera. Should be fun!
UPDATE: Recently I switched from filters added to the front of my lenses to “clip-in” filters that go over the sensor of my IR camera. You can read about that here.
(If you like this story, please share it with your friends and let them know about the links on photography that I post on my business Facebook page. I’m also on Instagram and Twitter, @reedhoffmann. And if you’re curious about the workshops I teach, you can find them here. And, you can subscribe to this blog on my home page.)
Thank you for an excellent explanation of using IR techniques.
Great suggestions