On this last trip to Africa, I shot videos as well as stills, using a Nikon D7000. While I was generally happy with the results, it’s a learning process.
In the weeks leading up to the trip to Botswana, I was thinking I’d probably shoot some video there. It wasn’t until about a week before leaving that I really committed to doing that. I’d been surfing YouTube, looking at clips from the areas we were going, and was both impressed with the beauty of the places and disappointed with the quality of the video. To do better than that, I’d need to take the right equipment. I’d need to shoot it right too.
Spending most of my life shooting stills, I have the luxury of doing the

I took advantage of the U2 setting on the Nikon D7000 to set it for when I wanted to shoot video.
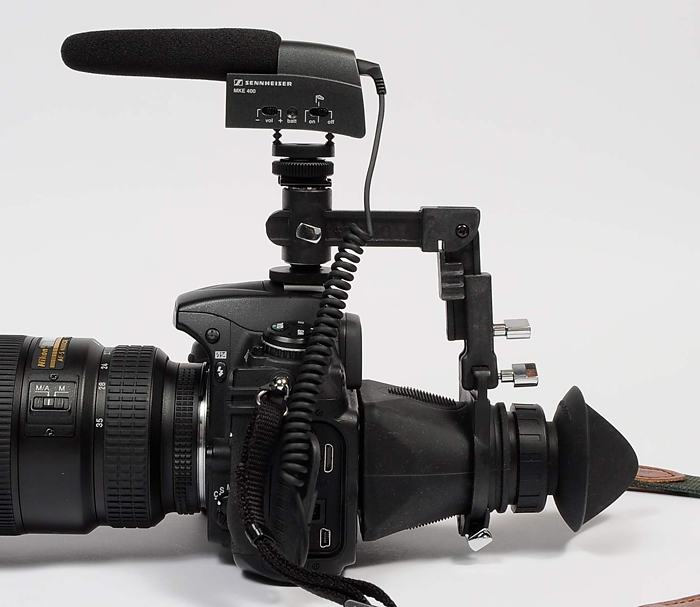
technical side of that pretty much on automatic, letting me concentrate on being creative. With video, though, I’m still learning, so it’s much more work. And a big part of that is sound. Bad audio can kill good video. So part of the decision to capture video involved bringing along a small shotgun mike for better sound. As with most of these cameras, the D7000 has a microphone in the front. That’s fine if your subject is close, but most of the time you’re better off taking advantage of the microphone port and using an accessory mike. My preference there is the Sennheiser MKE-400, a very compact shotgun mike with a “dead cat” windscreen. It does a nice job of recording sound that’s out in front of me, and the windscreen cuts down on noise from, well, wind.

Looking through the video clips I shot using Photo Mechanic.
I also needed to add another piece of gear to my kit, the Hoodman Cinema Kit Pro. Doing video means using the LCD for all viewing, and I’ve found it almost impossible to do that without some help. This Hoodman accessory gives me a magnified loupe to look through, so I can see my framing and focus better. And, using it like that also lets me press the camera up to my eye, so I can minimize camera shake.
Bringing these two accessories would make it easier for me to get good video and audio. The harder part was actually doing it. Since you can’t shoot video and stills as the same time, I always worried about making the right choice. And then there were the mistakes. After the first two days shooting, I realized I was plugging the mike into the wrong port… The D7000 has both video and microphone ports on the left side, and I’m used to using the video port when teaching Nikon School, as I do a demo feeding the video from the  camera to the projector. Thankfully, it wasn’t a complete disaster. The camera still recorded audio with its built-in microphone, so I did have sound.
That mix-up was a good reminder to me of how this whole video thing is still a learning process. The more I do it, the more I figure out what works and doesn’t. Just like how I learned – and am still learning – photography. In my opinion, a good photo trip means not just that I get some good photos, but that I learn something new too.
On this trip that learning involved how to take advantage of the

The finished video posted to my Vimeo channel.
D7000’s U1 and U2 settings. I set the camera differently based on whether I’m shooting stills or video. The key things I change are how the AE-L/AF-L button functions (lock exposure for video), what image processing I want (sharpening, color saturation and contrast), how autofocus functions (shutter for video, AE-L/AE-F for stills), what exposure mode (Aperture Priority for stills, Shutter Priority for video), and ISO (100 for video, 200 for stills). Using these U1 and U2 settings made it simple to switch back and forth between stills and video.
As always, producing the video was a big challenge too. With stills I can move through dozens of images in a matter of minutes. Going over the video and audio means watching and listening to every single second. Logging that information, creating a simple text document, meant I only had to do that once, as each log entry told me what was in the file and whether it might be worth using. With that information in hand, it took just a couple of hours to create the video using Adobe Premiere Elements 9.
If you want to see the finished project, you can view it at http://vimeo.com/22566186. While I still don’t love doing video as much as I love shooting stills, I realize that it’s unique in its own way, and an important addition to any visual project. And it can be fun too, as long as you remember to plug the mike into the right port J.