During sixteen years teaching photography classes around the country for Nikon, I used to joke to my students that they were paying me to read the manual and tell them what they really needed to know. Now, my friends buying the new Nikon Z 8, are asking me to do the same thing. Since it’s essentially a smaller version of the Z 9 – which I’ve been using for the past 18-months – I thought, “Sure, why not?” (NOTE: most of these settings also apply to many other Nikon cameras)
Before I get into that, though, it’s important to point out that these settings are what work best for me, with the photography that I do. One of the great things about today’s cameras is the wide range of customization of controls and features they offer, to allow each photographer to set the camera up just the way they want it. And that’s what I’ve done. As the saying goes, “your mileage may vary.” Here are the menu options I use, or find most important (I’m not going through each and every one in the Z 8). If you’d like to have a longer, more involved conversation about any of them, join me on one of my workshops. That’s the sort of stuff we often discuss while driving between locations. Or, god forbid, download and read the 948 page reference guide.
PHOTO SHOOTING MENU
Extended menu banks: ON
ISO sensitivity settings: ON when I’m shooting action (sports or wildlife) in Aperture Priority. I set a base ISO of 64 and the max at 8000, and then the minimum shutter speed I’m trying to maintain for the action I’m photographing. Otherwise OFF and I set ISO manually.
White balance: Natural light auto for everything outdoors. When indoors, or doing night photography, I’ll change the WB as needed.
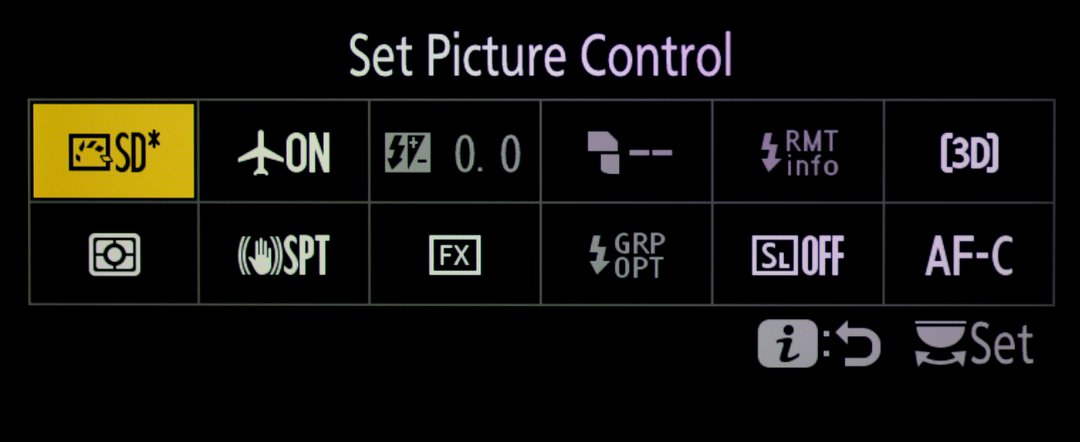
Set Picture Control: I like “Standard” for most things, with Sharpening changed to +3 and Contrast to -1.
Color Space: since I’m using a color-managed workflow, I set this to Adobe RGB and then convert images to sRGB as needed (which is frequently). For most people, I recommend staying at sRGB. And, if you shoot RAW, you can always change the color space later, during the editing process.
Active D-lighting: I recommend “Auto” for most people, although if you’re used to dealing with high contrast situations in traditional ways (adding flash, changing framing, using graduated ND filters, etc.), then you can leave it OFF.
Long exposure NR: OFF. It’s rarely, if ever, needed with today’s digital cameras, and doubles your exposure time as well as draining the battery faster. People disagree with me on this, and when they do, I always ask them to send me an example showing when it made a difference. I’ve yet to receive even one.
High ISO NR: I leave it set to Normal, and do any additional noise removal at the edit stage.
Metering: Matrix. It’s smarter than Spot or Center, and I know what to expect from it. The newer “Highlight-weighted” option is interesting, but again, I know what to expect from Matrix.
Flash mode: Rear-curtain sync (Always. Take my flash class to learn why).
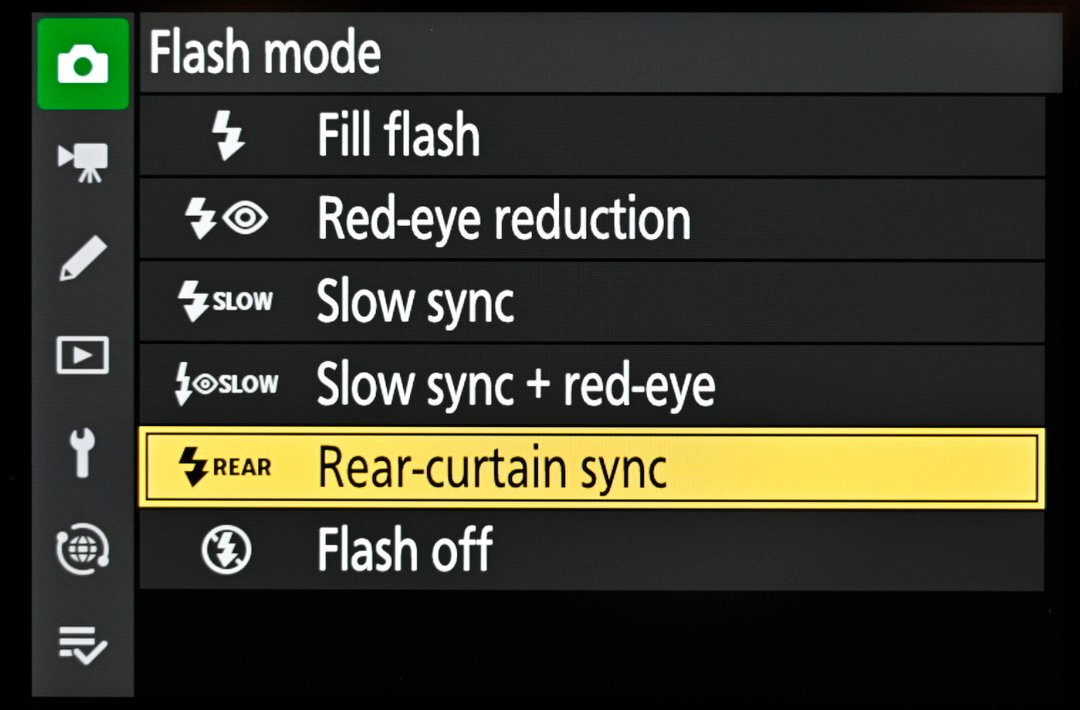
One of the first things I change on any camera I pick up is how flash synchronization will work with it. For me, there’s no downside to Rear-curtain sync.
Focus mode: AF-C. Since I use “rear-button AF,” I don’t need AF-S. And I switch to Manual focus when doing night photography.
AF-area mode: My default is 3D, but I change this regularly based on what I’m photographing. A whole book could be written on Nikon’s many new AF-area modes, and probably has been. The most important thing I can tell you is that you need to experiment and figure out which ones are best for the types of photography you do. To get the best performance out of autofocus, there’s no “one size fits all.”
AF subject detection options: I leave it at Auto as a default, but change if I’m shooting a specific type of subject offered in the options (such as People or Animal).
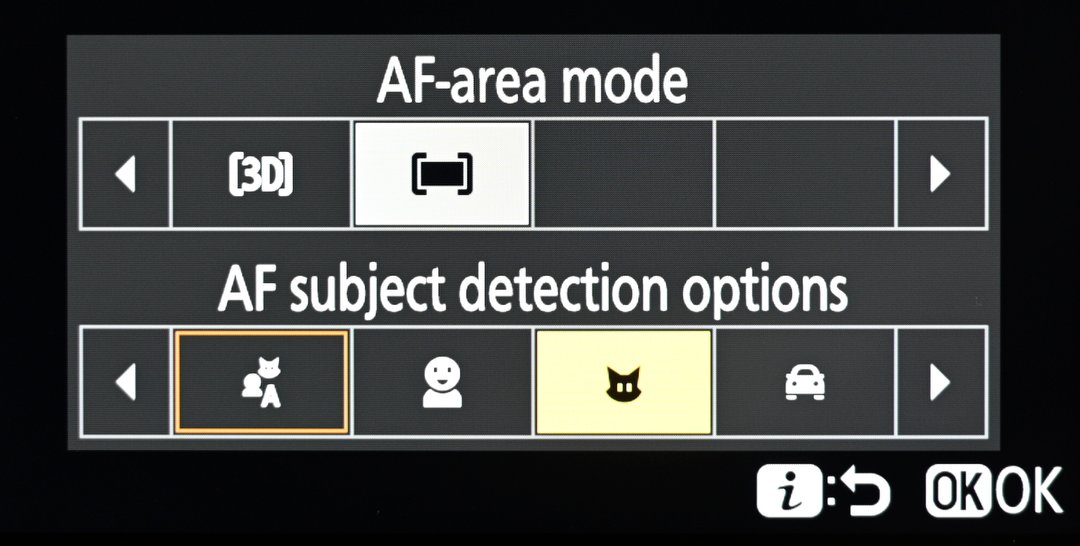
In addition to a wide variety of AF-area modes, you can also choose whether, or even what kind of subjects you want the system to look for.
Vibration reduction: I prefer Sport, giving up some image stabilization in return for less shifting of the framing as I shoot. If I have to hand-hold at extremely low shutter speeds, then I’ll switch it to the normal “On.”
VIDEO RECORDING MENU
I do very little video these days, so won’t waste time going into this one. The defaults will work well unless you get serious into video, at which point you’ll start taking advantage of the many great options there.
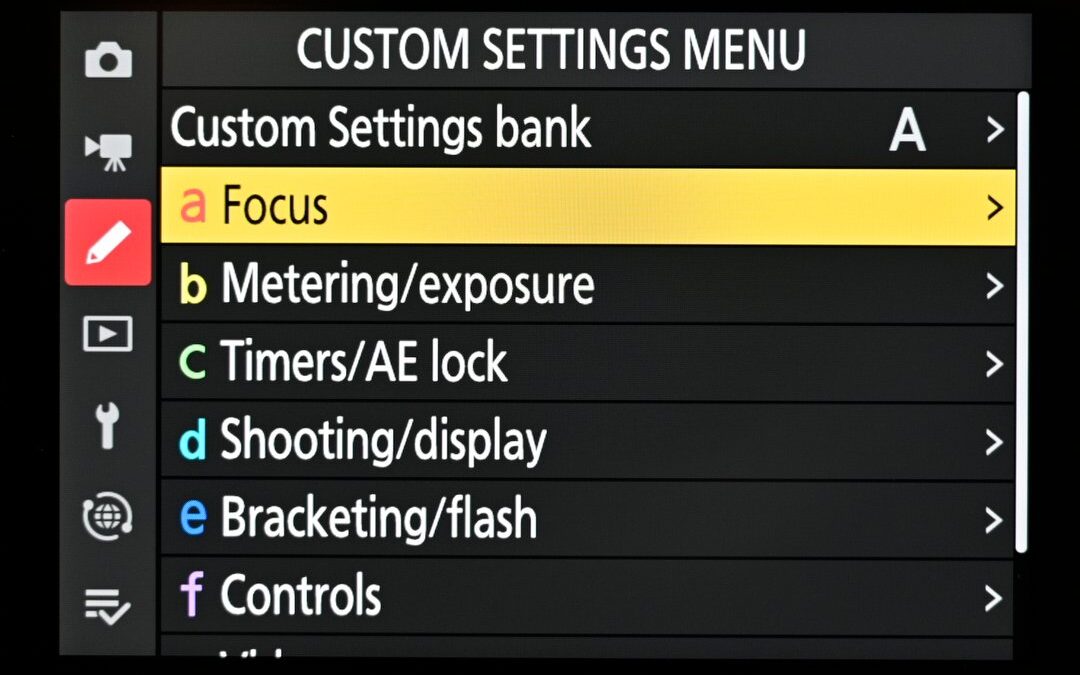
CUSTOM SETTINGS MENU
a Focus:
a1 AF-C priority – Release. I prefer the camera to shoot when I want it to, not when it thinks the subject’s in focus.
a3 Focus tracking with lock-on: I use the default of 3 and Steady, but again, adjust based on what I’m currently photographing.
a5 Store points by orientation: Focus point and AF-area mode, so when I turn the camera vertical I can immediately have different AF settings.
a6 AF activation: Off. As mentioned above, I prefer “back-button focus,” so this takes that function off the shutter button and leaves it only on the AF-ON button.
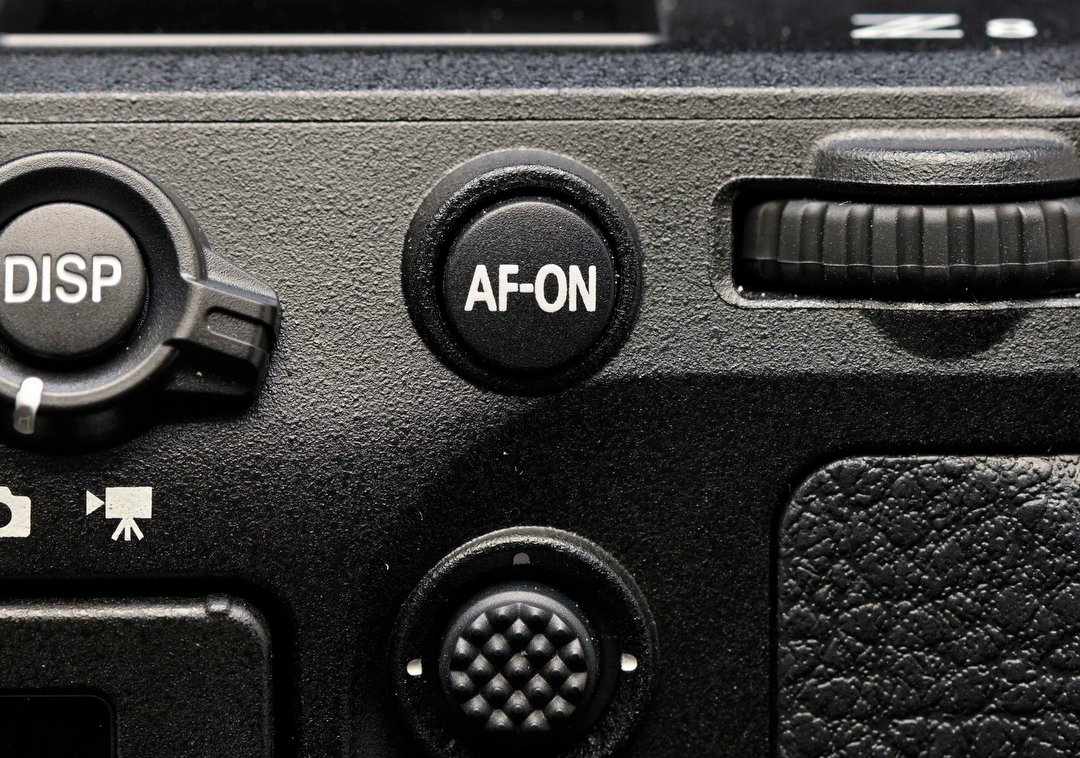
As a dedicated “back-button focus” photographer, my camera will only focus when I press this button with my thumb, not the shutter button with my index finger. To make the camera do that, I first need to change the menu to “AF activation – OFF” (which takes it off the shutter button). To photograph a non-moving subject, I simply press this button once to get focus, then release it. At that point the focus is essentially locked at that distance.
a7 Focus Point persistence: Auto.
a8 Limit AF-area mode selection: I use this menu all the time to change what modes are available to me based on what I’m shooting. Limiting those makes it easier for me to quickly change modes by showing fewer of them. For instance, that lets me quickly shift from 3D to single point or another AF-area mode on the fly.
a11 Focus point display: All ON, point color Red. I always want the camera showing me, as clearly as possible, where the focus point is.
a12 Built-in AF-assist illuminator. OFF. It won’t help unless you’re really close anyway.
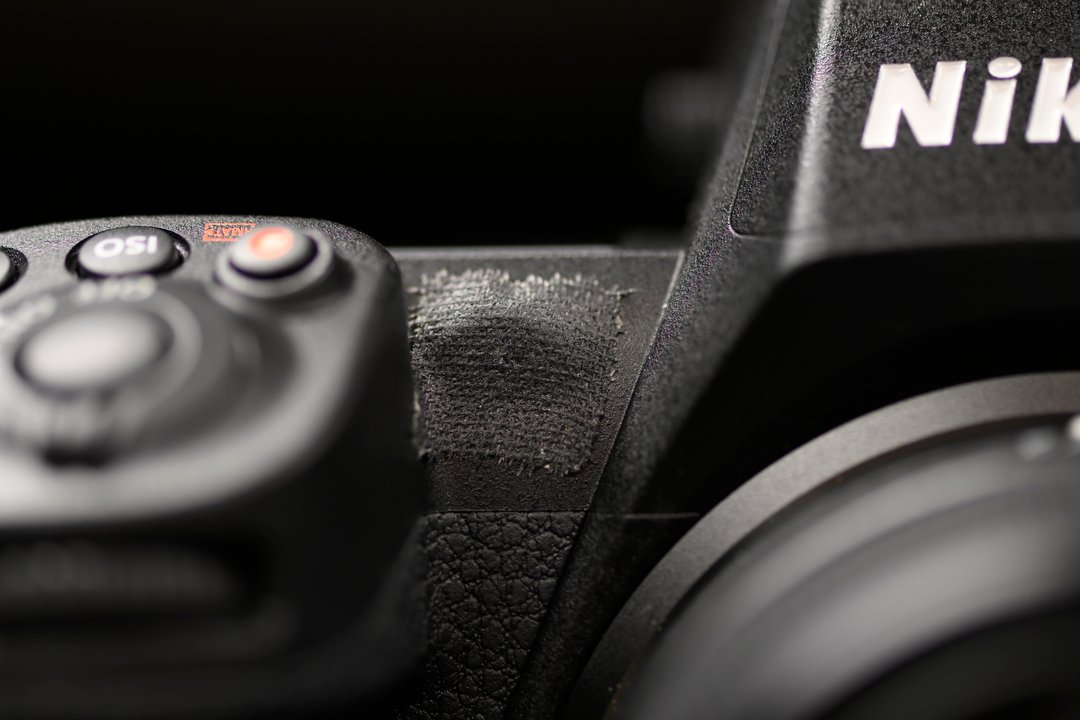
Since I don’t use the “Built-in AF assist illuminator,” I put a small piece of tape over it. In previous Nikons, when leading night photography sessions, I’d use “Exposure delay mode” to minimize vibration caused by the mirror and shutter on long exposures. Since that option doesn’t exist in either this camera or the Z 9 (no mirror or shutter), the self-timer can be used in its place. However, when I lead those night shoots, that light can affect the scene if anyone else is exposing while it’s flashing. Thus the tape.
a13 Focus peaking: ON, 2, Red.
b Metering/exposure
b3 Easy exposure compensation: RESET.
c Timers/AE lock
c3 Power off delay: I set all but one of these to one-minute. That’s because I always turn off the playback or menus once done using them, and don’t want them turning off until then. I usually leave the “Standby timer” at 30-seconds unless I’m shooting sports, when I then set it to one-minute.
d Shooting/display
d3 Pre-Release capture options: Turning this on and setting a time lets you take advantage of one of the most unique features of the Z 8/9. I usually set the Pre-release burst to .5 seconds and the Post-release burst to MAX.
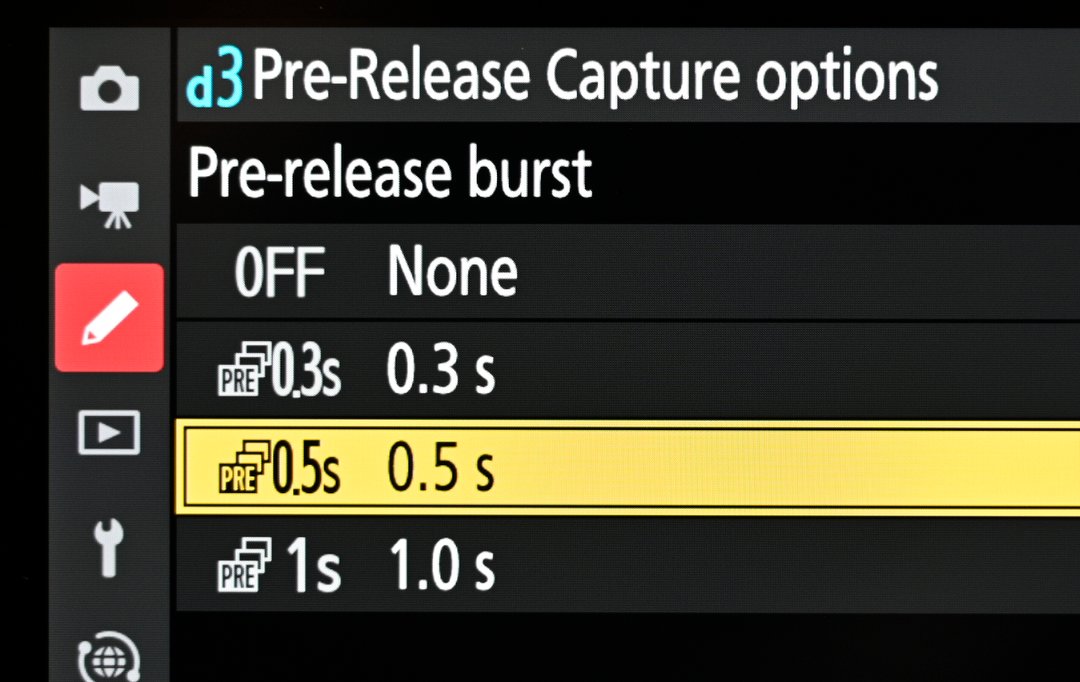
By choosing a time in “Pre-Release Capture options,” I can take advantage of the Z 8’s incredible ability to go back in time to capture a picture. I explain all of that in the link above.
d5 Extended shutter speeds (M): ON, so I can manually set exposure beyond 30-seconds, all the way up to 15-minutes. Great for night photography and light painting.
d6 Limit selectable image area: I limit this to FX and DX so I can quickly switch between them without having to go through the other two options.
d12 View all in continuous mode: ON
d13 Release timing indicator: Type A. For the longest time I was using Type B or C to take advantage of the Z 9’s amazing viewfinder (which has absolutely no flicker or “stutter” when shooting bursts). But, I didn’t really notice those lines flashing at the edges when I was shooting (Type B and C), so there were times I wasn’t sure I’d actually shot frames until hitting the Playback button. Now I’m trying Type A, and so far, really like it. I get the feedback that I’m taking pictures, but it doesn’t affect AF speed and doesn’t seem to bother me while tracking fast subjects. It’s also supposed to help when doing pan shots.
d16 Virtual horizon type: Type A.
d17 Custom monitor shooting display: I use three. One with loads of information around all four sides (SIMPLE and DETAIL). One with that plus Virtual horizon and Histogram. And one with just the Virtual horizon indicator, which I use for night photography, and also for when I flip out the LCD to put the camera on the ground or hold above my head.
d18 Custom viewfinder shooting display: Three here as well, but set up differently from custom setting d17 (above). The first has SIMPLE and DETAIL and the Histogram. The second has those three plus the Virtual horizon. And the third has nothing extra.
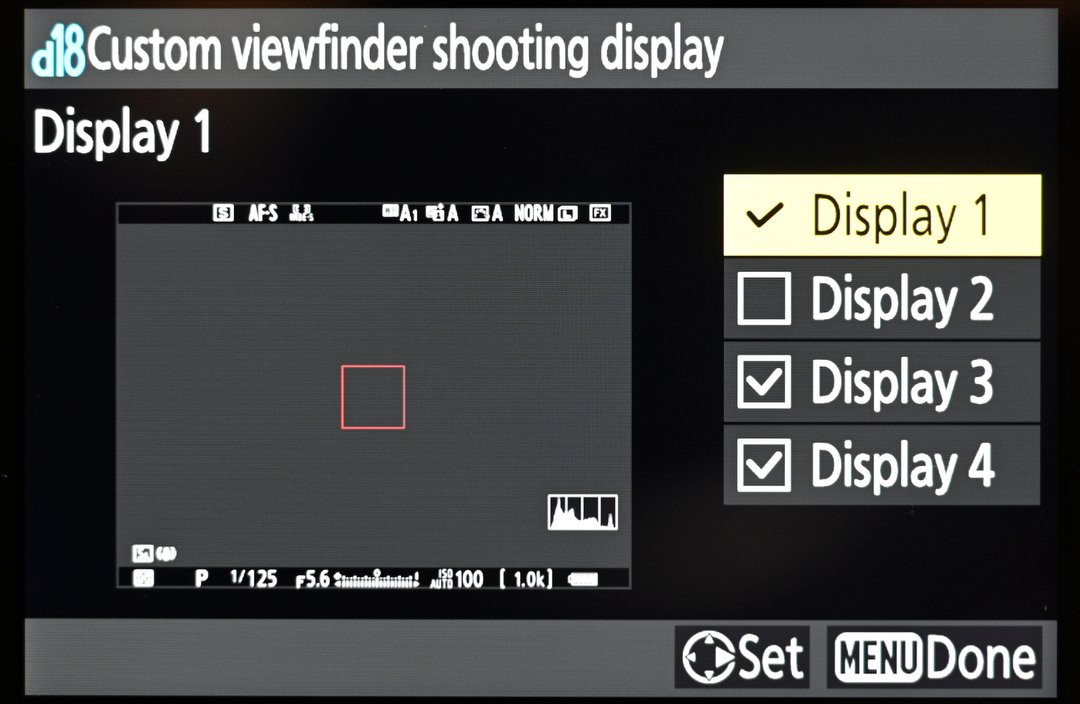
You don’t hear people talking about this, but it’s one of the great features on the Z 8/9 cameras. You can create up to four different viewfinder displays, choosing exactly what you want to see in each one. I created three that I switch between based on what I’m shooting. And I can also have up to four customized monitor displays as well, changing what I see if I’m using the LCD to frame and take pictures.
d19 High fps viewfinder display: OFF, as I’ve noticed little difference, and it adds to the battery drain.
e Bracketing/flash
e1 Flash sync speed: 1/250 s (Auto FP)
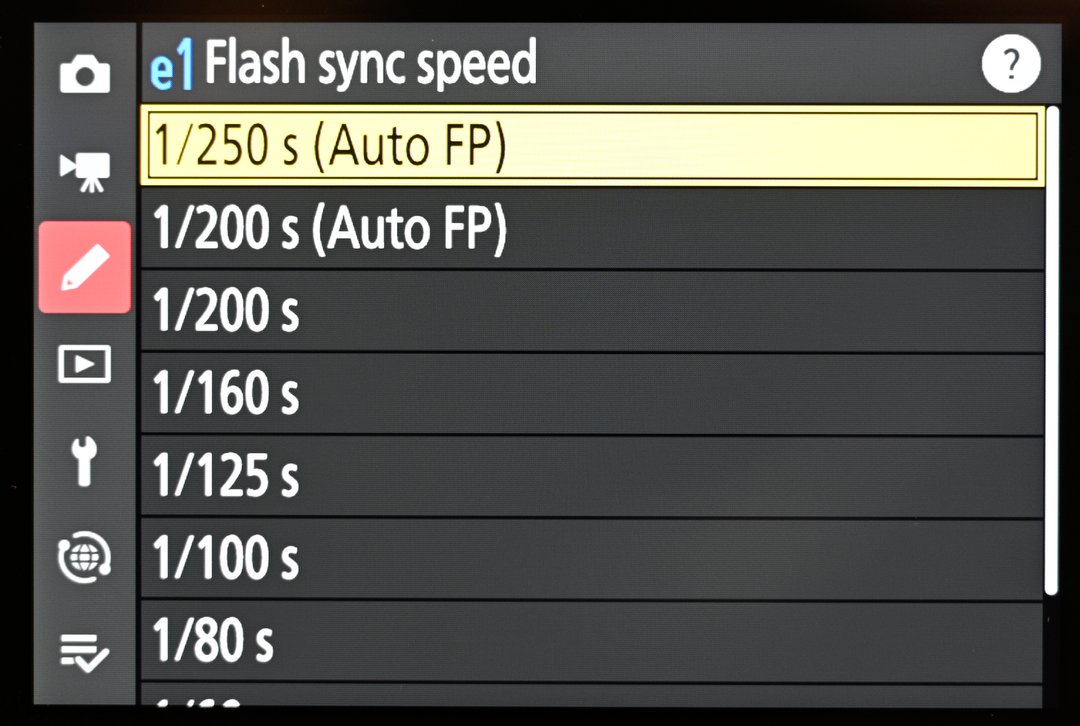
Taking advantage of this feature means you can use flash at shutter speeds higher than 1/250, if you have a flash that supports high-speed sync (like most Nikon speedlights).
e2 Flash shutter speed: 1/15 (allows the camera t0 go as low as this when using flash and Aperture Priority or Program exposure modes. The default is 1/60).
e7 Bracketing order: Under-Meter-Over, which just makes more sense to me.
f Controls
f1 Customize i menu: Here are the six choices l load into the top row, left-to-right: Set Picture Control, Airplane mode, Flash compensation, Wireless options/flash mode, Radio remote flash info, AF-area mode/subj. detection. NOTE: three of those are so I can easily control my Nikon SB-5000 flash(es) via radio control from the camera, using an accessory that plugs into the ten-pin port. The six options I load into the bottom row, left-to-right, are: Metering, Vibration reduction, Choose image area, Group flash options (also for radio control of my SB-5000 flashes), Silent mode, and Focus mode.
These are the twelve items I load into the “i” menu for fast access from the rear LCD. It’s another way, like “My Menu,” shown below, to make it easier for me to quickly change how the camera functions without diving into the entire menu system.
f2 Custom controls (shooting): Here are the buttons I change:
Fn1: Playback (so I can quickly check what I just shot in the viewfinder).
Fn2: Choose image area (to quickly go from FX to DX modes).
AF-ON button: AF-ON (back-button focus).
Protect/Fn3 button: OFF (still looking into how I want to use this one).
Video record button: Focus mode/AF-area mode (lets me quickly and easily change AF area modes without taking my eye from the viewfinder.
Command dials – Focus/AF-area mode selection – AF/MF on front (sub-command) dial, AF-area modes on rear (main command dial). IMPORTANT: this, combined with the change to the “Video record button,” above, lets me use my thumb to change AF-area modes. Otherwise it’s awkward to do because you’re holding the “Video record” button with your index finger and have to use your middle finger to try to turn the front dial.
f2 Custom controls (playback): Again, the buttons I change:
Fn1: Zoom on/off, 100%. Paired with Fn1, right after shooting a photo, pressing it once brings the image I just shot up in the viewfinder, and a second press zooms to 100% (where the active focus point was) so I can check sharpness.
Fn2: Voice memo.
Sub-command dial: Frame advance, 10 (so I can fly through photos in Playback).
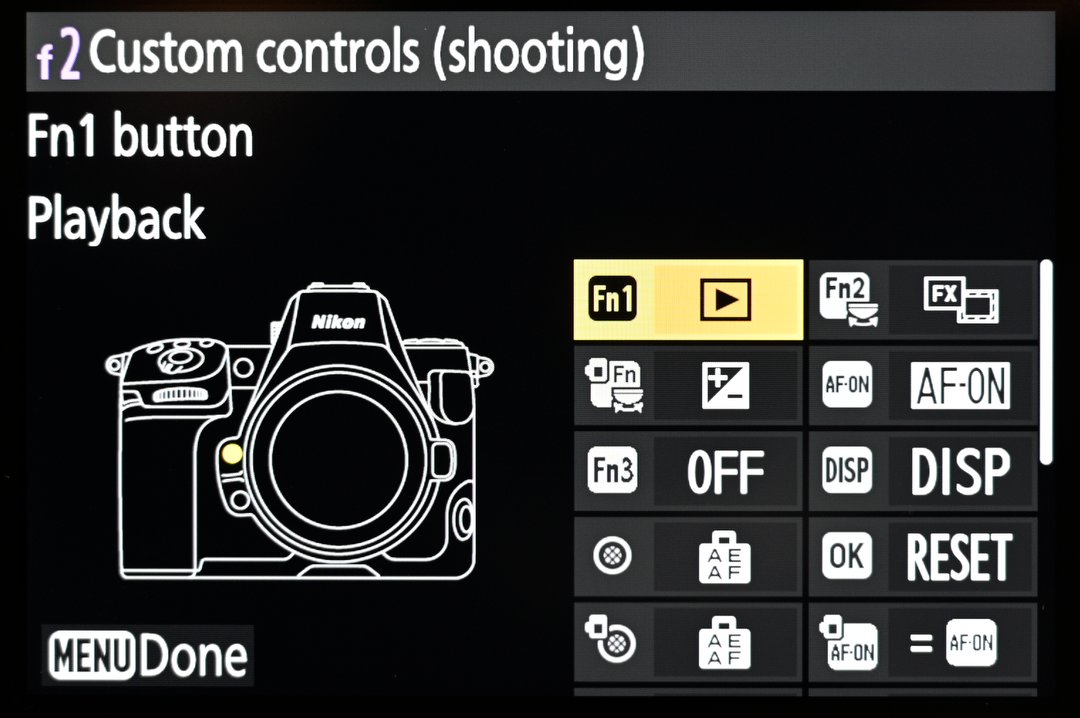
Nikon makes it very easy to tell exactly what button or dial you’re working with when you change the function of that button. In this case, you can see that I program the Fn1 button for playback.
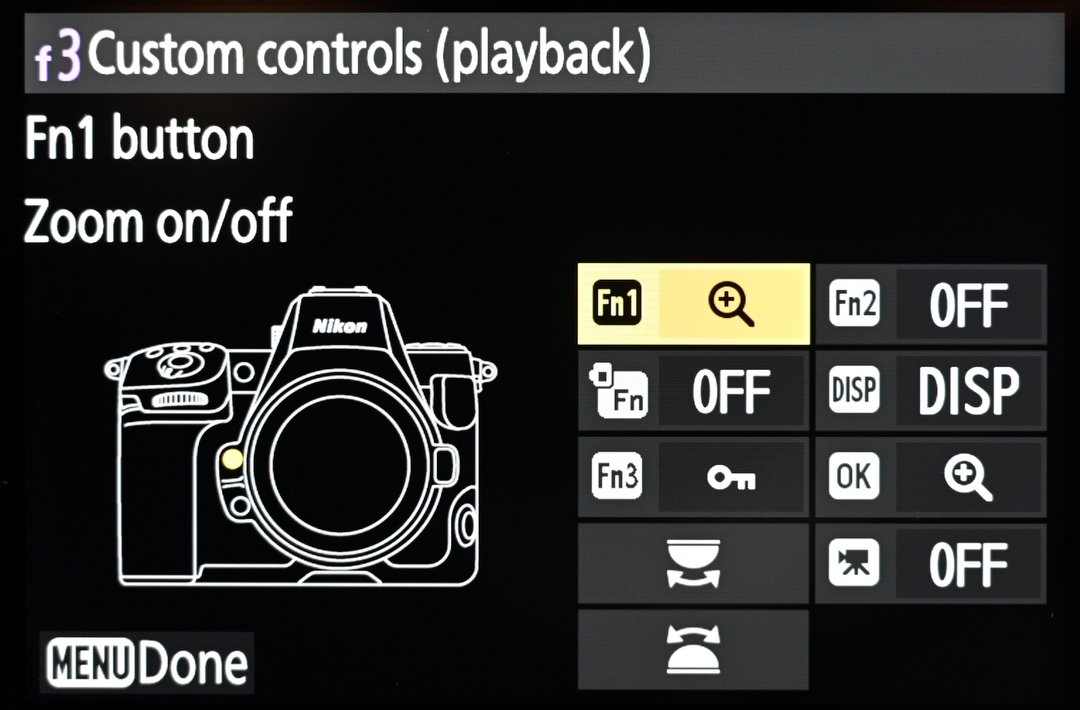
There are also “Custom controls” for playback, which means the same button can do two different things based on whether you’re shooting photos or reviewing what you shot. So for me, while shooting, pressing Fn1 turns on playback (illustration before this one). Once that comes up in my display, I can press the same button a second time now in playback) to zoom to 100%, which lets me check sharpness. It’s a killer combination!
PLAYBACK MENU
Playback folder: ALL.
Playback display options: Highlights and Overview.
Delete pictures from both slots: OFF (or the cool feature I explain next won’t work).
Series playback: List series as single thumbnails (this, paired with the above, lets me “Protect” one or several images from a burst, then delete the rest of the burst with one press. I explain that in this blog post).
Picture review: OFF (drains the battery fast, I find annoying in most situations).
After burst, show: First picture in burst.
Auto-rotate pictures: OFF (I’d rather have the larger image on the LCD and rotate my wrist.
SETUP MENU
Finder display size (photo Lv): SMALL (great if you wear glasses, otherwise “Standard”).
Limit monitor mode selection: I only use two, Automatic display switch and Prioritize viewfinder (2). Setting it this way means the LCD on the back only comes on if I press the Playback button, the menu button, flip the LCD out, OR press the Monitor Mode button.
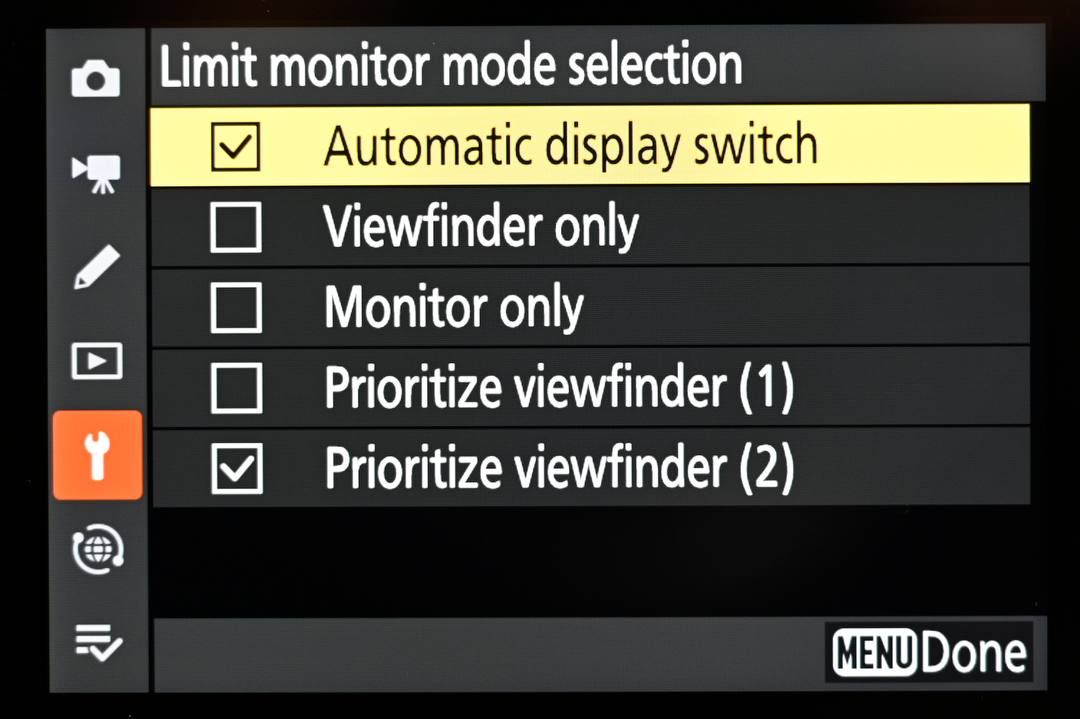
These are the only two modes I need for how I use the Viewfinder/Monitor when shooting.
Auto rotate info display: ON.
Save focus position: ON (so focus doesn’t change if you turn the camera off and back on).
Sensor shield behavior at power off: ON (helps limit sensor exposure to dust when changing lenses, as long as you turn the camera off first).
Camera sounds: Shutter sound ON, Beep OFF, Volume 1 and Pitch L.
USB power delivery: ON (so you can run the camera from external power via USB-C).
Slot empty release lock: LOCK (prevents you from shooting without a card).
MY MENU
Here’s what I load into My Menu, so I have quick access to these without having to go through all the menus:
ISO sensitivity settings
Battery info
Format memory card
Time zone and date
f2 Custom controls (shooting)
a8 Limit AF-area mode selection
a3 Focus tracking with lock-on
a6 AF activation – in case I decide to switch to shutter-button autofocus.
c2 Self-timer
d3 Pre-Release Capture options
d8 View mode (photo Lv) – Most of the time I want the camera to give me WYSIWYG (what you see is what you get) through the viewfinder – “Show effects of settings.” But when I use flash and the camera doesn’t know it (like with a “dumb” radio remote, such as my Pocket Wizards), I need to switch this to “adjust for ease of viewing.” If I have one of my Nikon speedlights attached, or controlled via the ten-pin port, the camera knows and sets the view properly.
Multiple exposure
Interval timer shooting
Focus shift shooting
d9 Starlight view (photo Lv) – for night photography.
d10 Warm display colors – for night photography.
d11 LCD illumination – for night photography.
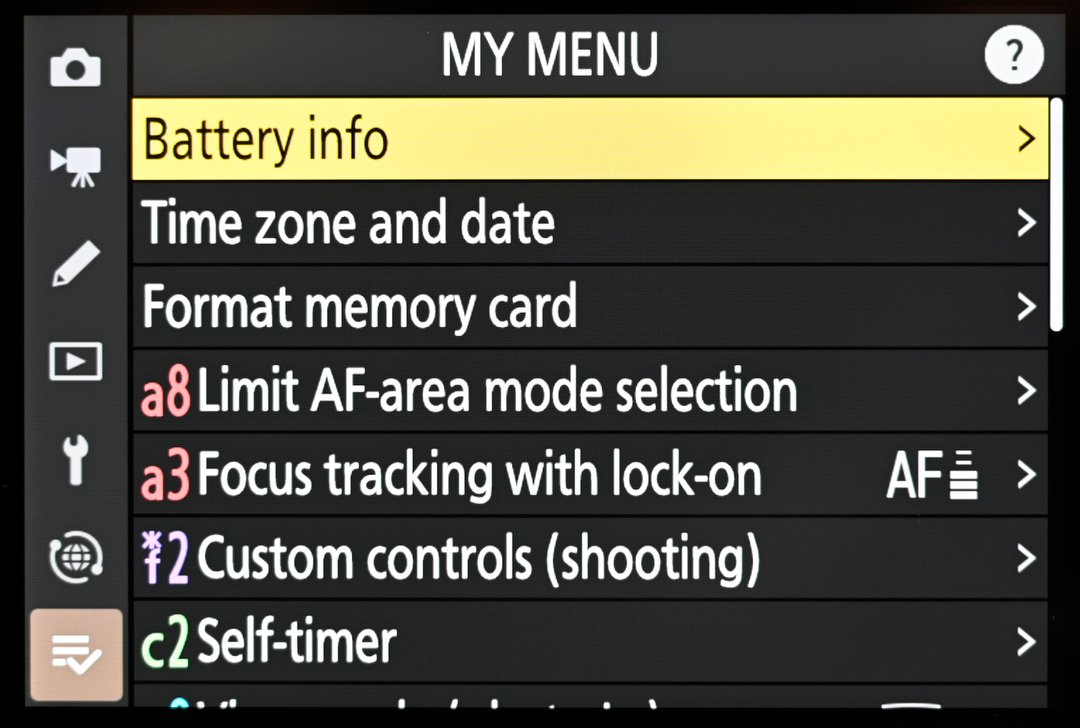
Nikon’s had this feature in their digital cameras for years, so I’m always surprised at how few people know about it. Using it lets you load up to twenty menu options from all those different categories on the left (Photo shooting, Custom settings, Setup, etc.) into one easy to find and access place. This is a huge time-saver, giving you quick access to those things you frequently or just occasionally use but don’t want to hunt for.
Whew! Hope that helps, and that you have as much fun with your new camera as I’m having with mine!
(If you like this story, please share it with your friends and let them know about the links on photography that I post on my business Facebook page. I’m also on Instagram and Twitter, @reedhoffmann. And if you’re curious about the workshops I teach, you can find them here. Finally, you can subscribe to this blog on my home page.)
Hello any way you can update to firmware 3.0 for the Z8 and include the bin file?
Hi Phillippe. Not sure I understand? You download the .bin file from Nikon, transfer that to a card, put card in camera, go to Firmware menu in Setup menu and tell the camera to update the firmware. The .bin file can remain on your computer, and/or on the card, but serves no purpose after it’s been uploaded to the camera. FYI, apparently at least some Tamron lenses will need their own firmware updated to use AF with the new Nikon 3.0 firwmare. If you have any of those, you probably want to wait until Tamron issues a lens update to address it.