This August I helped move my son from Kansas City to UCLA. A mere 1416 miles. Since it was less expensive to rent a car for two weeks and return it to KC instead of a one week rental and drop it in LA, I chose the cheaper option. Which meant I’d have a long drive home. For photographers, though, long drives aren’t so bad if you’re not in a hurry. Which meant I’d take my time returning the car, and drive more than twice that distance while scouting some places where I might lead photography workshops in the future. Having returned home now, I’m sure I’ll do that, because not only are there some beautiful spots between here and there, but now I know where to go and when.
Since the purpose was to move Nathan, and the car would be overloaded already, I went light on camera gear. Well, light for me. Two camera bodies (Nikon D850 and D7500), 18-35mm and 24-120mm lenses, plus a 20mm 1.8 for night photography. A last-minute addition was the Nikon 8-15mm zoom (more on that shortly). Add to that a small tripod and my set of three filters (polarizer, neutral density and graduated ND). One spare battery, plus the charger. I nearly went with only one camera, but reason prevailed. I stuffed everything (except the tripod), in the spare tire compartment of the rental car.
Leaving on a Monday morning, we took three days to drive out, then I stayed two more to help Nathan get settled. Saturday morning I drove away from LA, beginning the second leg of the trip, which would take nine days and cover 3224 miles. By mid-afternoon I was in Joshua Tree National Park. It’s at the intersection of two deserts (the Colorado and the Mojave), so summer there is very hot, over a hundred degrees when I arrived. On the plus side that means it’s not crowded, and I had two gallons of water, plenty of snacks and a full tank of gas. Having visited once in 2005, there were some old places I wanted to re-visit and some new ones I wanted to check out.
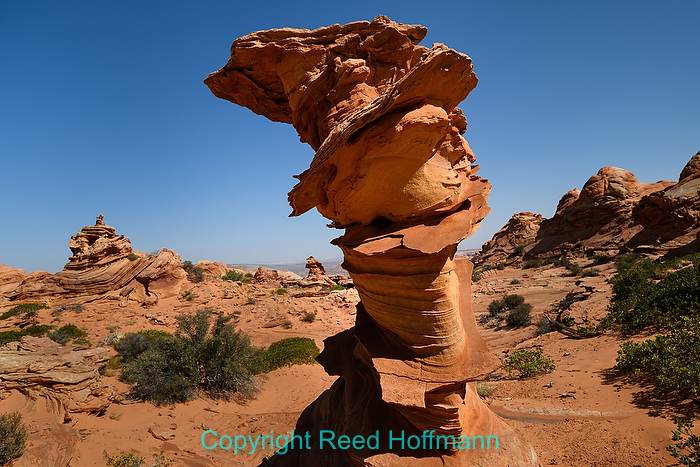
There’s a trail that goes from Jumbo Rocks campground to Skull Rock. If you follow it about 100 yards out of the campground, you’ll find some great rock formations to shoot. Nikon D7500, Aperture Priority, ISO 100, 1/400 at f/5.6, 0.0 EV, Nikkor VR Zoom 24-120mm f/4G IF-ED lens at 99mm.
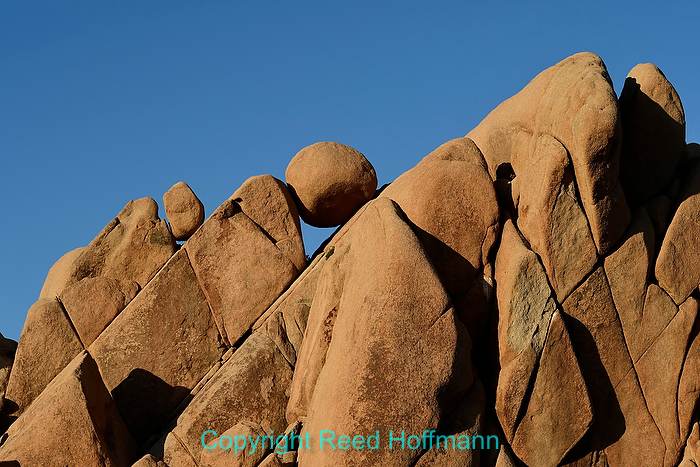
When scouting, I always try to have a plan before arriving. I knew I wanted to re-visit Jumbo Rocks Campground, where there’s a great boulder field near the amphitheater. I also planned to shoot the famous Joshua trees, both at sunset and night, so wanted to pick my locations for that. And finally, I’d read about an arch at White Tank Campground, so was going to visit that in daylight and see if it was possible, and worth it, to come back after dark.
In addition to those, on the way in (from the south), I stopped at the Cholla Cactus Garden. Called “jumping cactus,” I knew from previous (painful) experience to be careful around them. I figured they might be good candidates for trying out a new lens, the Nikkor 8-15mm zoom. It’s a unique design, being essentially two lenses in one. At 8mm, it’s a circular fisheye. At 15mm, a super-wide. The focal lengths between aren’t really usable, as it shows vignetting between the two extremes.
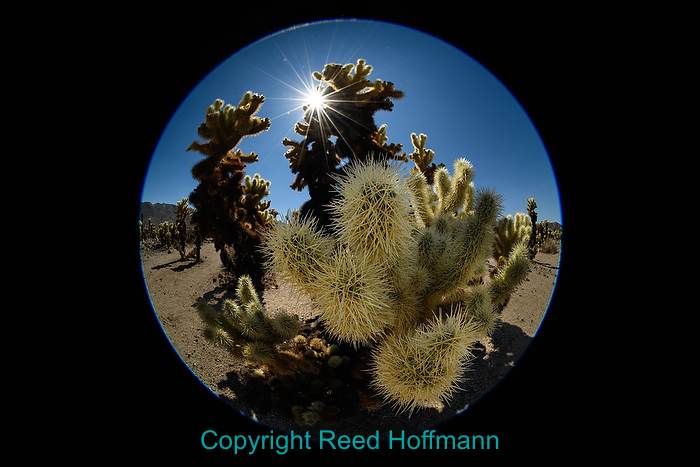
This is why I brought along the new Nikkor 8-15mm lens. At 8mm it’s a full frame spherical fisheye. I had to get uncomfortably close to these thorny guys at the Cholla Cactus Garden, Joshua Tree National Park. Nikon D850, Aperture Priority, ISO 160, 1/125 at f/22, -0.3 EV, Nikkor AF Zoom 8-15mm f/3.5-4.5 lens at 8mm.
At Jumbo Rocks I was also able to play with something fairly new, the ability to do focus stacking automatically with the D850. Called “Focus Shift,” the camera can automatically shift focus while shooting multiple frames from your near focus to infinity. I’ll have a more detailed blog post on that in the future.
As sunset faded, I pulled into the location I’d scouted earlier for the Joshua tree pictures. Being near the road, headlights from passing cars helped illuminate the scene for me. I also did a little light painting, and used the 15mm focal length of that unique lens for a few night shots.
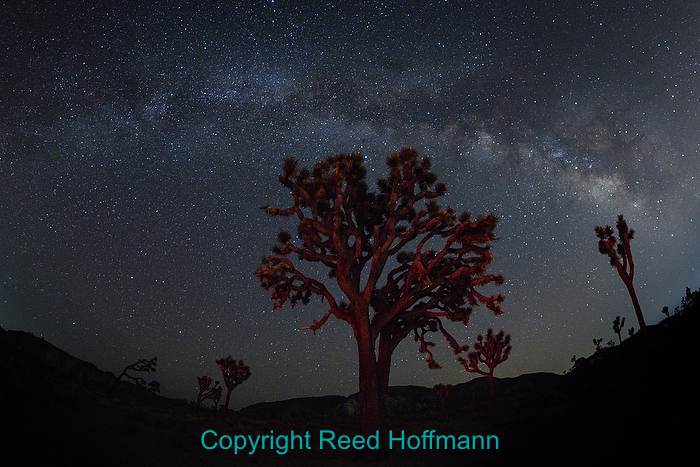
After darkness settled in I was able to shoot the Milky Way above some of the iconic trees. The light on this tree was provided by a passing car’s headlights. Nikon D850, Manual exposure, ISO 5000, 30-seconds at f/4.5, -1.0 EV, Nikkor AF Zoom 8-15mm f/3.5-4.5 lens at 15mm.
By 10pm I was hiking in to White Tank Arch, where I was surprised to find a crowd. There was a large group of foreign visitors who had the same idea I did. After about 45-minutes they finally left and I was able to make some pictures. Those shots turned out okay, but I’d make better nighttime arch photos later in the trip.
After a few hours of sleep at a motel in Blythe, CA, I headed for Phoenix early Sunday morning. There I’d meet up with two old friends and head up to the White Mountains. Having spent twenty years in upstate New York, I was familiar with the White Mountains of New England. But Arizona? We stayed in Pinetop-Lakeside, a beautiful area. But that’s not its biggest appeal. At nearly 7000-ft., the cooler weather makes it a great escape from the blistering heat in Phoenix and the lower areas. We spent a pleasant day-and-a-half driving around, checking out local lakes and mountains. Aside from a small incident involving me behind the wheel of a 1970 ford pickup while having a blow-out on a one-lane dirt steep mountain road (!!), it was enjoyable.
We had a couple of beautiful sunsets while exploring the Pinetop-Lakeside area. This one was at Big Lake. Nikon D850, Aperture Priority, ISO 250, 1/100 at f/7.1, 0.0 EV, Nikkor AF Zoom 18-35mm f/3.5-4.5G lens at 20mm.
Up at 5am Tuesday, I was off to meet some other friends in Page, AZ. I’d been there years ago on a family vacation, but didn’t have time to check out the photo attractions. And there are a lot. The iconic Horseshoe Bend is just a few miles outside Page, and I pulled in there a little before 10am. Which is good, because it was already turning into a zoo. I sprinted through the crowds down to the overlook (about ¾ mile from the parking area), shot for fifteen minutes and then raced back to the car. By then the lot was full, police were on the road chasing people away and I was happy to leave. When I return, I’ll get there early, before the crowds and have better light.
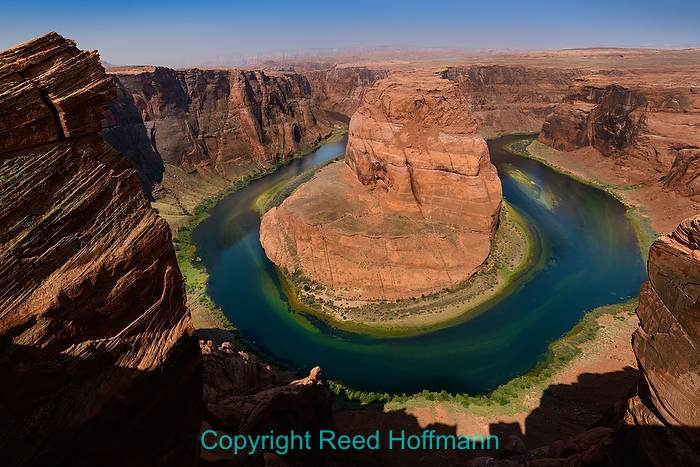
It wasn’t a great time of day to be at Horseshoe Bend, but it’s still a spectacular sight. Nikon D850, Aperture Priority, ISO 64, 1/160 at f/10, -0.3 EV, Nikkor AF Zoom 18-35mm f/3.5-4.5G lens at 18mm.
The reason I was rushing was so I could catch up with my friends Leon and John. They’d driven out from Kansas City a few days earlier, and we were going to spend the next several days together. I was meeting them around 11am so we could go to Antelope Canyon X. You may have heard of Antelope Canyon, but I doubt many have heard of “X.” Antelope Canyon has a justifiably famous reputation as one of the most beautiful slot canyons in the southwest. Unfortunately, that reputation means everyone wants to go there, and the crowds have made photography difficult.
If you do some research, you’ll find there are a number of other canyons in the area that are less crowded and also beautiful. One of those I’d read about was Antelope Canyon X. It was less crowded and friendly to photographers. Their normal tour is 1.5 hrs, $40, a “hiking” tour, no bags or tripods allowed. For twice the money ($80), you can take a photo tour that’s twice as long, limited to a small group, and with a guide who understands photography. That’s what we did, just six of us instead of the forty in a regular tour, and so we had plenty of time to set up tripods and wait for people to exit the scenes. Our guide, Eugene was great, I‘d highly recommend him and that tour to anyone visiting.
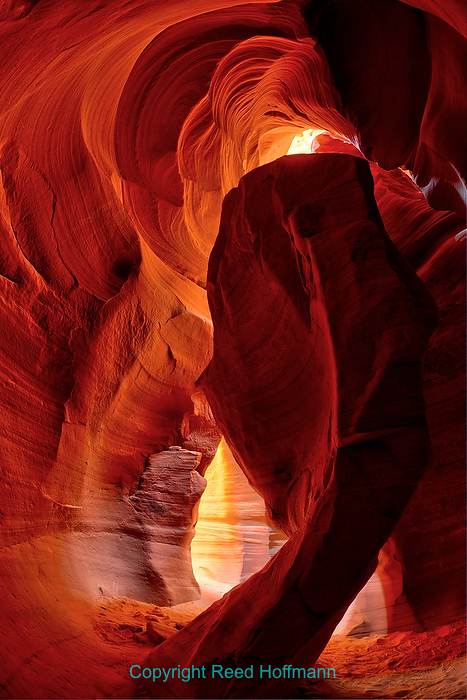
This HDR image was created using five frames shot at the entrance to one of the slots at Antelope Canyon X. It wouldn’t have been possible had we not been on the photo tour and able to use tripods. Nikon D850, Aperture Priority, ISO 80, Nikkor AF Zoom 8-15mm f/3.5-4.5 lens at 15mm.
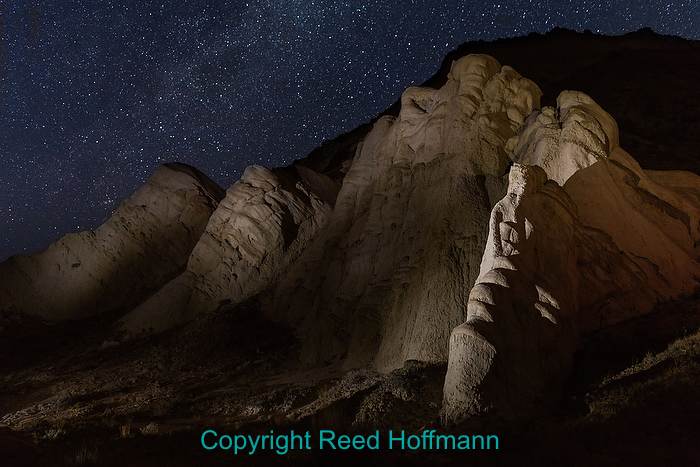
By the time we got out, around 4pm, we were hot, tired and thirsty. Which made it a perfect time to enjoy a nice break in Page and some Mexican food. From there we were off to Kanab, where John and Leon had their trailer parked. John was ready to call it a day, so he drove straight back. Leon and I, on the other hand, headed in to Cottonwood Canyon. This dirt road is essentially a shortcut to Bryce Canyon up north, but that’s not why we were taking it. We knew there were some nice rock formations, and thought it would be a good place to shoot sunset and do some night photography.
By the time we worked our way along the rough road to some nice areas, we’d lost the light. So instead of shooting, we did some planning. One of the keys to night photography is knowing where you’re going to go and what you’re going to shoot before it gets dark. We found three different areas to work, and figured out both where we’d place our tripods and how we’d light the rocks. Out of those three locations, two worked really well. It was close to midnight by the time we got to the trailer park, just the first of many late nights for us.
We planned our shoots in Cottonwood Canyon to be different. For this one we were fairly close to one edge of the rocks, in order to have some foreground in the photo. Nikon D850, Manual exposure, ISO 2500, 30-seconds at f/2.8, Nikkor AF 20mm f/1.8G lens.

On this, our last shoot that night, we were far from the wall, and took turns lighting it from about 100 yards away on the right side. And I’m happy to report I got lucky here and caught a shooting star as well. Nikon D850, Manual exposure, ISO 2500, 30-seconds at f/2.2, Nikkor AF 20mm f/1.8G lens.
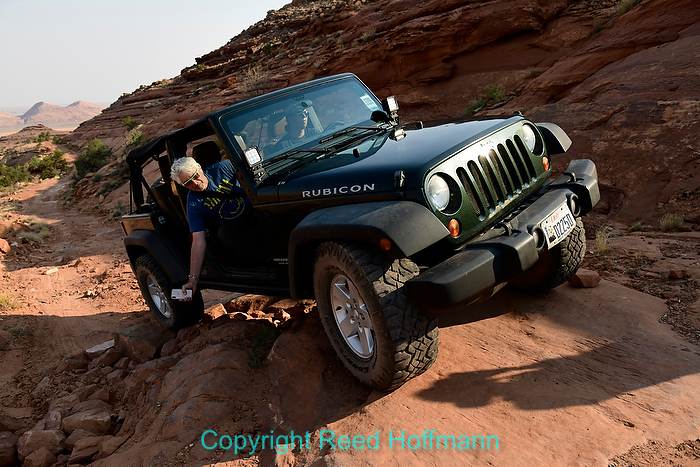
The next morning we were up at 4:30 because we had a 5am appointment. Some of the most beautiful areas around Kanab have a tightly controlled permit system to prevent overuse. Leon had been able to get one of those permits and book a guide to take us in there, to visit South Coyote Buttes and Water Pocket (The Wave is the most popular spot, but we couldn’t get a permit for that). Our guide Larry picked us up early that morning in his truck, towing a trailer with two large ATVs. We’d take turns driving one of them, following him in the other, over rocky and sandy tracks impassable by anything less than a high-clearance 4WD vehicle. I have to say, driving the ATV was a blast.
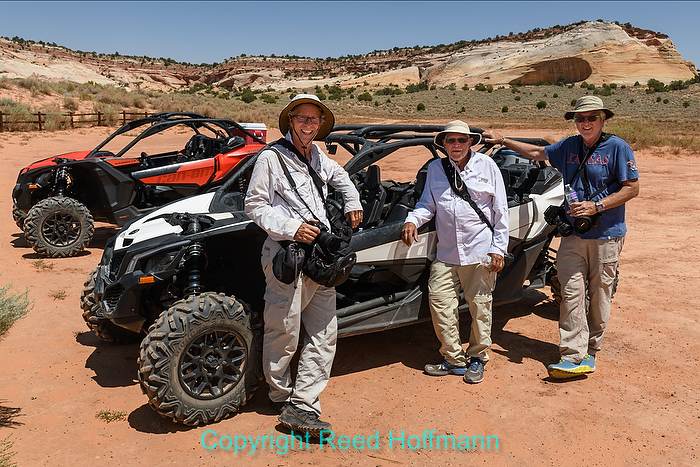
Myself, John and Leon with our trusty steed. As much fun as these were to drive, the dust, sand and heat took their toll. Next time I might ask for an air-conditioned truck!
Both locations were amazing. These kind of places are actually challenging to photograph, because everything’s so surreal looking. Again, we had plenty of time to wander and shoot, and by the end of our visit we’d walked over seven miles. While it is possible to visit those places (with a permit) on your own, I’d strongly advise getting a guide. Between the difficulty of getting in (driving), and then the large areas to walk and explore, a good guide like Larry is well worth the extra money.
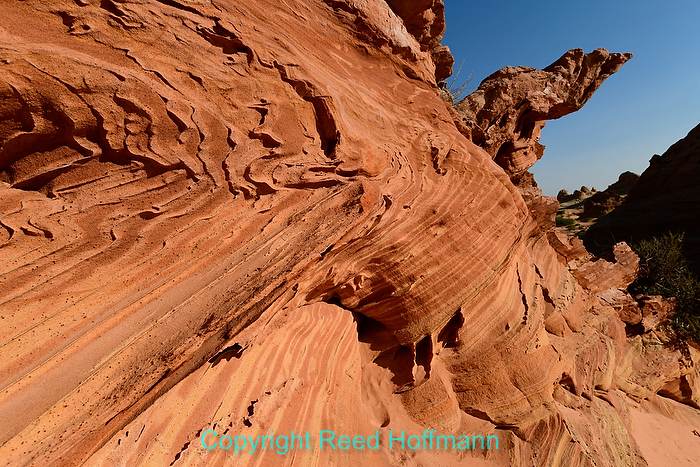
Crazy, psychedelic rock formations are the order of the day at South Coyote Buttes. Nikon D850, Aperture Priority, ISO 100, 1/320 at f/10, -0.3 EV, Nikkor AF Zoom 18-35mm f/3.5-4.5G lens at 21mm.
Returning to Kanab late that afternoon, we may have been hot and tired, but weren’t done yet. After a quick stop at a burger joint, we hopped in my car and headed to the Grand Canyon. The south rim of the canyon is where most people go, but we were on the north side. Hearing that some of the viewpoints on BLM land before you actually get into the national park were nice, we decided to investigate. Unfortunately, fires in the area meant several of the gravel roads were closed. We did manage to find one spot that was open, and had some nice views. But the smoke from the fires, while nice for sunsets (resulting in more color), created a haze that hurt the more scenic views.
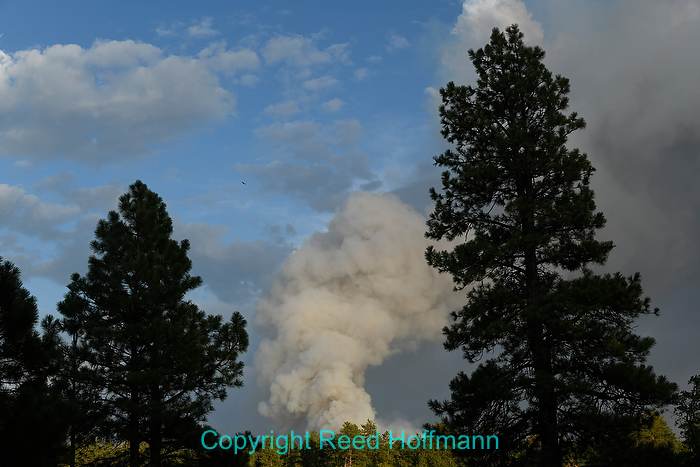
This was one of the fires along the north rim of the Grand Canyon that kept us from some of the viewpoints we wanted to explore. Nikon D7500, Aperture Priority, ISO 200, 1/250 at f/7.1, 0.0 EV, Nikkor VR Zoom 24-120mm f/4G IF-ED lens at 44mm.
The next day we actually slept in, as we were moving to Monument Valley and had no plans until late afternoon. Our goal was to be in the valley before sunset, but knowing just when that was could be a challenge. One of the difficulties visiting this part of the nation is the changing time zones. Between Arizona, Utah and the Navajo Nation, and whether they were on Mountain or Pacific, or chose to observe daylight savings time or not, we quickly learned to ask the time whenever we went. Our smartphones weren’t always smart enough to figure that out quickly.
There’s a fee to enter Monument Valley, and it’s open from 6am to 8pm (this time of year). But there’s a catch to that. You can’t enter the valley after 8pm, but you don’t have to be out by then. So we shot through sunset, and were out by 9pm. That gave us a few minutes to shoot time exposures of cars leaving the valley before starting our night shoot. We’d booked another guide for that outing.
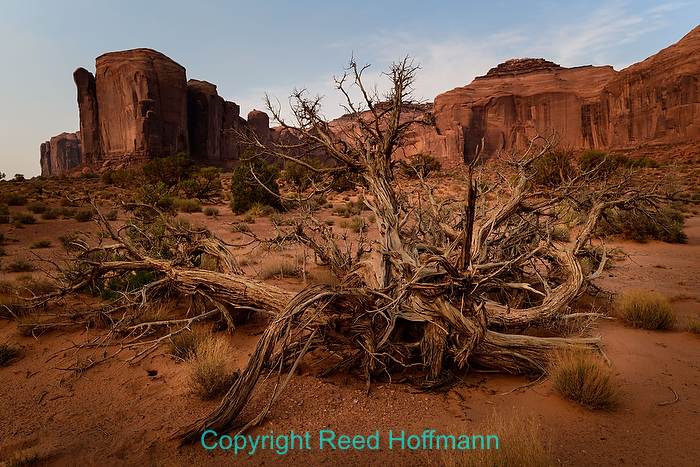
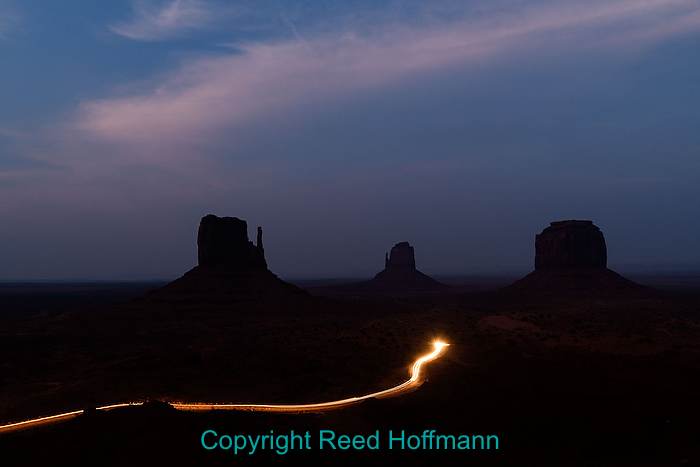
Monument Valley is full of interesting subjects to use for foregrounds in landscape photos. Nikon D850, Aperture Priority, ISO 100, 1/125 at f/6.3, +0.3 EV, Nikkor AF Zoom 18-35mm f/3.5-4.5G lens at 24mm.
There was just a bit of light still in the sky above Monument Valley as we waited to go out on the night shoot with our guide. Nikon D850, Manual exposure, ISO 200, 30-seconds at f/10, Nikkor AF Zoom 18-35mm f/3.5-4.5G lens at 26mm.
The entire area in and around Monument Valley is Navajo tribal land. That means if you want to do anything off the public roads, or beyond normal operating hours, you need a local guide. I’d written a story a couple of years ago on night photography for Nikon, and shortly after that received an email from Quanah Parker. His family runs tours there, and he guides and leads night photography outings. I saved the email, and was really glad I did. I’d recommend him now to anyone.
Quanah took up photography a few years ago, reading articles online and practicing. He soon realized that he preferred shooting at night instead of daytime. Why? He says it’s easier. That’s the first time anyone’s ever said that to me, and it took a minute to sink in. But you know what, in some ways he’s right. There are fewer variables. The light is constant. You don’t worry about stopping action. No need for long lenses. So it’s true that there are certain aspects of night photography that are actually easier than day photography. Of course, you do need a tripod, and have to figure out things like exposure and focus. But that’s one nice thing about hiring a guide. Just as I help people with that sort of thing when they’re on workshops with me, Quanah’s there to help his clients. And maybe teach them a thing or two.
I spend a lot of time teaching photography, but know there’s a lot I don’t know, and do enjoy learning new things. One reason I enjoy going out to shoot with other photographers is that I can often pick up new ideas from them. And Quanah had a big one, one I’d never heard of or thought about before. “Low Level Lighting.”
I’ve enjoyed doing night photography for decades, and over the last ten years been doing more and more light painting. Night photography is done with a tripod and uses whatever light there is (streetlights, moon, stars, etc.). Light painting is taking a night scene and adding light to it with flashlights (or even strobes). You’re “painting” light into the scene. It’s fun, but challenging, because getting the light right is mostly trial and error, and honestly, mostly error. Low level lighting takes away a lot of that “hit and miss.” Here’s how it works.
Find the scene you want to photograph, set up your tripod and get your focus. Do some test exposures (perhaps for the stars in the sky). Now, take some low-powered lights (perhaps a few headlamps) and hide them in the scene so they’re illuminating areas you want to see. Low power is the key, because they’ll be on during the entire exposure. If you’re shooting a 20-second exposure at 2000 ISO and f2.8 for the stars, then your lights need to match that exposure. It will take some experimentation, but the great thing is that once you’ve dialed in the exposure, it’s not going to change. You’ll actually spend less time shooting frame after frame, trying to get the light right as you do when light painting.
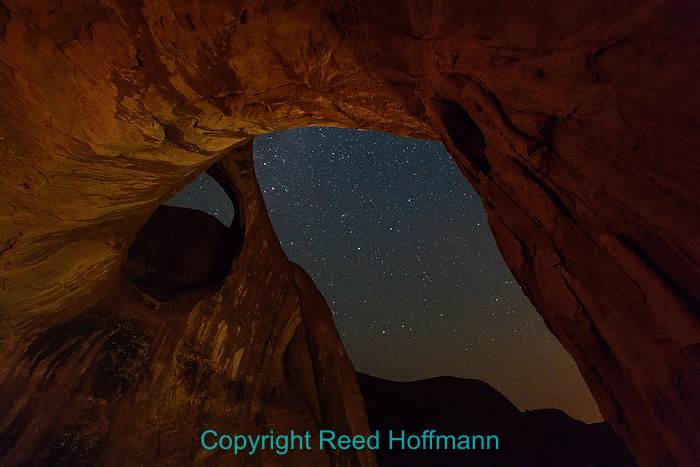
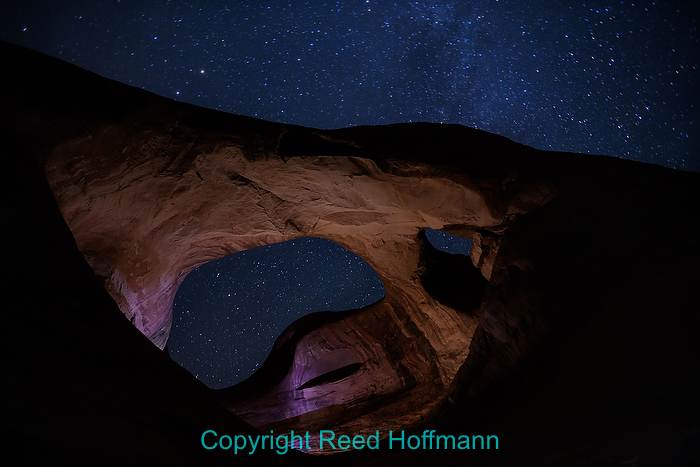
Moccasin Arch, just barely illuminated by a headlamp below to the right. Nikon D850, Manual exposure, ISO 8000, 30-seconds at f/3.5, Nikkor AF Zoom 14-24mm f/2.8G lens at 14mm (I didn’t bring this lens with me, but our guide, Quanah, loaned me his for the shot).
Another benefit is the quantity of light. Using flashlights to illuminate subjects can be annoying to anyone else in the area. It’s also almost impossible for anyone else to be shooting, because your light will mess up their shot. And, every time you use the light, you ruin your night vision. Using these low-powered devices, the glow is so dim it will hardly be noticeable. You can use any light source whose output you can adjust, and inexpensive light panels are a great option. They often come with filters, so you can change the color (generally to something warmer). Quanah showed us how he does this with just a couple of headlamps, and by bouncing the light off of rock, sand, or even his shirt could change the power and color. I’m really looking forward to trying more of this in the future!
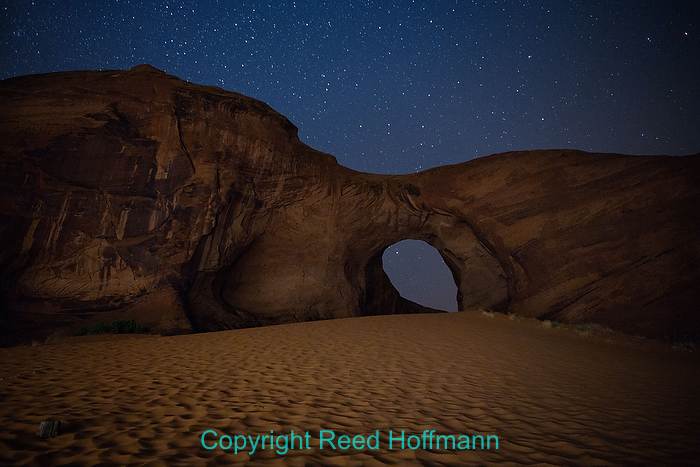
For this photo of Ear of the Wind, Quanah reflected the light off a rock behind us to the left. That bit of light was enough to illuminate the sand dune, and also add shadows to bring definition to it. Nikon D850, Manual exposure, ISO 4000, 30-seconds at f/2.2, Nikkor AF 20mm f/1.8G lens at 20mm.
Another late night, we got to bed around 2:30am, then were back up before 6 for sunrise. An easy place to photograph the valley is right next to the hotel (appropriately named The View Hotel), on the rim overlooking the valley. We started there, then hiked down the nearby Wildcat trail to get some lower angles. After that it was back to bed for a well-earned nap!

The last thing we wanted after a late night was to get up for sunrise, but I’m sure glad we did. For this photo I set the camera to Fluorescent white balance to add more blue to the scene. Nikon D850, Aperture Priority, ISO 64,1/50 at f/6.3, -0.7 EV, Nikkor VR Zoom 24-120mm f/4G IF-ED lens at 50mm.
Up once more early that afternoon, we met Quanah again, this time for a trip to Hunts Mesa. It’s another classic view of the valley, but takes about two hours in a Jeep, crawling over rocks to cover the ten miles from bottom to top. The views didn’t disappoint, although a sandstorm sweeping in on the valley brought high winds, making it hard to get a sharp image even with a tripod. On the plus side, it did add more drama to the photos, and the light was exceptional.
With Quanah at the wheel, Leon leans out to shoot some video of the Jeep crawling over rocks on the way up to Hunts Mesa. Nikon D850, Aperture Priority, ISO 200, 1/640 at f/5.6, 0.0 EV, Nikkor VR Zoom 24-120mm f/4G IF-ED lens at 24mm.
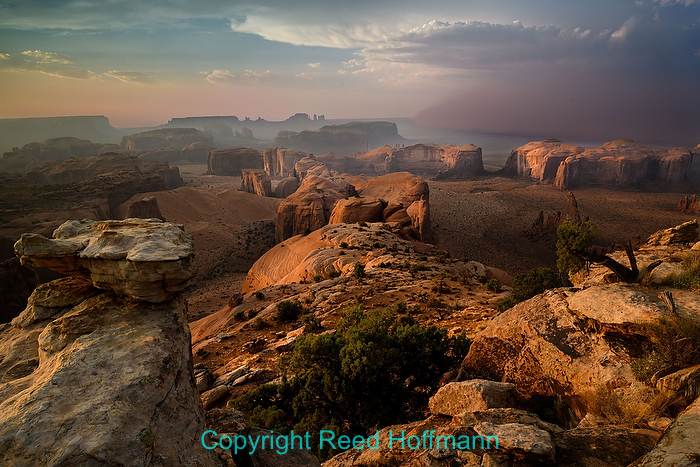
In this photo you can see the sandstorm far away to the right, approaching Monument Valley. The light, as you can see, was exceptional. Nikon D850, Aperture Priority, ISO 100, 1/50 at f/11, -0.3 EV, Nikkor AF Zoom 18-35mm f/3.5-4.5G lens at 22mm.
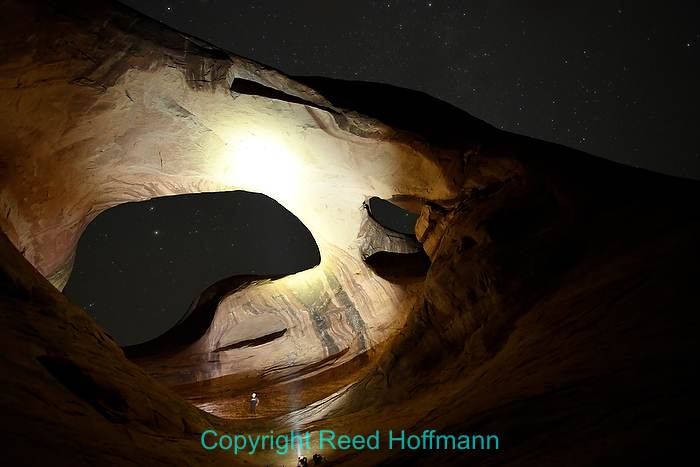
As the light faded, we headed down, but not back to camp. Instead, Quanah took us through narrow canyons to Spiderweb Arch, a double arch. This is actually not a place I’d recommend most people go, as you have to climb some very steep slickrock, in the dark, to get to where you can shoot it. We shot it from outside and inside, as lightning rumbled in the skies around us. Unfortunately, we didn’t see any bolts, but on the other hand, we didn’t get hit either! Just as important, we survived the slide down on our butts to make it safely to the ground.
In this shot, you can see Quanah up in the arch, setting headlamps to light it. Leon’s using his bright flashlight to help Quanah see where he’s going. That bright light won’t be part of the final exposure. Nikon D850, Manual exposure, ISO 2500, 25-seconds at f/2.2, Nikkor AF 20mm f/1.8G lens at 20mm.
This was the end result of those headlamps placed in the arch. Nikon D850, Manual exposure, ISO 1250, 80-seconds at f/2.5, Nikkor AF 20mm f/1.8G lens at 20mm.
The next day, Saturday, was time to start the two-day drive back to Kansas City. Leon came along with me, as he lives nearby (John lives in Oklahoma). Again, we took advantage of the drive to make stops at Mexican Hat, Hovenweep and Great Sand Dunes National Park. The dunes were fantastic, and another great sunset shoot.

Hovenweep National Monument isn’t big, but it’s still impressive. The remains there are some of the best preserved of the Anasazi culture that existed in the area over 700 years ago. Nikon D850, Aperture Priority, ISO 125, 1/320 at f/10, +0.3 EV, Nikkor AF Zoom 18-35mm f/3.5-4.5G lens at 18mm.

Our timing at Great Sand Dunes National Park was just right. We arrived about an hour before sunset, giving us time to climb into the dunes and find untrampled sand to shoot as the light fell. Nikon D850, Aperture Priority, ISO 80, 1/100 at f/11, -0.3 EV, Nikkor AF Zoom 18-35mm f/3.5-4.5G lens at 22mm.
We overnighted in Colorado Springs, where Leon visited Garden of the Gods at sunrise. Then it was time for the last day’s drive, with one small detour to see Monument Rocks. These unusual rock formations are in western Kansas ,about 45-minutes south of I-70. Interesting, but pretty small in comparison to what we’d been seeing all week. By 8:30 that night we were both back home.
It was a wonderful trip. I had a nice time driving out with Nathan and helping him get settled in for the next few years of graduate school. Returning from there, I had some great opportunities to explore a number of beautiful areas with good friends. And now that I’m home again, I can start work on an itinerary to share those discoveries with others by leading a workshop there next year. Want to join me?
(If you like this story, please share it with your friends and let them know about the links on photography I post on my business Facebook page. I’m also on Instagram and Twitter, @reedhoffmann)