When I started in photography, there was only manual focus, turning the ring on the lens until what you saw in the viewfinder looked sharp. Today autofocus is so good I think you’d be nuts not to take advantage of it, at least when shooting action. The challenge is figuring out what settings work best for what you’re shooting. In nearly twenty years of teaching Nikon School and about a hundred workshops, I’ve learned how to help people work through those settings, from beginners to advanced users. This is how I do it:
The Beginning Photographer
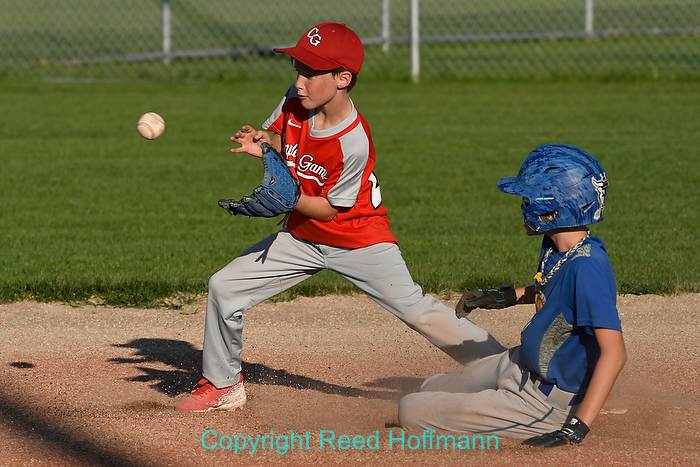
Occasionally I’ll have someone new to photography join me on a wildlife trip (as I just did in
Africa). On those trips we use long telephoto lenses to photograph animals that are sometimes moving, which means you need relatively high shutter speeds and autofocus that will follow the subject. So the first step is taking the camera off of full Auto, where it makes all the decisions (which won’t be the best for action). But if that photographer isn’t ready to start getting serious about learning the camera’s functions, what’s the answer? Sports scene mode.
Most cameras that offer scene modes have a Sports (or “Action”) mode, which does the basics of what you want for wildlife photography. It will try to give you fast shutter speeds, set the autofocus system to track a moving subject and put the camera in continuous shooting mode (if you hold down the shutter button it keeps firing). This is a simple yet effective solution for those who don’t want to spend time learning more about their camera.
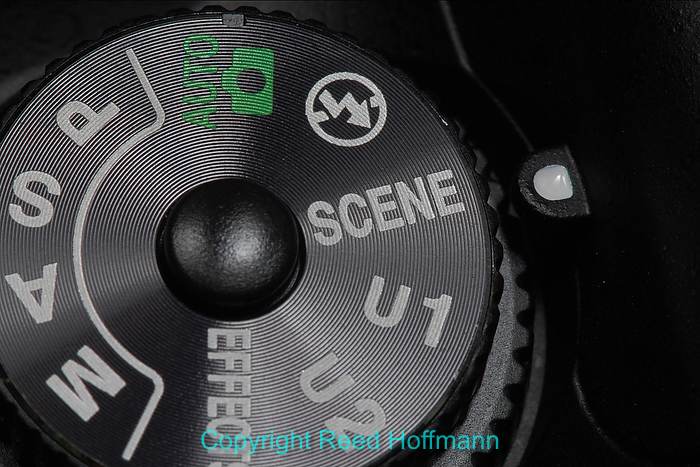
Most entry to mid-level DSLRs have an option for using Scene modes, which are a step up from full point-and-shoot mode (green camera icon). Once you’ve chosen Scene on the mode dial, you can then chose the specific mode you want in a menu on the camera.
While sports scene mode can do a pretty good job, you’re going to be very limited about making any other changes to how the camera works. After all, you’re asking it to make the decisions, so why should it let you screw things up? To get beyond that, you’ll need to leave scene modes and move to one of your camera’s exposure modes. Most cameras have four: Program, Aperture, Shutter (or “Time Value” for Canon) and Manual. I personally prefer to use Aperture Priority most of the time, but feel free to use whatever mode works best for you as long as it gets the job done.
While these four modes are initially about exposure, they also open up a wide range of menu options that control other features of the camera. And that will let you now take advantage of a multitude of autofocus choices.
For photographers at this level, the first thing I tell them is to set the camera’s autofocus to “Continuous.” With most DSLR’s, there are usually three choices. The first is AF-A, “Automatic” (or “AI-Focus” for Canon), where the camera decides whether to lock on the subject or try to track (which is what it does in point-and-shoot mode). The downside to this mode is you have to hope the camera makes the right decision.
The second is AF-S, “Single Servo,” (or “One-Shot,” for Canon), where the camera will lock focus once a subject is still. By default, it also won’t let you shoot a picture until it confirms focus. Good for portraits and landscapes, but obviously the wrong choice for action.
In AF-S (“Single Servo” or “One Shot”) the camera will focus wherever you place the active sensor. As long as you’re photographing a non-moving subject, that’s fine. But AF-S can’t track movement.
And the third, AF-C, “Continuous” (or “AI-Servo” for Canon), is where the camera expects the subject to move and will try to track and keep it in focus. Obviously, this is the best choice if you know you’re shooting action. Plus, it will let you shoot anytime, whether the camera thinks it’s in focus or not. Which is why I leave my cameras set to AF-C all of the time.
NOTE – from this point on, I’ll use Nikon’s terminology. Most other manufacturers use the same or similar terms, but check your manual to be sure.
In Nikon cameras, these three options are call “AF Modes.” They control how the autofocus system works. “Where” the autofocus system focuses is controlled by what Nikon calls “AF Area Modes.” These let you choose the number of AF sensors the camera will use and how those sensors work together. But before we get into the nitty-gritty of settings, let’s make sure we have a good basic understanding of the challenges of autofocus.
First, you need to remember that a lens can only focus in one place at any one time. In other words, you can’t focus on a person in the foreground and the mountain behind that person at the same time. Now you may be thinking, “But Reed, it’s possible for me to have both in focus, right?” And yes, you can. However, that’s due to depth of field, not focus. The lens will be focused on either the person, the mountain or somewhere in between, but it can’t focus on both at the same time. Make sense?
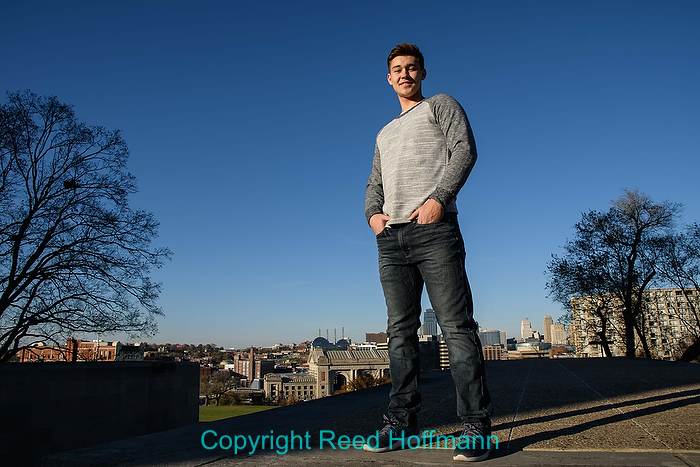
For this senior photo shoot of Walter, I’m focused on his face, but the skyline of Kansas City appears sharp as well. That’s due to depth of field. At that distance from him, with a wide-angle lens at f/6.3, I can still show a lot of detail in the background.
Another thing to keep in mind is that the less work the camera has to do, the faster the autofocus system can perform. As subjects get closer to you, the lens must shift elements faster to maintain focus. So subjects traveling side-to-side in front of you are easier to keep in focus than subjects coming straight at you. Furthermore, the closer a subject is when coming straight at you, the more difficult it is for the camera to maintain focus.
While your camera certainly has more than one focus sensor it can use, the fewer focus sensors the system is paying attention to, the faster it can perform. So just because you camera might have over a hundred sensors doesn’t mean you want it to work with all of them all the time.
Finally, the camera model and lens also play important roles in
how fast your system can focus. More expensive cameras have faster autofocus systems and more sensors. For instance, in Nikon School I talk about seven different AF systems Nikon has used in their entry-level to pro bodies. And, since autofocus performs faster with more light, using a wider aperture lens also allows the autofocus system to perform faster.
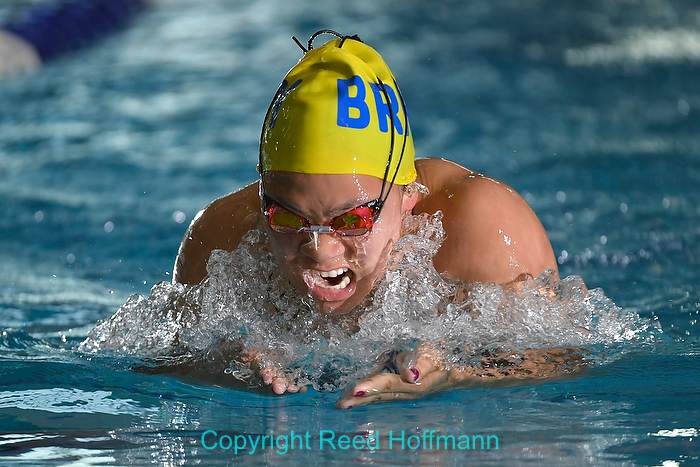
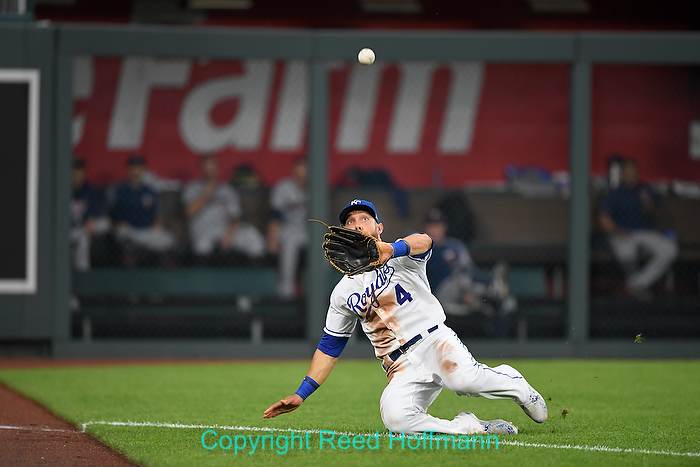
I was using Nikon’s top-of-the-line camera, the D5 to shoot this swim meet, taking advantage of its incredibly fast autofocus. There’s just a brief moment when the athlete’s head clears the water, so using a fast autofocus system and relatively fast lens (Nikkor 200-400mm f/4) is critical.
Now to those settings.
First, let’s agree to leave the AF Mode set to AF-C. Remember, that lets the camera track a subject while trying to keep it in focus. If you ever shoot action, you need to have your camera set this way (and you can still photograph non-moving subjects while in AF-C). That means what we need to focus on, pardon the pun, is the AF Area Mode settings, or “where” the camera focuses. Which in turn are determined by the action itself.
When photographing action, the two most important factors for AF are difficult that action is to follow and how fast it is. I’m going to explain the various AF Area Mode options and when I’d recommend them for various types of action. Again, while I’ve handled and shot most major brands of cameras, these suggestions are based almost exclusively on my experience with Nikons.
AF Area Modes
Single Point – If you want the fastest possible performance out of any camera’s autofocus system, then you want to choose single point. The camera will focus wherever that single “active” sensor is (it should light up briefly when you touch the shutter button). So speed is it its strength. Its weakness is that you have to keep that single point on your subject at all times. If the subject changes direction, or you drift off the subject, the camera will re-focus. The best time to use this, then, is if your subject is easy to follow. For erratic action, or when distance means your subject is small in the viewfinder and hard to keep that sensor on, other choices might be better. For an entry-level camera, that Single Point option will almost always give you the fastest AF performance.
If the action’s not too fast and it’s fairly easy to keep the AF sensor on your subject, then Single point will be the fastest. That’s especially true with entry-level cameras.
– This, and the others below, take advantage of the fact that your camera has more than one autofocus sensor (most cameras today have dozens, some even over a hundred). Again, you need to get the “active” sensor (the one that lights up when you touch the shutter button) on your subject and acquire focus. But once acquired, as the camera tracks, if that one point gets off the subject briefly, some surrounding points will automatically help maintain focus. How many points is something you will choose in the menus. There are two important things to remember about using this. One, if that active sensor stays off the subject for more than a second or so, the camera will assume you want to shift focus to where it is. And two, there’s a slight slowdown in performance as you ask more AF sensors to help out. So Dynamic is often a good choice when you have action that is difficult to follow.
In football, since I’m often shooting through groups of players, I tend to choose a Dynamic AF Area Mode. Depending on which Nikon camera I’m using, I’ll usually pick Dynamic 21 or 51. I have to make sure and acquire focus on the subject with the active point first, but then the surrounding points will help maintain focus briefly if that point moves off the subject.
– The difference between Dynamic and 3D is that with 3D, once you’ve acquired focus and are tracking the subject, you can shift your framing and the active sensor will also shift to keep the subject in focus. Remember, in Dynamic, if you stray off the subject briefly, the camera will re-focus. In 3D, the camera will hand-off focus duties to whatever sensor the subject happens to be under. This makes it easy to change your composition (framing) while following a subject in motion. Of course, this takes a lot of effort on the part of the AF system, so works best with more expensive (meaning more powerful) cameras.
3D has become my default mode, as it lets me acquire focus, then shift my framing for the composition I want. As long as I get my focus on the subject at the start, it does a good job of keeping it there.
– New to some Nikon cameras, this in effect gives you a super-sized AF sensor. With small subjects, the challenge is often getting that single sensor on them. Group uses five sensors (the four surrounding the center one are highlighted), and whatever’s closest to you that one of those five touches are where the camera will focus and start tracking. This is a great choice for bird photographers, or anyone who photographs small moving subjects.
This is one of my favorite situations to use the Group AF Area Mode on my Nikon cameras. It “groups” five sensors together, then focuses on whatever is closest to you that one of those five sensors is touching. This makes it easier to insure proper focus on small, fast or erratically moving subjects.
This is where time and experimentation play a big role. If you shoot enough action, and are willing to try different settings, you’ll discover what choices work best for you in what specific situations. In June I covered the Endeavor Games for Disabled Sports USA. This is a sports festival with indoor and outdoor activities from track to basketball to swimming.
Over the course of those three days I probably used a half-dozen different focus options. While I stayed in AF-C the entire time, I changed the AF Area Modes regularly. If the action was easy to follow, I could use one point. If I wanted to shift composition while shooting, I’d use 3D. If I had a clear shot (nothing between me and the subject), and wanted to focus on whatever subject was closest to me, I sometimes used Auto AF (letting the camera choose where to focus). If I could keep the subject relatively centered, but was worried about erratic action, I could choose a Dynamic option (and one of three choices for number of sensors), or Group. The key thing was that no one group of AF settings were going to be best all the time. And there were even times where I simply pre-focused on a spot and waited for the action to happen there. Just as no one ISO, shutter speed or aperture is going to be right for all situations, no one AF setting will be either.
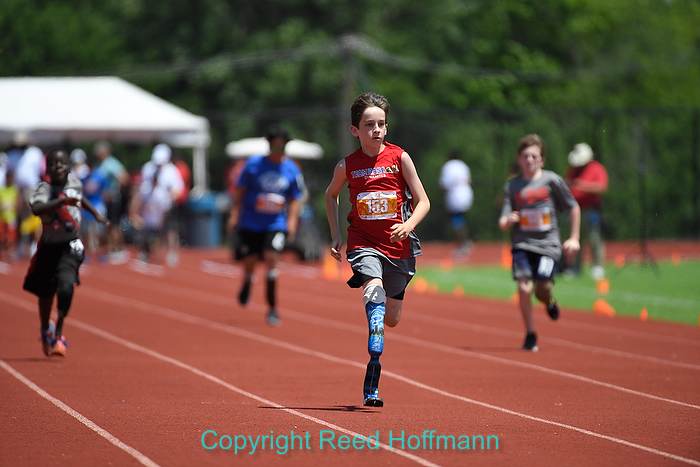
In this case, where I wanted to make sure the lead runner was sharp, I simply used the Auto Area AF mode, where the camera focuses on the subject closest to me. While often dismissed as “point-and-shoot” mode, in certain situations it’s a great choice.
And that, of course, is the most important takeaway from this whole conversation. Every photographer who shoots action should take time to play with their camera’s autofocus settings. I can tell you what’s worked best for me, but to find out what works best for you, with your camera(s) and lens(es), shooting the action you like to photograph, you need to go out and play. And that’s not so bad, is it? We should all take more time to play. You might be surprised at what you learn.
(If you like this story, please share it with your friends and let them know about the links on photography I post on my business Facebook page. I’m also on Instagram and Twitter, @reedhoffmann)
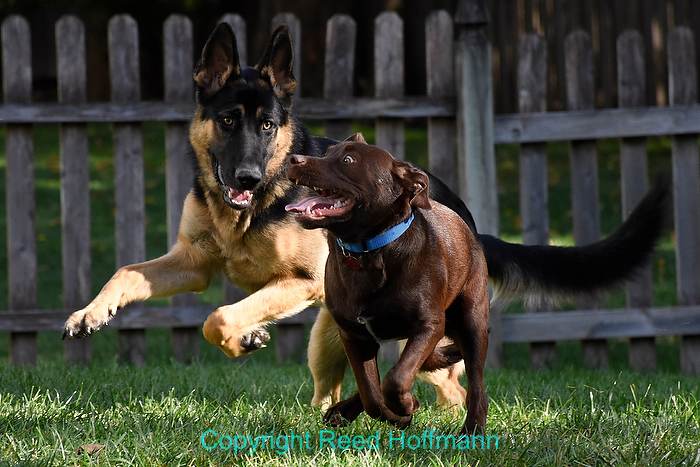
Dogs at play is my favorite way to experiment with different autofocus options. If you don’t have dogs at home, then visit a local dog park. Practice makes perfect!