I’ve been a big fan of light painting since I first learned about it nearly twenty years ago. But last summer I was introduced to a new style that I’ve come to love: low level lighting. Here’s why…
Light painting is when you use an artificial light source, at night or in a darkened room, to illuminate something. You simply put your camera on a tripod and use a flashlight to “paint” your subject with light. You can learn all about that here. However, there are two downsides to light painting. One, it’s difficult to get the light just right, so you spend a lot of time trying, over and over. And two, when doing it outdoors it can be annoying to other people.
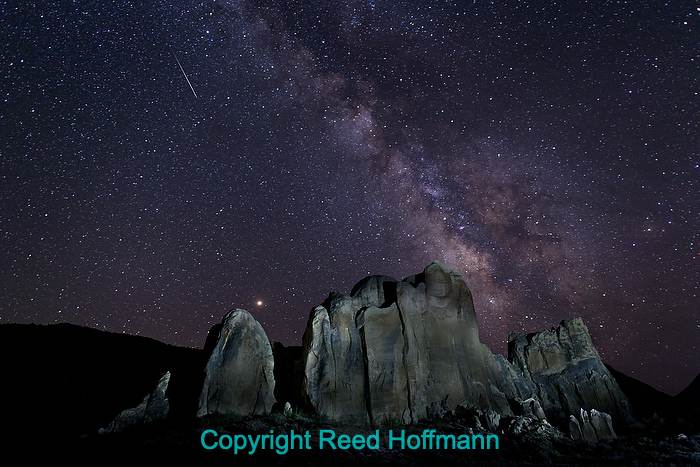
This is classic light painting. To photograph these rocks in Cottonwood Canyon in Utah, we needed a very powerful flashlight, and used it to paint them from far to the right. We positioned our cameras to put the Milky Way over the rocks, and got lucky with a shooting star. Nikon D850, Manual exposure, ISO 2500, 30-seconds at f/2.2, Nikkor AF 20mm f/1.8G lens.
On a visit to Monument Valley last August the guide we hired for a night shoot showed me something new: low level lighting. It solves the two problems I mentioned above. Instead of using high-powered flashlights to illuminate large structures outdoors, you use smaller, weaker devices. In fact, they’re so dim you often can’t see the light you’re creating until your eyes have adjusted to the dark. That also means they’re less likely to bother anyone else. And, you place them in the scene and leave them until you’re finished. Once you’ve got them positioned properly, you’ll probably have your shot within a few frames of starting. Here’s what you’ll need and how to do it:
1 – Lights – Your lights don’t need to be bright. The key is low intensity and adjustable. “Warm” light is also more pleasing, meaning under 5000K or adding slight warming gels. There are two things I really like about this. One, small lights, are well, small. Less weight and bulk to carry around. And two, they’re inexpensive. While I have a number of small lights, my favorites are the Goal Zero Lighthouse Micro Flash and Lighthouse Micro. They tend to run in price between $20 and $30. I have five, two of the flashlight models and three of the lantern types.
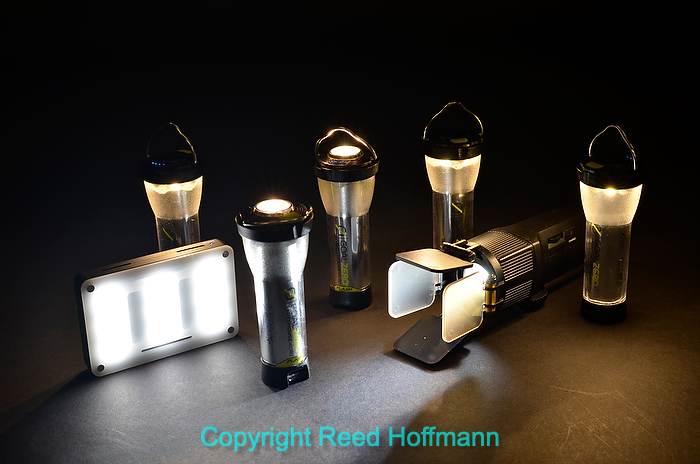
Here are some of my favorite low-powered lights. Standing up are two Goal Zero Lighthouse Micro Flash (, center, with flashlights in the head) and three Lighthouse Micros (LED lanterns). Lying down at right is an Ikan Micro Spot, and at left is an Aputure AL-M9 Amaran Pocket -sized LED panel. The Goal Zero’s have four LEDs in the lantern part, and you can choose to use all four or just two of them, and both they and the flashlight on top are dimmable to nearly zero light output.
This is my light painting kit now. I’ve got powerful lights (1000+ lumens) as well as low-powered ones, plus a number of different ways to mount and control them.
2 – Camera and lens(es) – You won’t be making these photos with a smartphone – you need a camera that has Manual exposure control so you can set shutter speed and aperture. And you’ll need a wide-angle lens with a fast aperture. My “go-to” lens with full-frame cameras is the Nikkor 20mm f/1.8. Another good option is a super-wide, fast zoon, like the Nikkor 14-24mm f/2.8. Regardless of what brand you use, you’re going to want wide and fast. At least f/2.8. If you use slower lenses (like f/4), then your exposure times will be longer and/or you’ll need to use even higher ISOs. Both of those can create problems (see “Exposure”).
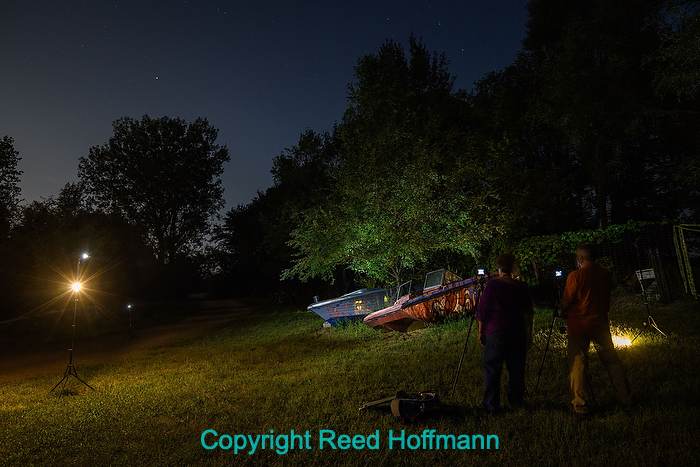
For this shoot, I used four small lights. There are two on a stand at left, to light both the grass in front of the boats and the boats from the front. One at far right to light the side of the near boat. And one behind the boats, backlighting the tree above them.
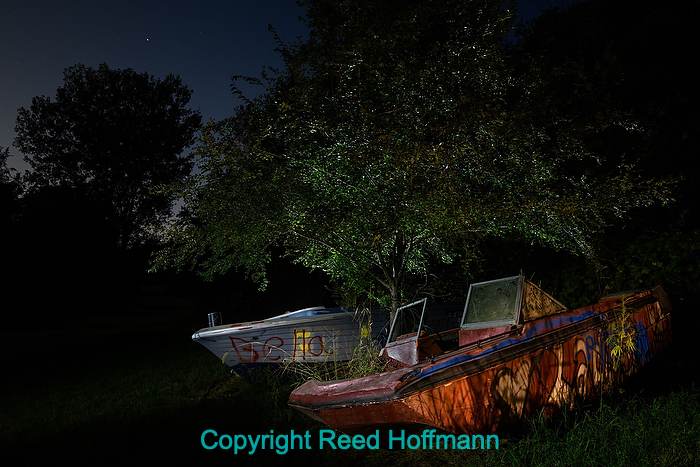
Here’s the final image. Since we did this just after sunset, we still had some light in the sky and didn’t need to go very high with the ISO and also were able to use a smaller aperture for some depth of field. Nikon D850, Manual exposure, ISO 800, 10-seconds at f/5.6, Nikkor 20mm f/1.8 lens.
3 – Exposure – A tripod, of course, is necessary because you’ll be doing fairly long exposures. Most people doing this kind of photo are also trying to show the night sky, with stars and perhaps the Milky Way. To do that, you’ll be using high ISOs (generally 1600 to 4000) and long exposures. Remember, the higher you go with ISO, the more noise you’ll have, which can hurt your photos. And the longer exposure time you have, the more likely your stars will show blur from the earth’s rotation. Anything much beyond 20-to-30 seconds with a wide-angle lens will start making that movement obvious. ISO and exposure times are why it’s important to have a fast lens.
4 – White Balance – For this I’ll use daylight at dusk, then shift to 3850K after complete darkness settles. That helps the sky maintain a rich blue hue.
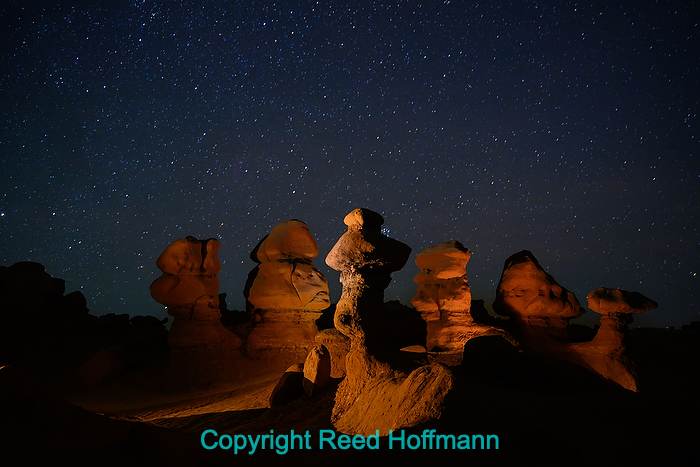
I’m using five lights for this photo, two at the left (to light the ground at left and rock in the center), and three hidden behind the front rocks to light up those in back. There’s still just a bit of light in the sky, so I was able to use my f/4 lens for this. Nikon Z7, Manual exposure, ISO 1600, 30-seconds at f/4, Nikkor AF Zoom 24-70mm f/4 lens at 37mm.
5 – Practice – It’s going to take a few tries to get the hang of this. I guarantee the first time(s) you do it, you’ll use too much light. You also need to think about your lighting differently than standard light painting. When doing that you’re limited to one light source and mostly one angle of light (you can only move around as long as your exposure allows. With low level lighting, while I’ve sometimes used just one light, most of the time I’m using three to five. So it’s important to scout your location before dark, and think about what parts of the scene you’re going to light.
The best way to get started is at home, at night. Pick a room, think about where you’ll put your lights to create the look you want, then adjust their power, place them, turn off the room lights and shoot. In this situation, you can use brighter light levels. But if you want to practice for outdoors and capturing stars, then dim those lights and go for a long exposure with the lens wide open.
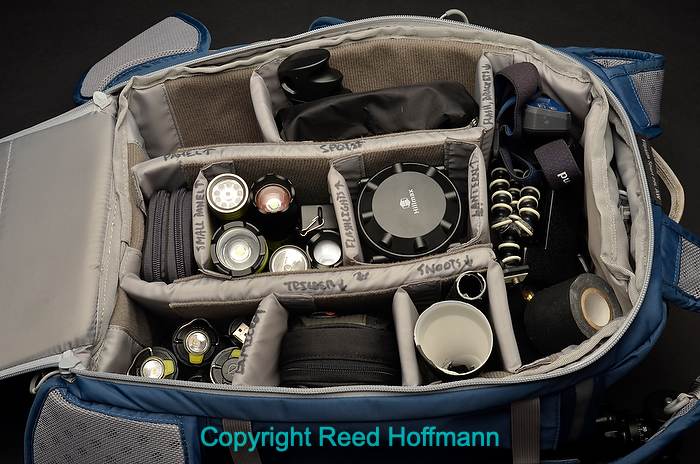
I’ve combined my newer, less powerful lights with the ones I’ve been using for light painting into a kit, in a small backpack. In addition to the lights, I’ve built some snoots to better control the light, added warming gels and included a couple of small light stands (sometimes the lights need to be off the ground). Around Kansas City I take the whole kit, but for my workshops in Quebec and Moab this fall, I just took a few of the new, small lights. The one extra hassle this creates is that most of those new lights are powered by lithium-ion batteries, so they have to go in my carry-on when flying. But that’s a small price to pay for what they let me do.
I’ve always enjoyed doing night photography, partly because not many people do it. Light painting took that a step further, and now low level lighting lets me do that in a new and different way. And, of course, that’s what we’re always looking for in photography – new ways to create interesting images, and explore the world around us.
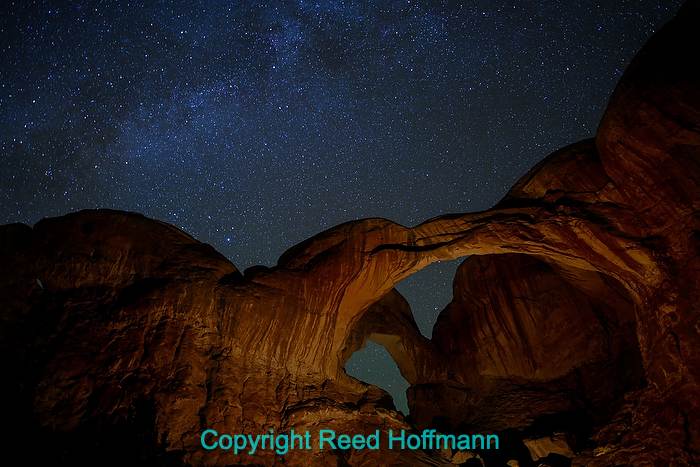
For this photo of Double Arch during the workshop I was leading, I used only one small micro lantern to light it for my group. Since I’m using high ISO, long exposure and a fast lens, it doesn’t require much light. And placing the light at the base of it gives a better look than light painting it from near the camera. Nikon Z7, Manual exposure, ISO 1600, 30-seconds at f/1.8, Nikkor AF 20mm f/1.8G lens.
(If you like this story, please share it with your friends and let them know about the links on photography that I post on my business Facebook page. I’m also on Instagram and Twitter, @reedhoffmann)
Trackbacks/Pingbacks